It's silly but it made me so happy I had to share.
I shared pics of my Earth Day hoop over at the Feeling Stitchy flickr photo pool and guess what?
They showed it off on the blog. In a pos all by itself (not just one of the stitch-a-long round up posts, where everyone who participates gets shown off--my cupcake got his moment of glory, but a post all its own is so much more exciting)
HERE.
Like I said, it's totally silly to be excited about such a thing but it's so much FUN to have my stuff showed off on a "popular" craft blog that I also really like (I lurk a lot of popular blogs but can't say I really interact there--Feeling Stitchy is just such a nice place I wanted to share on their flickr pool).
So check out Feeling Stitchy (the blog and the flickr group--there's a link to it right on the blog over in the right corner). Lots of super talented folks over there who are VERY inspiring.
Hee hee, this made my day.
Monday, April 30, 2012
Felt Kitties!
After I finished re-decorating the Altoid tin, I had to get back to my original weekend plans.
KITTIES.
I was even more motivated because I was "crafting for a cause" (if you will). My boss's cat died (after lingering for a few days--old age took him) and her sons were very upset over it. I asked her if they might like it if I whipped them each up a little kitty (since I was planning to make kitties anyway).
And here they are.

This pic doesn't do the orange color justice. It's much brighter than it appeas here (but not neon--just very orangey). And the gray is a very light gray.

This tabby is the same pattern as the kitty I made for inside the re-done Altoid tin. Except the tail isn't elongated (it's the same size as the pattern--I gave the altoid tin kitty a longer tail on purpose). I wanted to try my hand at stripes and was pleased with the result. I also wanted to try my hand at socks/ tail tips. The tail came out nice. The sock is a little rough. No to the point of being "bad" but I think I could definitley improve it.
I liked the stripes so much I wanted another go at them, maybe make them even thicker and more dramatic.
Which lead to kitty number two.

You can see the orange a bit better in this pic (hey, I use my cell phone for these and the "best" lighting which is in my kitchen--yeah, I could set up a "real" photo shoot upstairs with bright ass lights but I'm just so lazy I can't be bothered--if I was trying to selll these I'd go all out with the pics but I'm not so. . .).
The eyes are brown and the stripes are black. And they are much thicker. I really like the tail and ear tip stitches.
Both kitties turned out VERY well and I'm very pleased with them. Especially given I'm an embroidery novice (which is pretty obvious) and this was a new pattern.
I'd like to work with the pattern a bit more and see if some of the versions could me re-worked so they could stand on their own (neither of these can). I think the orange kitty pattern could definitely be re-worked to stand alone (jut need a little oval on the bottom). The gray kitty might not since the legs are more defined (and the circles they'd need for feet would be a royal pain in the butt to work with).
I want to work up a lion and a siamese cat from this pattern (find it HERE).
Altoid Tin Makeover #1
Now that I've made one my obsession may or may not be over. It remains to be seen (I think I really want to make one more for myself--I already have an idea cooked up).
So I got this bug up my butt to makeover an Altoid tin. I just had to do it but for some strange reason I needed a reason to do it (it couldn't be a "just cuz" craft like the majority of my stuff).
Then I remembered my sister's birthday is in a few days so. . .
How cool would it be to make an Altoid tin into a birthday card/gift?

That's the front/top of the tin.
Since I abhore actual measuring (you know, using a ruler and all that) I just did the ole trace the shape onto paper to make a pattern and cut and go. The whole top is covered in felt (my good felt--yeah, I've been hoarding it but that's so dumb so I'm going to use it more for just whatever I feel like). The balloon design is from a Wild Olive embroidery pattern. The tails are some string an internet friend sent me and I've been actively looking for uses for and this was perfect (just had to seal both cut ends with a wee dab of modge podge).

Side view. Like I said, the top/lid sides are covered with felt (glued down with modge podge) and the top piece was blanket stitched to the sides (and lightly stuffed).
The bottom I covered with a few coats of acrylic paint and then glued down the cup cake ribbon. It was only AFTER I dutifully put on multiple coats of paint (and one modge podge top coat) that I realized the box couldn't easily open and close anymore. Who knew there was so little wiggle room in the size (mostly on the corners--you add any thickness there and forget it, that bad boy is not going to open easily). So I sanded the paint off (just along the top) so the box would open and close smoothly. Then once I was all done, I added just a very thin coat of paint to cover the scratch marks (because they were driving me nuts--looked so junky). But the corners were still a wee bit too thick so I had to take my finger nail to the curves of the corners and "distress" the paint. Once that little bit of paint was gone the box opens and closes smooth as silk.
Next time I'll know better (and if I really wanted to re-do a lot of tins I'd probably invest in some spray paint and just give the bottoms a light shot of Krylon which would probably be a lot less thick then generic acrylic craft paint--see, if you think it out a bit it makes things so much better).
If it weren't for the batch information (which they stamp on the back outside wall of the tin--back below the hinge) I probably could have just gotten away with sanding down the very bottom (where the nutrition info is) and giving it a few coats of paint. But I had to get rid of that batch info so. . .

And what it looks like inside (when the recipient opens it).
Very simple. Just embroidered the note on some felt and glued it (w/modge podge) into the lid. Yeah, the stitching is a little warbly in places and it irked me at first but then I realized it really does look like my hand writing (which it is since I just took a ball point pen and lightly wrote the words out) which wouldn't be perfect either (going slightly up/down hill and all that).
The colors don't pop in the pic but the top is a light purple (not quite pastel) and the bottom is a richer/deeper purple (but not the darkest I have).


The cuteness erupting forth!

Mmm, cake. Such generous slices, too! (man, I want cake so bad right now--totally doing the Homer Simpson drool noises).

Wee little kitty stretching his tiny legs.
I made him to slightly resemble my sister's cat, Lowell. Lowell has white feet but at this point I couldn't get the socks to work out (this is the first kitty I made like this) so I abandoned them. I stretched out the tail a bit to mimic Lowell's giant monkey tail (really, he has this super long tail, it's crazy). You may notice the lack of mouth. I thought about giving him one but once I got used to this look I just coudn't add a mouth. And some cats don't have noticable lips, so they could kind of appear to have no mouth (ok, I'm reaching on that but just go with me). I also didn't put on any whiskers. I just didn't know where to situate them and I couldn't decide if they should be just stitches or if they should be dimensional (little whisps of floss). So instead I went minimalist. I can always try out other things on the kitties I continue to make (since I plan to make a lot more of these style kitties).
Everything is made from wool blend felt. Other supplies used: modge podge, acrylic paint, embroidery floos, polyfil, sandpaper, paper, tape, scissors.
OH, the pattern is from Nuno life. Great free patterns and tutorials. I want to make a siamese cat just like the one in the tutorial.
AND, I want to re-make another tin. I'm thinking it could be a space ship with a wee alien inside. Yeah, that idea is really lingering in my brain so I might just have to do it.
Friday, April 27, 2012
Don't you DARE make pirate noises!
Because Priscilla is NOT amused.

Yeah, she may have a wee litte smile all Mona Lisa style but really, she's just not into the whole pirate thing (zombies don't do anything for her either, in case you were wondering).

It might have something to do with her scar. It's like the minute something cute has a little flaw then it's all trendy and "zombie kitty".
Priscilla says: "NO."
She's just a gal with one good eye.

And a FABULOUS eyepatch.
Hey, when you're rocking a cool circle pattern on your entire body you just can't wear some bland eyepatch. And when you have so much going on, what with your pattern and your pink eyepatch (with rick rack band) you just don't NEED whiskers.
(really, I wanted to give her some but her face is just so busy and cute that whiskers would be overkill).


See! Her pattern just makes her so fabulous she has transcended something so mundane as whiskers.
But if I make another kitty (which is a possibility) I'll go for a more plain pattern on the face (maybe use a solid for the front face panel or for the whole head) and try to include some whiskers.
Priscialla has the honor of being the first thing I've made using the fabrics I purchased from The Fat Quarter Shop. Of course I scowered the sale offerings and got two fat quarter sets where no one fat quarter (that's 1/4 yard of fabric just cut different dimensions then just whacking 1/4 straight from the bolt) was more than $2. I do love a deal.
Her eyepatch is also from the new fabric (part of the same collection her body fabric came from). The eyepatch fabric was a repeating cat pattern and when I got to looking at it the cat heads were the perfect size for the eyepatch. I cut one out (got lucky and the one I wanted was right along the selvage edge, so I didn't have to waste any extra getting the image I wanted) and top stitched it to a piece of wool blend felt then attached the rick rack. (the next time I might try to sandwich the rick rack between the layers--don't know how that might work out or if I'd ever make another eyepatch cat so. . .)
This is my second go 'round with this pattern and this time I sewed it all with the machine. I was concerned sewing the head would be tricky but it was pretty painless. Is the stitching perfect? Of course not. You can see Priscilla's head is a little wonky. You can see she has a bit of a wee pointy chin, but I kind of like it. And the back of her head is where I hid the fact that her ear seams don't line up as neatly as they could (but that's why you have a front and back, so you can put your best face forward!).
Overall I'm SUPER happy with Priscilla. She turned out just like I wanted (where the eyepatch really fits the head and she has an overall good look to her).
But maybe she needs her own robot rider? I do want to make a cylindrical robot so. . .
(but first I need to work on re-making an altoid tin that has me all a-twitter--but more on that later)
Thursday, April 26, 2012
"Kitty Up" : Progress Report
What it looked like when I started class:

AND. . .
What it looked like AFTER class:

And just for good measure, this is what I'm aiming for:

Ok, so I see I still need to level out Mr. Roboto's head. It's still too high in the back (the top line along the light gray goes up too much--and the bottom line along the light gray needs to come up a bit on the front corner under the mouth). Basically the whole head is still at too much of an angle. The negative space between the shoulder point (dark gray area) and the corner of the head is too narrow in my painting.
The good thing is, Tomothy's head is looking much better. The angle along the front is now severe enough (in the painting). And the angle back to the ear is more straight (I had more of a curve going on before but it's straightened out a lot).
Once I get Mr. Roboto's head fixed up, dare I say I might be able to start real work on the painting (though I may want to revisit the Mr. Roboto's foot/leg--it's still not quite right but I can't see it perfectly in these pics to tell exactly what it is that needs fiddling).
I look forward to getting the texture on Timothy. I have a black and white version of the photo and it shows the corduroy so well.
Overall I'm pleased with the progress of this painting. And I haven't had the "I hate this painting, I suck" moment (yet). Maybe doing these progress reports is helping me keep perspective.
Wednesday, April 25, 2012
Coming Soon: Priscilla (the cat with an eyepatch)
Oh, she'll be arriving VERY soon.
I was tempted to show a teaser pic but she's so close to being done that a sneak peek would be a complete spoiler!
I'm definitely in a cat phase right now. I think I'm going to whip up some little felt kittens (perhaps in altoids tins) once Priscilla is done.
I was tempted to show a teaser pic but she's so close to being done that a sneak peek would be a complete spoiler!
I'm definitely in a cat phase right now. I think I'm going to whip up some little felt kittens (perhaps in altoids tins) once Priscilla is done.
PUPPIES!!!
I told you they would be "coming soon".

A meeting of cute minds right here.
Lets meet the litter.

Moxie and Roxie. I think of them as "the twins" (even though with a litter of puppies there are hardly "twins"). Moxie is the shy one to Roxie's raucous demeanor. Both have gray noses and tan ears.

Winston, Clyde and Zelda.
Winston has one dark brown ear and darker brown stitching (and I think he's the one with a black nose). Clyde and Zelda have gray (sometimes it's even bluish) stitching and brown noses. Clyde has one gray ear. Zelda is the odd girl out with one dark brown ear and one gray ear.

What are you three plotting?
A race?
On your marks. Get set. GO!

And it's ROXIE by a nose!
Each puppy has an embroidered neckerchief. They all turned out fairly well but Winston's had a bit of placement issues (that's a long name to fit on a tiny triangle of felt).
All puppies are came from ONE sheet of acrylic felt (hence their slightly nappy appearance--sometimes acrylic felt pills up while you're working with it) and scraps for the scarves. How's THAT for a deal. Five puppies for only 33 cents of fabric (and I used a lot of scrap embroidery floss, too, you know those little bits you save because they're just a bit too long to throw away).
They would really look fabulous if I used wool blend felt (but I'm being miserly with what I have right now and it's kind of fun to use up my cheap supplies stash).
The pattern is an altered version of the Wee Wonderfuls wiener dog necklace (from the Wee Wonderfuls book). That pattern was just for a pillow style dog (couldn't stand on its own) displayed on a necklace. I added an underbelly to turn it into a tiny plush (and stitched it diferently, using surface stitching versus reverse and turn as the pattern called for).
Which begs the question, how much do you have to change on a pattern before it's different enough to be "original"? With this particular one I don't think I've changed it quite enough to be "original". I'm thinking about changing the tail shap around. If I do that, the tail change and adding of underbelly would be enough (in my book) to make it original. But it's all a moot point since I don't plan to start a business selling these (though I'm tempted to offer them up for the next Regretsy charity sale--I think someone would donate $20 to charity to get this set).
Monday, April 23, 2012
Waiting is the hardest part.
Sing along with me and Tom Petty.
The wa-ai-iting is the haaaa-deeest. . .part.
Waiting for today to be OVER so I can get home and tear into the fabrics I ordered from The Fat Quarter Shop. According to the USPS tracking, that package should be waiting on my porch when I get home.
Two bundles of color coordinated fat quarters means it just might be. . .
Miriam mermaid and her pet octopus time.
I've been dieing to work on the Wee Wonderfuls mermaiden pattern (it's from the book) but my fabric supply was lacking. I have flesh-like tones (I have some great beigey tan just waiting) but I wasn't thrilled with the fin/hair choices I had. So these new bundles of fat quarters should give me some more choices (though I'm still leaning toward using the goldfish print fabric for the mer-tail).
And tomorrow is a day off. So I'll have two bundles of fat quarters and all day to play.
(and I might just be taking my office desk lamp home to start working on the embroidered zodiac lamp shade I've been thinking about).
Coming Soon: PUPPIES!!
That title makes me happy. The only way it could be better is if it was KITTENS. Real kittens. Real kittens coming to live at my house for ever and ever and ever.
But I digress.
I'm one puppy away from a litter of five. And I've alread named three of them (well, they kind of name themselves).
I'm just debating how to construct their wee little collars (to hold their name tags--and if the tags should be paper or embroidered felt--I'm leaning toward felt but. . .)
So YEAH, PUPPIES!!
Friday, April 20, 2012
Spoonflower Pre-printed stuffies!
I finally dipped into my Spoonflower fabrics and started assembling the super cute stuffies!

All those are from just ONE fat quarter of one of the fabrics. That's 11 stuffies so far! I still have three more fat quarters to go. There are some bigger items on those, too, including a coffee pot, cutting board, and assorted little cakes and cuties. I want to shout from the roof tops what how great a deal I scored!
The yard of fabric was $20 (including shipping--$18 +$2) and with just minimal work (cut them out, sew them together using the machine) and the bare minimum of extra notions needed (thread, polyfill) you could have a big ole collection of little toys for yourself (or for a kid--but why waste them on a child!).
The other yard of fabric I bought at the same time (same price) contains two dolls. Each doll is a nice huggable size, too. I'll start working on them later (since the tattoos need embroidered to be at their most awesome).

That's how happy this purchase has made me!
Thursday, April 19, 2012
"Kitty Up": Progress Report
It's that time again.
Here is where "Kitty Up" was last time.

Here is where it is now after last night's session.
I made a ton of changes to the placement of just about everything. I made a full counterclockwise sweep around both figures and adjusted just about every inch. I'm particularly pleased with Timothy's rear area. The back legs (the one that you can barely see and the crotch area) are just about spot on to what I want. Mr. Roboto's leg is better but still needs major work. Mr. Roboto's body/head is much improved but the shoulders definitely need more work (with the lighter gray area needing expanded and the angle on the corner near the tail needs fixed).
Overall, good progress.
And just for good measure, this is what I'm aiming for:
Wednesday, April 18, 2012
Love your mother!
Early for Earth Day (4/22) but just in time to celebrate "Earth Week" (well, that's what I heard NBC call it--yeah, it's jut a way to market "green" stuff--don't get me started.

My version of the Wild Olive free Earth Day design.
It's far from perfect. You can see the stitching is a little warbly down at the bottom. And it's not exactly perfectly centered in the hoop. And if you look at it in person, you can see I didn't pay close attention on the eyes and the stitching goes in to different directions (one eye is vertical stitches, one horizontal). But as a whole, I like it.
The fabric is corduroy which was a bit of a mini obsession of mine lately. I blended threads (2 green, 2 brown) for the satin stitches (which I didn't do properly--you're supposed to go all the way around with the stitches, so they wrap on both sides of the fabric but I didn't wrap on the back--next time I will, it will help keep twisting to a minimim).

Just one last close up. You can see the eye thing I mentioned.
All in all it was a fun project and I like the results. I even took the finished hoop to work to display the rest of this week (since Earth Day is on a weekend).
April Stitch Along : DONE!
Oh yeah. Had the day off yesterday (hooray for having so much vacation time hoarded I have to take off not one but two days this month, lest I stop accruing) so I whipped out the Feeling Stitchy April Stich Along.

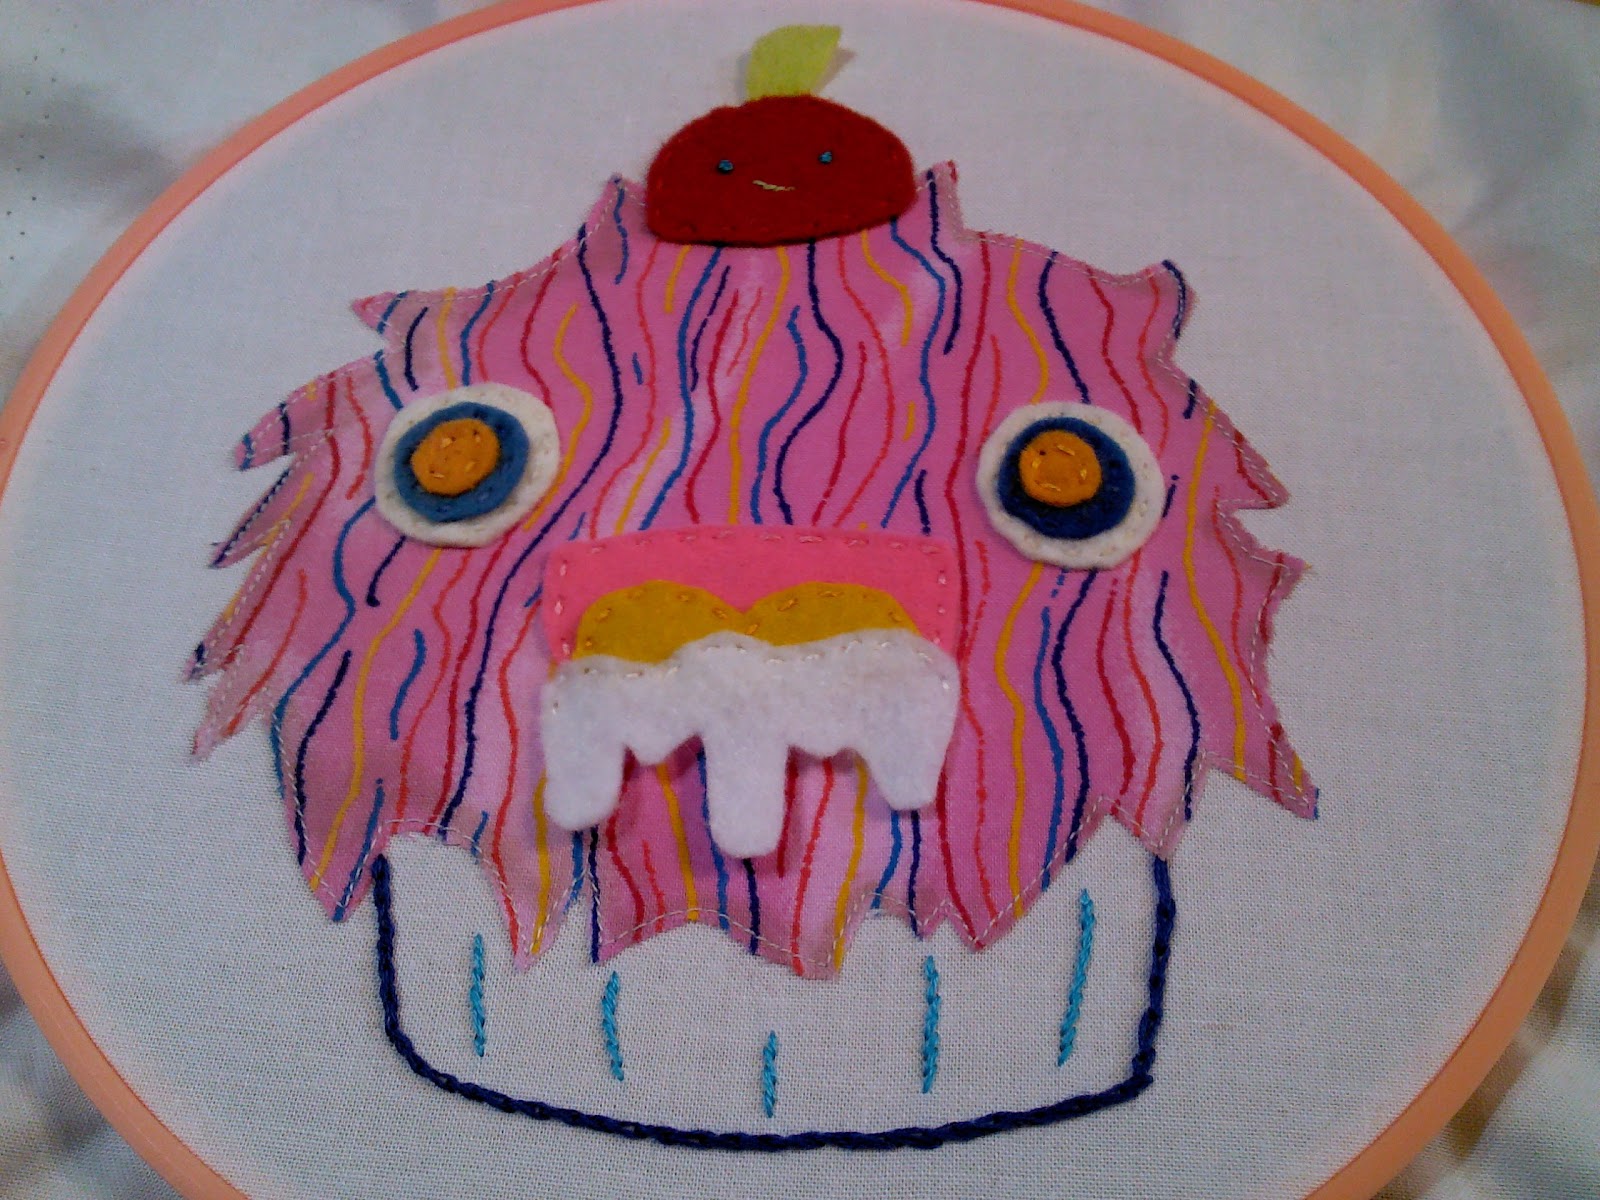
Rawr! This cupcake is kind of how I get when I really want a cupcake.
But my favorite part is the cherry on top.

Smug little bugger.
The original design has a rather sad cherry, like s/he's a hostage on this crazed cupcake. But my cherry is more a mastermind. S/he's really enjoying riding high on crazy cupcake.
I didn't finish it in a hoop mostly because I only have on finishing hoop in that size and I'm not sure I really want it finished. I like it but do I really want to DISPLAY it? Not really. (and that's not because I don't think it's "good enough" it's more that I'm not in love with the whole pattern--it's cute but not something I want to look at all the time).
Monday, April 16, 2012
Feather Your Nest: Stitch along
Stumbles and Stitches is having a stitch along contest, Feather Your Nest.
More info HERE.
I've decided to join up but only in a sideline kind of way. For one, I'm intimidated by the whole thing. I'm a mega amateur crafter and I feel I'll just be out classed. This is a real contest for prizes. It's not a matter of not wanting to really participate because I only want to win a prize (and I know I won't). It's more about feeling like the sad "oh, they tried so hard *snicker*" participant. Don't lie, you know you've had that moment when you look at submissions for a contest (or some such) and there are CLEARLY some less talented folks participating.
Yeah, it's a hang up of mine but I know I'm not "good enough" yet and I don't want to embarrass myself.
But more importantly, I don't know what I want to make so I don't want to sign up to participate and then NOT participate and be one of THOSE people.
Third, I have an idea of something I want to do that kind of fits the theme, but kind of doesn't and I don't want to be "that person" who's all nitpicking the rules and rocking the boat (especially if I'm brand new to the group AND I have less than great skills). Yeah, how annoying would that be, someone nit picking the requirements and then what they make is all sad and pathetic.
So, I'm going to be a sideline participant.
And I have an idea. It fits the "feather your nest" requirement (where you make something decorative/practical for display/use in your home) and the recycling/upcycling theme.
I'm not going to go into details on my idea yet (not because it's so fabulous or anything, but just because I'm pressed for time and I want to do a progress report type thing with this too, so it will need a separate post) but I'm excited about it.
So this makes two "craft along" type projects I'm aiming to complete this month. Good thing I'm taking the next two Tuesdays off from work (love that I have so much vacation accrued I have to take two days--wheee!).
Now to work out all the details of my Feather Your Nest project.
But first I need to do the last little bit on my Earth Day project (really, I just need to finish the hoop off so it can be displayed--such an easy step but I'm procrastinating like mad on it).
Thursday, April 12, 2012
"Kitty Up": Progress Report
Eee, it's exciting. The first update on "Kitty Up" (new oil painting).
I've always wanted to document a painting from blank canvas to completion and now I can!
Let's start at the beginning.
 Blank canvas. 18x24
I wasn't sure about the size. See, I kind of let time get away from me and I thought I didn't even have a canvas. But I found this one upstairs (ok, the wife found it) and decided to just go with the flow. I worried I might want to go a bit smaller but "Jackie and Xerxes" and "Bye Week" are both smaller so I've done that already. I definitely didn't want to go larger (a la "Baby Elephant Walk"). Transporting the larger canvases is a pain in the butt. My first painting ("Vaguely Dog-like") is right around this size (perhaps a wee bit larger) so I'm familiar with the dimensions.
So, what am I aiming for?
That's Mr. Roboto riding his trusty feline steed, Timothy. "Kitty Up"
So, in the course of 2-2.5 hours (class is 6:30-9:30 p.m.--but sometimes we're a little late or the instructor does a little power point of a certain artist or type of are--last night we got an intro to cubism) this is how far I got:
Not a bad bit of progress. I kind of like how Timothy looks like he's wearing a ski mask. I tend to do that with faces. I leave the eyes unpainted instead of laying down a base and then painting the eye over it. Especially when the background is black (and the eyes are white) I don't want to have to put that many lighter layers over dark (it's annoying). And clearly Timothy's eyes are going to shift and change around as we move along (eventually I probably will cave and cover the whole face and they lay the features in over top--but not yet). The eye we can fully see is clearly too narrow right now.
I like these progress reports. I can really see what needs shifted. Mr. Roboto's head/face is clearly not in the right direction (in the photo he's clearly turned more to the right) and his limbs are all kinds of wonky (especially that leg--woah!). But it's a solid start.
I look forward to tackling Mr. Roboto's spring. Getting the fine metallic shine will be fun (and getting the thread filament visible will be a challenge). Getting the corduroy texture will be fun, too. But I'm a long way from that stage.
But for now, I'm pleased.
I've always wanted to document a painting from blank canvas to completion and now I can!
Let's start at the beginning.

I wasn't sure about the size. See, I kind of let time get away from me and I thought I didn't even have a canvas. But I found this one upstairs (ok, the wife found it) and decided to just go with the flow. I worried I might want to go a bit smaller but "Jackie and Xerxes" and "Bye Week" are both smaller so I've done that already. I definitely didn't want to go larger (a la "Baby Elephant Walk"). Transporting the larger canvases is a pain in the butt. My first painting ("Vaguely Dog-like") is right around this size (perhaps a wee bit larger) so I'm familiar with the dimensions.
So, what am I aiming for?
So, in the course of 2-2.5 hours (class is 6:30-9:30 p.m.--but sometimes we're a little late or the instructor does a little power point of a certain artist or type of are--last night we got an intro to cubism) this is how far I got:
Not a bad bit of progress. I kind of like how Timothy looks like he's wearing a ski mask. I tend to do that with faces. I leave the eyes unpainted instead of laying down a base and then painting the eye over it. Especially when the background is black (and the eyes are white) I don't want to have to put that many lighter layers over dark (it's annoying). And clearly Timothy's eyes are going to shift and change around as we move along (eventually I probably will cave and cover the whole face and they lay the features in over top--but not yet). The eye we can fully see is clearly too narrow right now.
I like these progress reports. I can really see what needs shifted. Mr. Roboto's head/face is clearly not in the right direction (in the photo he's clearly turned more to the right) and his limbs are all kinds of wonky (especially that leg--woah!). But it's a solid start.
I look forward to tackling Mr. Roboto's spring. Getting the fine metallic shine will be fun (and getting the thread filament visible will be a challenge). Getting the corduroy texture will be fun, too. But I'm a long way from that stage.
But for now, I'm pleased.
Wednesday, April 11, 2012
Work in Progress: Too early for July 4th?
Here's the question.
What can you do in an hour?
Today I did this:

I'm working (way in advance, I'd like to point out) on a project for July 4th.
I managed to get a pattern roughed out (so I can make another, neater version of this) and get this proto type sewn up (it's not closed up in the back). Of course, I need to ad a cute face and a sinister little flame, but I'd say I got a lot done in an hour (my lunch hour to be exact).
I also got a good start on the pattern for a different design. I would have kept working on it but I snapped the thread (I was doing a running stitch to make a ball shape) and got frustrated so had to put it aside. But I think the sizing I have is going to work.
I have a little free time now so I might work on sketches for the flame.
Timothy (aka corduroy kitty)

No, you're not seeing things. Timothy has two different eyes. I was going to make him an eyepatch but once I got both his eyes on I just couldn't cover one up with a patch. So I'm going to make a second cat with an eyepatch (and only one eye).

PATTERN
Timothy is the result of my first go with that pattern and I'm pleased with the results. I've also only worked with corduroy one other time and this was a much better experience (but my sewing skills are better now so that could be a big part of it).
I will say, this pattern is not really for a raw beginner. The sewing of the body is fairly basic (I used the machine with good results) but the head is a little more challenging. Not "hard" but you do have to pay closer attention. I had stitched the head only because I don't trust my machine skills, at least when it's working with pieces that are rounded like the head is (getting it all lined up to go through the machine is tricky--a skill I'm working on).
The "hard" part of this pattern is the turning and sewing. The head turns and stuffs easily but the body is a challenge. The tail in particular. It's worth the effort (and being patient since you have to go slowly) but it will take time. This also took a LOT more stuffing than I anticipated. Now I always have a ton of polyfill around so I wasn't in danger of running out but it was amazing how much I kept cramming into Timothy. You want the extremities to be really stuffed TIGHT (especially the legs so the finished product will stand on its own). Pay special attention to the front legs, at the shoulder area. I stuffed Timothy very tight but now that he's been standing on his own for a while I'm seeing I could have probably used even more stuffing in his front legs (where they meet the body).
I'm going to use this same pattern for my eyepatch cat, so I expect even better result with round two. I'll definitely stuff the head a little firmer (at least in the ears--I like Timothy's head but the ears could be more defined) and really pack the stuffing in at the shoulder/front leg arm pit area (to prevent slow bowing as the cat stands on its own).
I'm not sure what fabric I'll use next time. I think I have enough black corduroy that I could make a second but I might want to change it up a bit. I'm tempted to try it with fleece but I have a feeling the stretch on fleece wouldn't work so well. I'll have to go through my fabric and see what strikes my fancy.
Tuesday, April 10, 2012
Crafty overload!
Guess what arrived yesterday.
My Spoonflower fabrics!!
It took every ounce of my will not to race to my sewing machine and start working on them right away. I love pre-printed fabric where you just cut out the image and stitch it up. It's as close to instant craft gratification as you can get.
BUT. . .
I can't start any new embroidery projects until the Earth Day hoop is done. So that means one yard of the fabric I bought is off limits (it's dolls that have tattoos on them and you can embroider the tattoos which I'm dieing to do).
Since I got a wee mouth on Timothy (aka corduroy cat--going to show him off tomorrow) I'm ready to take on a new sewing project. So tonight (after a bit of household chores which include my daily exercise routine) I'm diving into that other yard of fabric. So many cute little edibles on there. . .it'll be worth re-threading my machine (with white thread) so I can get busy.
Tomorrow: Showing off Timothy (coduroy cat) and it's back to painting class (with first progress photos to follow).
Monday, April 9, 2012
Painting: "Kitty Up"
I want to document a painting from start to finish (I meant to do it with some of my other paintings but always forgot) so my newest painting will hopefully be fully documented.
I wanted to try something different from my normal painting themes but the prospect of a blank canvas where I just doodle with paint is daunting (and I just can't produce good "abstract" paintings like that--I'm too uptight when I paint).
So my next painting will yet again feature some of my plushie creations. This time the lucky subjects are two of my newest (and yes, I do feel a little bad that brand new items are getting preferential treatment but I'm sure I'll get over it). Mr. Roboto and Timothy (the yet to be shown off "corduroy kitty").
It was my wife's idea. I was packing up Mr. Roboto and Timothy (for a trip to my parents' house to show them off in person) and pondering aloud what my next painting would be (since painting starts again this Wednesday) and he says, "Mr. Roboto could be riding Timothy."
It sounded awesome, so I put Mr. Roboto onto Timothy and it looked fabolous.
My wife is officially a creative genius. (and it's going to his head a little)
Seeing Mr. Roboto on Timothy, the title was obvious:
"Kitty Up"
I do love a pun-y type play on words silly thing like that, so now I HAVE to do this painting.
But I still want to do robot portraits, too. Mostly so I can use oval shaped canvases. So Mr. Roboto will have the honor of being in TWO paintings (eventually). And his (yet to be constructed) companion (currently referred to as "cylindrical robot") will be the companion piece for the pair of portraits.
It's odd to have painting ideas all lined up and waiting to be done. I know "Kitty Up" will probably take the whole semester (I'm a slow and tedious painter) so that gives me enough time to secure the oval canvases (looks like I'll have to buy them online) and get "cylindrical robot" constructed. But I'm hoping the actual portrait painting will be relatively quick (yeah, right--I'll be nit picking and cursing over all three of these new canvases--don't expect to see finished products for at least a year).
So, all tha rambling aside, this here post is officially the first one in the progress report for "Kitty Up". I want to take two pictures each class session (one at the start, one at the end) and post them every Thursday. Ambitious? Yeah, but that's going to keep my creative juices flowing.
April Crafty To Do List
April Crafty To Do List:
--Earth Day embroidery (Due 4/20): In progress--about half done and looking good if I do say so myself
--Corduroy cat: The kitty is done (I'm just debating putting a wee mouth on him--I was going to make him an eyepatch, too, but now I think I want a separate eyepatch cat so. . .)
--Eyepatch cat
--Cylindrical robot : sketched up, pattern needs roughed out (should be a relatively easy project)
--April Stitch-along (from the Feeling Stitchy blog): pattern printed (it's next on the list once Earth Day project is done)
--Spoonflower pre-printed plushies: I won't be able to resist them once they finally arrive (the order has shipped so. . .)
Those are the core items I'd like to get done (along with starting a new painting). If I get all that done, then I can also think about:
--Evelyn Inchworm
--Tiny Dachsund
--Mermaid doll
--Marie Antoinette embroidery doll
I love having a list I can check off!
Friday, April 6, 2012
Coming soon: Corduroy Cat!
Next project: Corduroy cat with an eye patch.
Status: Being stuffed, needs finished.
Status: Being stuffed, needs finished.
Easter Basket of Awesome

Closeups.


One duckling that fits snugly in his/her egg.


And it's all for my sister. She'll get a kick out of it.
Subscribe to:
Posts (Atom)