Ok, it's the best part of a giveaway.
Announcing the winners.
For the record, here's how I came up with the winners. There were 51 valid comments (one commenter expressly asked not to be included so I left them out). I used random.org to draw two numbers and then I counted down the comments to that number and gave away the prize they asked for. If they didn't specify then they got whatever prize was left (but that wasn't an issue).
Random.org gave me numbers 18 and 19, which worked out great because each of those comments wanted a different prize.
Comment 18: Dona: won the book
Comment 19: Liz: won the turtle
Both winners have been contacted via the email address they provided on their blogger profile.
Winners please check your spam filters for a message from "madameugly(at)gmail(dot)com".
Winners have until August 6 (Monday) to provide a mailing address. If for some reason they don't, I'll draw another name for that prize.
Thanks to everyone who participated. I consider my first giveaway to be a smashing success thanks to each of you!
Tuesday, July 31, 2012
Monday, July 30, 2012
Crafting for Charity!
I love Regretsy .
Yeah, yeah, it can be extra snarky at times. But the items they snark on there bring crazy attention to the sellers so it's really a WIN. And I adore how they lambast Etsy (as a company) for their general hypocrisy.
But that's neither here nor there. What I REALLY like about Regretsy is the community. In particular their generosity.
I've lurked Regretsy for some time and witnessed quite a few of their charity sales. As soon as I got back to my crafting/sewing, I was in the Regretsy forums lurking about waiting for information on how/when I could join in on the fun.
At long last my moment has arrived. The fat jealous losers are organizing a new charity sale and I was thrilled to offer up some fun stuff. (I can't give a direct link to the info since it's on the Regretsy forums--go to Regretsy and sign up to access the forums and it's right there at the top)
The first item was the lovable Peen Turtle. Yes, I got a kick out of him but I'll get an even bigger kick out of knowing he could net $10 for charity.
But one item just was NOT enough.

So I whipped up a half dozen Ewoks. (from the free Wild Olive pattern--no, I don't consider this an abuse of the "for personal use only" request on the pattern--charity sales count as "personal use" in my book since I'm not making one cent from them--in fact, I'm probably losing money on them if you wanted to really crunch the numbers, which I do not).
My goal was to make a bunch of lower ticket items so folks on a budget could get in on the sale. So I priced them to move at $8 each. That sounds crazy fair to me. They aren't terribly hard to make and don't take a lot of materials but they do have wool blend felt hoods (not cheap-o acrylic) and they are nicely made. If I was in the market for such a thing (and it was for charity) I wouldn't think $8 was too steep.
They'll be collecting items until the end of the week so I *might* make up something else. I'm not sure yet. I'd love to be able to contribut 10 items but I have to get to work on the potential commission giant squid, so I may have to stop at the 7 items I've already made.
(and yes, I did go through stuff I've already made but most of it wasn't "good enough" for a sale. A lot of the stuff I keep for myself is first runs of a pattern so it's a little wonky or I made it from cheaper materials and I'd feel bad expecting someone else to part with hard earned cash for it. And those "cheap" things I made have kind of grown on me, becoming part of my Misfit Toy collection).
I'm toying with making up some cloth bags and offering them for a few dollars each but would someone want to pay the price of shipping to get an inexpensive cloth bag? Maybe I'll poll the Regretsy community and see what they think (and save that idea for the next charity sale).
Don't fret. I'll pimp the sale once I have more details on when it happens. But if you want to learn more about the charity (it's an individual, not a big name charity) or details on participating, I urge you to go to Regretsy and sign up to access the forums (sign up is non-invasive--and they won't spam you later or any of that). Please note: Regretsy can and does contain "adult themes" (usually of a nudity persuasion) so anyone who's easily offended has been warned.
Monday, July 23, 2012
GIVEAWAY!! (right here, right now!)
NOTE: THIS GIVEAWAY IS NOW CLOSED!!
Guess what time it is?
Yup, finally time to get to that giveaway.
But first some chit chat which will segue into the prize. So I'll be a brief as possible but I just have to share this so. . .
In making one of the prizes for this giveaway, I was reminded how fluid patterns are and how changing just ONE thing can change the finished product dramatically.
First, I was using a free pattern from Ric Rac (link goes to the blog but the pattern is on the right hand side). The pattern calls for sewing right sides together (by machine, using felt) and then turning the pieces out . So I dutifully followed the pattern and this was my result.
 Now if you clicked on the link and looked at the tutorial, you will have already noticed the obvious.
But in case you didn't see the tutorial I'll save you the click. That there turtle looks NOTHING like the one in the tutorial. NOTHING. I'm not saying that my turtle is "bad" but it was not what I was expecting and I was disappointed. (oh and the hat is part of the tutorial and called for sewing and turning as well, which is what I did).
So there was just no way I could offer that sad turtle as a giveaway prize. Again, it's cute and all but really? It's just not good enough (no, I'm not throwing it out or anything like that, it fits in fine in the Land of Misfit Toys--I'll even find a name for him/her and all that).
Back to the pattern to give it another try, this time sewing on the right sides (by hand) with no turning.
Results?


MUCH better. They look spot on like the ones in the tutorial (if I do say so myself). In fact, I like them a bit better than the tutorial because I hand embroidered the shell designs and I used a blanket stitch to attached the top shell to the bottom shell (oh and I forgot to show it, I also hand embroidered lines across the belly--I can't believe I forgot about getting a pic of that).
Once I got the first turtle (the one in the red had) done I started the second with all intentions of having both of them as giveaway prizes (along with another item I'm getting to--you're being so patient and for that I thank you). But then I noticed one odd little thing. . .
 Ok, he looks normal on this side. What's the problem. . .

What the. . .oh my lordy. . .is that a. . .that one spot does it look a bit like. . .
I cracked up laughing. Now maybe I'm just a perv but that one spot looks more than a bit. . .how shall I say it delicately. . .naughty?
Close up?
 *snort*
Yeah, that looks like what I think it looks like. And even if it didn't, now that I see it that way I can't UN-see it so. . .
The yellow shell turtle will be staying with me. I don't want to offend anyone by sending them a peen turtle and (to be honest) it cracks me up so much I don't want to get rid of it. (and for the record I polled my sister and my hubby and both agreed it did have a peen flair to it but that it wasn't blatant or obvious in a "you deliberately put a peen on a turtle shell, you're a pervert" kind of way).
---------------------------------------------------
---------------------------------------------------
So, pattern discussions and peen turtles aside. Let's get down to the getting down.
THE GIVEAWAY!!!!
There are TWO prizes so that means TWO winners! How's that for a bit of alright?
PRIZE 1 is the aforementioned (non-peen) turtle.


This turtle is made from wool blend felt stuffed with poly fill. (all new materials). The eyes, shell decor, and belly stripes are hand embroidered and the whole thing is hand sewn. The hat is also felt (with attached pom-pom) and can be removed (but it's a bit of a chore). This is a small-ish sized toy (about as big around as the palm of your hand) so it's not a good idea to give to really small kids (they'd eat that hat in two seconds flat, I'd bet--I don't have kids but even I know that's what they do, eat stuff they shouldn't then cry about it).
PRIZE 2 is a copy of "Toys to Sew" by Claire Garland.
Somehow I ended up with two copies so my loss is your gain.


Those are pics of the front and back covers so you can see some of the cute patterns it includes.
And a pic from inside the book (in keeping with the turtle theme).
 I can't wait to make this tortoise. But it involves a bit of patchwork (to get the top shell all frizzy like that) so I need to get some easier patchwork experience under my belt before I foray into this (though you could just use a solid piece of fabric for the shell or applique to get a rippled effect--so you don't need to do patchwork).
If you want more inside the book pics, you can check out Amazon (I had a second inside pic--of this cool patchwork alligator--but it just would not upload for me and I got miffed and gave up).
SO, once again there are TWO prizes so that means TWO winners.
How to enter (and other details): NOTE: GIVEAWAY IS NOW CLOSED!!
1. Leave a comment here stating which prize you'd prefer. That's the prize you'll be entered to win.
2. For one additional chance (to win prize of your choice) FOLLOW my blog. Just leave a comment saying you do/did and note what prize you'd like to win.
So you have TWO chances to win a prize (and yes, you can pick the same prize for both of your entries or you can have one try for each--so you do have a slim chance of winning BOTH).
This giveaway is open to any and all comers (U.S. and international). If you are an anonymous commenter (or just want to make extra sure I can contact you should you win) leave your email address in your comment. (you can type it the "no spam" way like this: email(at)place(dot)com )
Winner will be drawn randomly and notified by email. Winner will be announced in a separate post at this blog.
Winner will be drawn Monday, July 30 and announced/notified the next day. (and if the winner doesn't respond within 5 days of notification, a new winner will be drawn from the pre-existing entries).
So, summary: TWO prizes up for grabs, TWO chances to win, OPEN to all comers (leave an email address).
GOOD LUCK!! (and no, the peen turtle is not up for grabs, so don't try and beg me to give it to you, you dirty perv!)
Guess what time it is?
Yup, finally time to get to that giveaway.
But first some chit chat which will segue into the prize. So I'll be a brief as possible but I just have to share this so. . .
In making one of the prizes for this giveaway, I was reminded how fluid patterns are and how changing just ONE thing can change the finished product dramatically.
First, I was using a free pattern from Ric Rac (link goes to the blog but the pattern is on the right hand side). The pattern calls for sewing right sides together (by machine, using felt) and then turning the pieces out . So I dutifully followed the pattern and this was my result.

But in case you didn't see the tutorial I'll save you the click. That there turtle looks NOTHING like the one in the tutorial. NOTHING. I'm not saying that my turtle is "bad" but it was not what I was expecting and I was disappointed. (oh and the hat is part of the tutorial and called for sewing and turning as well, which is what I did).
So there was just no way I could offer that sad turtle as a giveaway prize. Again, it's cute and all but really? It's just not good enough (no, I'm not throwing it out or anything like that, it fits in fine in the Land of Misfit Toys--I'll even find a name for him/her and all that).
Back to the pattern to give it another try, this time sewing on the right sides (by hand) with no turning.
Results?


MUCH better. They look spot on like the ones in the tutorial (if I do say so myself). In fact, I like them a bit better than the tutorial because I hand embroidered the shell designs and I used a blanket stitch to attached the top shell to the bottom shell (oh and I forgot to show it, I also hand embroidered lines across the belly--I can't believe I forgot about getting a pic of that).
Once I got the first turtle (the one in the red had) done I started the second with all intentions of having both of them as giveaway prizes (along with another item I'm getting to--you're being so patient and for that I thank you). But then I noticed one odd little thing. . .


What the. . .oh my lordy. . .is that a. . .that one spot does it look a bit like. . .
I cracked up laughing. Now maybe I'm just a perv but that one spot looks more than a bit. . .how shall I say it delicately. . .naughty?
Close up?

Yeah, that looks like what I think it looks like. And even if it didn't, now that I see it that way I can't UN-see it so. . .
The yellow shell turtle will be staying with me. I don't want to offend anyone by sending them a peen turtle and (to be honest) it cracks me up so much I don't want to get rid of it. (and for the record I polled my sister and my hubby and both agreed it did have a peen flair to it but that it wasn't blatant or obvious in a "you deliberately put a peen on a turtle shell, you're a pervert" kind of way).
---------------------------------------------------
---------------------------------------------------
So, pattern discussions and peen turtles aside. Let's get down to the getting down.
THE GIVEAWAY!!!!
There are TWO prizes so that means TWO winners! How's that for a bit of alright?
PRIZE 1 is the aforementioned (non-peen) turtle.


PRIZE 2 is a copy of "Toys to Sew" by Claire Garland.
Somehow I ended up with two copies so my loss is your gain.


Those are pics of the front and back covers so you can see some of the cute patterns it includes.
And a pic from inside the book (in keeping with the turtle theme).

If you want more inside the book pics, you can check out Amazon (I had a second inside pic--of this cool patchwork alligator--but it just would not upload for me and I got miffed and gave up).
SO, once again there are TWO prizes so that means TWO winners.
How to enter (and other details): NOTE: GIVEAWAY IS NOW CLOSED!!
1. Leave a comment here stating which prize you'd prefer. That's the prize you'll be entered to win.
2. For one additional chance (to win prize of your choice) FOLLOW my blog. Just leave a comment saying you do/did and note what prize you'd like to win.
So you have TWO chances to win a prize (and yes, you can pick the same prize for both of your entries or you can have one try for each--so you do have a slim chance of winning BOTH).
This giveaway is open to any and all comers (U.S. and international). If you are an anonymous commenter (or just want to make extra sure I can contact you should you win) leave your email address in your comment. (you can type it the "no spam" way like this: email(at)place(dot)com )
Winner will be drawn randomly and notified by email. Winner will be announced in a separate post at this blog.
Winner will be drawn Monday, July 30 and announced/notified the next day. (and if the winner doesn't respond within 5 days of notification, a new winner will be drawn from the pre-existing entries).
So, summary: TWO prizes up for grabs, TWO chances to win, OPEN to all comers (leave an email address).
GOOD LUCK!! (and no, the peen turtle is not up for grabs, so don't try and beg me to give it to you, you dirty perv!)
Thrift SCORE!
This weekend I did something I haven't done for quite some time. I shopped ALL DAY.
My sister visited for the weekend and we (along with my long suffering wife) made a day of shopping including hitting up the thrifts. I haven't been on a good thrift run in so long.
Want to see what I scored?

100% wool sweater slated for felting. I found a few cashmere and other natural fiber ones but they were a bit pricey considering I didn't have a project planned for them. I was glad I passed on them so I could get this one (for only $3.99) instead. No, I don't have a project planned for it but it was inexpensive enough that I don't mind having it as a stash item. AND as a bonus, the buttons are really nice (and it has a spare one sewn in at the bottom--this must have been a higher end sweater when it was new).

Sizzix punches (only 95 cents for three!) and two packs of floss bobbins (again, only 95 cents for the pair).
I've been curious about the Sizzix things (read about them somewhere) but then learned they don't make them anymore (except on ebay where I'm sure you'd end up paying way too much) so I let the curiosity fade. Until I spied these at the Red White and Blue (fabulous thrift, by the way). No, I don't have the sizzix mallet and mat but I do have a heavy rubber mallet and a cutting mat (or a stack of cardboard/paper) so I'm thinking I can find a way to get my dollar's worth back from these. Even if it's just something I play with once and don't enjoy, I'm not out much. And the floss bobbins? Yeah, I have some plastic ones but I don't like them because it's too hard to label them. These cardboard ones I can write on and it won't smear off, so I'm very happy.
Now, to the fabric.


 All that in one bag for $7.95. I was very happy with how many really cool pieces there were. Not too many duds at all.
Check out the tag I found on three of the pieces. It's from G.C. Murphy Co. The tag was folded over card stock PINNED (in a kind of staple way) to the fabric. So it looks like I scored some truly vintage fabric.
I'm not really a big Christmas pattern fan, but these ones I do enjoy. I think they are all the roughly the same age (with the exception of the light colored one that has the cartoony santas and reindeer on it) since they look like they are from the same fabric stock and design collection (they match that well).
I even used a bit of one of these in my first foray into patchwork. I'm working on a small drawstring bag and so I snipped up a bit of the pink with blue flower (first picture, the fabric right above the pepsi print). It works well with the random patches I already had cut up. But I'll have more on that when I finish the bag and post it. Suffice to say, so far so good in my first attempt at patchwork (we'll see if that holds true when I fire up the iron--I got a new one this weekend, one that doesn't leak water!--only $9.99--I figured why spend more when I don't have to).
Speaking of good deals, I was initiated into the Joanne fabrics coupon club this weekend. I used five of the coupons they have on the back page of their flier. I've never used that many Joanne's coupons before. I got a quilting ruler for half price (so I bought the largest one, of course and it ended up being only $8), a 5 lb box of poly-fil for half price (only $12), and a pattern for the skirt I want to make (it was on sale for only 99 cents--and the notions I bought for it were all half price with the coupons). I even got a roll of craft paper (to draft up the pattern for the giant squid) for half price.
All in all it was a good weekend. Now. . .I have one more post to make. . .something about a giveaway?
My sister visited for the weekend and we (along with my long suffering wife) made a day of shopping including hitting up the thrifts. I haven't been on a good thrift run in so long.
Want to see what I scored?

100% wool sweater slated for felting. I found a few cashmere and other natural fiber ones but they were a bit pricey considering I didn't have a project planned for them. I was glad I passed on them so I could get this one (for only $3.99) instead. No, I don't have a project planned for it but it was inexpensive enough that I don't mind having it as a stash item. AND as a bonus, the buttons are really nice (and it has a spare one sewn in at the bottom--this must have been a higher end sweater when it was new).

Sizzix punches (only 95 cents for three!) and two packs of floss bobbins (again, only 95 cents for the pair).
I've been curious about the Sizzix things (read about them somewhere) but then learned they don't make them anymore (except on ebay where I'm sure you'd end up paying way too much) so I let the curiosity fade. Until I spied these at the Red White and Blue (fabulous thrift, by the way). No, I don't have the sizzix mallet and mat but I do have a heavy rubber mallet and a cutting mat (or a stack of cardboard/paper) so I'm thinking I can find a way to get my dollar's worth back from these. Even if it's just something I play with once and don't enjoy, I'm not out much. And the floss bobbins? Yeah, I have some plastic ones but I don't like them because it's too hard to label them. These cardboard ones I can write on and it won't smear off, so I'm very happy.
Now, to the fabric.


Check out the tag I found on three of the pieces. It's from G.C. Murphy Co. The tag was folded over card stock PINNED (in a kind of staple way) to the fabric. So it looks like I scored some truly vintage fabric.
I'm not really a big Christmas pattern fan, but these ones I do enjoy. I think they are all the roughly the same age (with the exception of the light colored one that has the cartoony santas and reindeer on it) since they look like they are from the same fabric stock and design collection (they match that well).
I even used a bit of one of these in my first foray into patchwork. I'm working on a small drawstring bag and so I snipped up a bit of the pink with blue flower (first picture, the fabric right above the pepsi print). It works well with the random patches I already had cut up. But I'll have more on that when I finish the bag and post it. Suffice to say, so far so good in my first attempt at patchwork (we'll see if that holds true when I fire up the iron--I got a new one this weekend, one that doesn't leak water!--only $9.99--I figured why spend more when I don't have to).
Speaking of good deals, I was initiated into the Joanne fabrics coupon club this weekend. I used five of the coupons they have on the back page of their flier. I've never used that many Joanne's coupons before. I got a quilting ruler for half price (so I bought the largest one, of course and it ended up being only $8), a 5 lb box of poly-fil for half price (only $12), and a pattern for the skirt I want to make (it was on sale for only 99 cents--and the notions I bought for it were all half price with the coupons). I even got a roll of craft paper (to draft up the pattern for the giant squid) for half price.
All in all it was a good weekend. Now. . .I have one more post to make. . .something about a giveaway?
Friday, July 20, 2012
I didn't forget. . .
I'm just a little behind on it.
The giveaway will be next week (hoping for Monday but Tuesday at the latest).
What is holding up progress?
Slow stitching. I found what I thought would be a quick little pattern to stitch up BUT, I didn't like the first finished product so I made another (which is turning out great!) so that slowed down progress. I WILL get the last stitches done this weekend (I'm so close to being finished I'm getting antsy about it).
Then if the weather cooperates (so I can get some well light outdoor pics) I can get all the pics taken and then making the post will be super fast.
SO. . .I'm not guilty of forgetting about this (or ignoring it). I'm just guilty of being over excited about it and talking it up a little too soon.
Sit tight, next week will be FUN.
Thursday, July 19, 2012
Going BIG!
I have another (potential) commission in the works.
It's for the same person who commissioned Kismet (the rainbow octopus). They definitely want a squid (from the same pattern I used for Violetta) BUT. . .
. . .they want it made full size.
The pattern (HERE) is for an 8 foot squid.
HOLY SQUID, Batman!
It'll be far easier to sew than Violetta (who's narrow legs weren't hard to sew but rather tedious to work with) but now I have to draw out the giant pattern pieces.
That involves. . .wait for it. . .
MATH.
*shudders*
Ok, so not really complicated math (and more like measuring than math) but OH NO!!
For the record, I'm a total stereotypical girl when it comes to math. Remember those skits on "In Living Color", "Super Bimbo"? Her weakness was math.
Yeah, that's me. "Oh no. . .not math!"
I have to overcome my weakness and figure out how much fabric will be required to make the giant squid.
Yes, I'm going to have my wife double check my work (as an architect, he's good with math, especially "measurey math").
I'm excited about this potential new commission. So much so that I kind of want to make a giant squid for myself for next year's "Art All Night" (our neighborhood has a "no jury, everyone welcome" art display every year--a giant squid would be a hit there--and I could sell it, too).
Hmm, maybe I'll sell it and donate the funds to a charity. That would be even better.
Oh, so much to think about.
Wednesday, July 18, 2012
Welcome Wednesdays (at Happy Hour Projects)
Yeah, I'm pimping my blog a bit here and there and I love linky round ups.
You can see on the side there the linky roundups I've already added. I tried to find one for every day of the week (ok, the weekend's not represented but I don't have much computer time on weekends--too busy enjoying real life!). Those are ones where you link a particular project (or projects).
But this linky roundup at Happy Hour Projects is to pimp your blog as a whole and get to know other folks and all that happy stuff.
Hey, why not, right?
It might get more followers to my blog but more importantly, it might give me more blogs to follow. That means more creative inspiration. And that's what it's REALLY about, getting my creative on and having fun making stuff.
Tuesday, July 17, 2012
Double Digits BABY!
Woot woot!
I now have double digit followers (10 on the nose!).
Know what that means?
Yup, I'll get a giveaway all ready. Just give me a day or so to rustle up something FABulous (and make up some simple rules).
I'll definitely have it posted by the end of the week (at the latest).
Hee hee. This is going to make the rest of my work day go so much faster, what with having something creative to distract me from the duldrum.
And now we dance the happy dance.
*pelvic thrust*
Monday, July 16, 2012
I'm a WINNER!
Not of a prize, but I'm still a winner (and it's very cool).
Remember the color collections I posted for the contest over at Fluffy Sheep Quilting?
Well one of my combos won.
Not a prize but something just about as great.
My combo MERMAID SPLASH will be a fat eighths bundle for sale at Fluffy Sheep Quilting's store.
How's that for fun?
And it got my blog a bit of notice, which makes me happy because. . .
I WANT TO DO A GIVEAWAY.
BUUUUUUUT. . .
Not until I reach the magic number of 10 followers. That's only ONE MORE TO GO.
Now I'm not super pimping this. I only pimped it one place beside this lone mention right here, right now.
So when I finally get lucky number 10, I'll whip up something fun to give away.
Nope, I'm not going to even mention what it may or may not be (mostly because I haven't decided yet--have a few ideas) but I will say this one last thing. It will be open to any and all (international, follower or anon, vegetable, alien, ghost. . .whatever!).
And that's all I'm going to say about that.
*does happy dance*
GRRR! Meet a scrappy girl.
Yeah, yeah. I have things I should be finishing (the tattooed boy doll, the cylindrical robot) and things I have somewhat planned out (the egge laying hen, monkey doll) but what did I go and make this weekend?
![]()
![]()
Her name is Kenneth.
Yes, you read that right. HER name is Kenneth.
When I was working on her the name just popped into my head but the fabric pattern and colors just weren't classically "boy" to me and, well, I tend do make to many "male" critters so I needed another girl.
She's definitely a girl. So I'm thinking her parents named her when she was still an egg and they were convinced she'd be a boy, so. . .Kenneth.
You can call her Kennie (if you'd like--but she really enjoys the "huh?" looks folks get when she tells them Kenneth).
Kenneth is (yet another) pattern from the "Wee Wonderfuls" book. At this point I'm pretty much resigned to the fact that I'm going to make pretty much everything from that book. (side note: there are only about three patterns in the book that just do ZERO for me--one is the dolls made using wooden spoons *yawn*, the little felt train *yawn*, and this one doll/blanket combo where the blanket doesn't interest me and the dolls are kind of *yawn*, too--I might make that one someday but it's not high on my list).
![]()
I was worried this pattern would be annoying but it wasn't (well, one part was but I'll get to that in a minute). It's two side pieces with one long gusset/middle piece. I was worried it would be too wrinkled/bunchy but there are only a few gathered spots that aren't super bulgy or distracting to the overall quality of the item.
NOTE: This isn't a flaw of the pattern but more my sewing skills/patience. My skills have gotten better so the body construction went better than they would have a few months ago (I would have thrown a hissy fit).
The only part of the pattern that gave me a hard time (and it was due to my lack of skill) was attaching the bottom.
(Poor Kenneth, she has to show us her bum now--she's such a trooper).
![]()
![]()
It's not a complete and total fail but it's not very nice and neat, either. I should have just hand sewn the bottom but I went balls to the wall and put it through the machine. When I got to the junction where the leg seams hit the bottom piece, it got ugly (and a thread ball was born when the machine got a fabric wedgie and. . .yeah, it was ugly).
I managed to get it stitched up in my own half assed way. I only had one seam issue (where I had to stitch closed a bit of a gap/hole after turning). I was worried that I had caught the edge of the leg seams (the seam allowance/extra) and it wouldn't turn properly so I took my embroidery scissors and cut it apart (in the tiny space between the leg seam and the butt/body seam). Tha's what resulted in the one little gap/hole (you can see it in the bottom of the two pics).
It also didn't help that I altered the materials called for and used felt for the underbelly piece. The pattern calls for two pieces of cotton stitched together on the wrong side then turned. I thought I was all clever using felt (only one piece needed, no sewing and turning!) but I forgot to take into consideration the built in 1/4 inch seam allowance. So when I cut my felt directly from the pattern, it was set to be too large for the finished product. So that's why Kenneth has as rather large underbelly. It took me about an hour to realize that's what the problem was (and felt like a super genius when I did).
I'd probably make this pattern again but NOT just for myself (I don't really want another of these dolls for my own collection). The pattern isn't overly complicated and now that I've done it once I know where my weaknesses are so I can work around them to make an even cuter (and neater) finished product.
This being my third project completed from "Wee Wonderfuls", I have just ONE critique.
The patterns aren't frugal when it comes to fabric NOR do they mention how to be frugal with fabric. I understand that it's better to over estimate fabric needs in the supplies list (and sometimes you have to use more fabric for fabrics like fur or corduroy where you have to worry about the direction of the nap). But there is no mention of how to be more conservative with fabrics.
Examples?
The diagrams for the mermaid dolls show how to trace the pattern onto a double layer of fabric then sew on the line. Yes, this is an easier method for the small pieces (and a great tip) BUT the diagram doesn't show the pattern put up close to the edge of the fabric to conserve. Nor is there any mention in the book about how to place pattern pieces to get the most from your fabric (without skimping on the final product).
And in the case of the dinosaur pattern, there is no mention that you could use plain fabrics (not corduroy) which would mean you could use LESS fabric. (ok, I'll admit, that's a nit picky critique--but a quick "if you don't use corduroy, less fabric may be required" would be nice).
Since I didn't use corduroy (which made the grain of the fabric less of an issue) I was able to make Kenneth with just a large scrap of fabric I had on hand (it was about 18 x 44--that's a guess, I did measure it but don't remember the numbers now). I got both side pieces, the three tail pieces, and the butt piece out of a scrap about 10 x 22 (all followed the grain). Not quite enough to get the long gusset piece from the bottom BUT I had enough width to get that long strip from the other "half" of the scrap and STILL have decent "scrap scraps" left over. (I didn't follow the grain for the long gusset and had no issues with fraying or weird stretch or any of that--probably because the piece was wide enough).
Again, it's just a nit picky critique but I'd love the book even more if it mentioned how to be frugal (since I'm a cheapskate when it comes to fabric).
Oh, and for the record, the fabric came from one of the JAQs fabric scrap bundles. So Kenneth is now the fifth item I've made from JAQs scraps (other items: shh tiny pillow, two mermaids, and small bag). Kenneth is also the largest item made from scraps, too.
Lets hear it for scraps!!
Up next?
Yeah, I should get to those lingering projects but I kind of want to try my hand at patchwork. There's a really cute alligator and tortoise in another book I have but you have to patchwork fabric together to use for the pattern pieces. Could that be my gateway to making quilts?


Her name is Kenneth.
Yes, you read that right. HER name is Kenneth.
When I was working on her the name just popped into my head but the fabric pattern and colors just weren't classically "boy" to me and, well, I tend do make to many "male" critters so I needed another girl.
She's definitely a girl. So I'm thinking her parents named her when she was still an egg and they were convinced she'd be a boy, so. . .Kenneth.
You can call her Kennie (if you'd like--but she really enjoys the "huh?" looks folks get when she tells them Kenneth).
Kenneth is (yet another) pattern from the "Wee Wonderfuls" book. At this point I'm pretty much resigned to the fact that I'm going to make pretty much everything from that book. (side note: there are only about three patterns in the book that just do ZERO for me--one is the dolls made using wooden spoons *yawn*, the little felt train *yawn*, and this one doll/blanket combo where the blanket doesn't interest me and the dolls are kind of *yawn*, too--I might make that one someday but it's not high on my list).

I was worried this pattern would be annoying but it wasn't (well, one part was but I'll get to that in a minute). It's two side pieces with one long gusset/middle piece. I was worried it would be too wrinkled/bunchy but there are only a few gathered spots that aren't super bulgy or distracting to the overall quality of the item.
NOTE: This isn't a flaw of the pattern but more my sewing skills/patience. My skills have gotten better so the body construction went better than they would have a few months ago (I would have thrown a hissy fit).
The only part of the pattern that gave me a hard time (and it was due to my lack of skill) was attaching the bottom.
(Poor Kenneth, she has to show us her bum now--she's such a trooper).


It's not a complete and total fail but it's not very nice and neat, either. I should have just hand sewn the bottom but I went balls to the wall and put it through the machine. When I got to the junction where the leg seams hit the bottom piece, it got ugly (and a thread ball was born when the machine got a fabric wedgie and. . .yeah, it was ugly).
I managed to get it stitched up in my own half assed way. I only had one seam issue (where I had to stitch closed a bit of a gap/hole after turning). I was worried that I had caught the edge of the leg seams (the seam allowance/extra) and it wouldn't turn properly so I took my embroidery scissors and cut it apart (in the tiny space between the leg seam and the butt/body seam). Tha's what resulted in the one little gap/hole (you can see it in the bottom of the two pics).
It also didn't help that I altered the materials called for and used felt for the underbelly piece. The pattern calls for two pieces of cotton stitched together on the wrong side then turned. I thought I was all clever using felt (only one piece needed, no sewing and turning!) but I forgot to take into consideration the built in 1/4 inch seam allowance. So when I cut my felt directly from the pattern, it was set to be too large for the finished product. So that's why Kenneth has as rather large underbelly. It took me about an hour to realize that's what the problem was (and felt like a super genius when I did).
I'd probably make this pattern again but NOT just for myself (I don't really want another of these dolls for my own collection). The pattern isn't overly complicated and now that I've done it once I know where my weaknesses are so I can work around them to make an even cuter (and neater) finished product.
This being my third project completed from "Wee Wonderfuls", I have just ONE critique.
The patterns aren't frugal when it comes to fabric NOR do they mention how to be frugal with fabric. I understand that it's better to over estimate fabric needs in the supplies list (and sometimes you have to use more fabric for fabrics like fur or corduroy where you have to worry about the direction of the nap). But there is no mention of how to be more conservative with fabrics.
Examples?
The diagrams for the mermaid dolls show how to trace the pattern onto a double layer of fabric then sew on the line. Yes, this is an easier method for the small pieces (and a great tip) BUT the diagram doesn't show the pattern put up close to the edge of the fabric to conserve. Nor is there any mention in the book about how to place pattern pieces to get the most from your fabric (without skimping on the final product).
And in the case of the dinosaur pattern, there is no mention that you could use plain fabrics (not corduroy) which would mean you could use LESS fabric. (ok, I'll admit, that's a nit picky critique--but a quick "if you don't use corduroy, less fabric may be required" would be nice).
Since I didn't use corduroy (which made the grain of the fabric less of an issue) I was able to make Kenneth with just a large scrap of fabric I had on hand (it was about 18 x 44--that's a guess, I did measure it but don't remember the numbers now). I got both side pieces, the three tail pieces, and the butt piece out of a scrap about 10 x 22 (all followed the grain). Not quite enough to get the long gusset piece from the bottom BUT I had enough width to get that long strip from the other "half" of the scrap and STILL have decent "scrap scraps" left over. (I didn't follow the grain for the long gusset and had no issues with fraying or weird stretch or any of that--probably because the piece was wide enough).
Again, it's just a nit picky critique but I'd love the book even more if it mentioned how to be frugal (since I'm a cheapskate when it comes to fabric).
Oh, and for the record, the fabric came from one of the JAQs fabric scrap bundles. So Kenneth is now the fifth item I've made from JAQs scraps (other items: shh tiny pillow, two mermaids, and small bag). Kenneth is also the largest item made from scraps, too.
Lets hear it for scraps!!
Up next?
Yeah, I should get to those lingering projects but I kind of want to try my hand at patchwork. There's a really cute alligator and tortoise in another book I have but you have to patchwork fabric together to use for the pattern pieces. Could that be my gateway to making quilts?
Friday, July 13, 2012
Upcycle: From placemats to purse
I can't believe how fast this one came together.
Wait, let me back up for just one second.
A few weeks ago I was at my local Goodwill (there's one a few blocks from my house--on Saturday's I can go to the farmer's market then over to the Goodwill in one fun walking trip) and found two super cute placemats for only 50 cents each.
![]()
Super cute, right?
The minute I saw them I thought, "Those could be a bag."
And a few weeks later, they were.
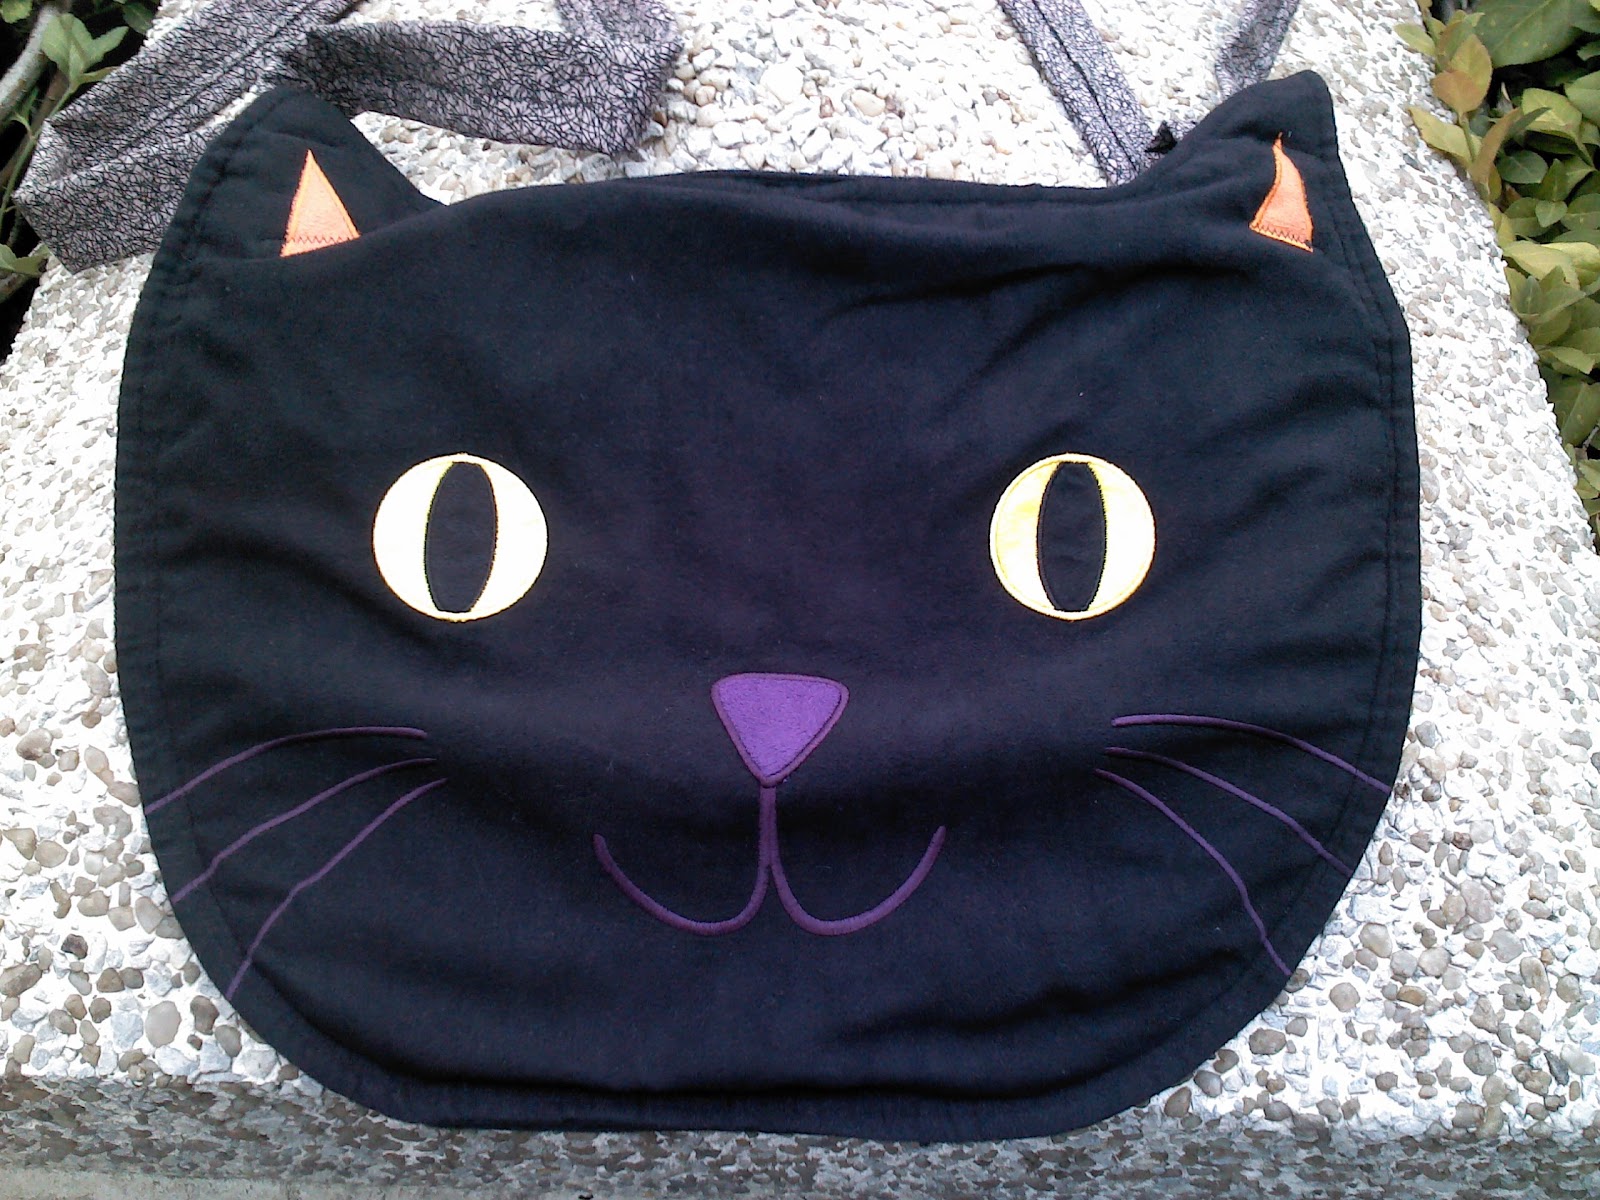
![]()
![]()
There are two straps and they're long enough to wear the bag either on one shoulder or across the body.
![]()
![]()
These stitch closeups are kind of hard to see (what with it being black thread on black pattern fabric) but I used a zig zag stitch to make the straps and to attach them. The straps are from my remnant stash (it's the Ghastlies collection, I think this is called Ghastly Brambles). It's a very light purple with black squiggles all over it. The straps are triple (?) folded? I took the strips (approximately 44 inches long--or whatever the width of the bolt is/was) and a couple inches wide. I didn't measure. I just took the remnant I had and folded it in half then cut on the fold. Then I took each half and folded it in half then brought both sides in until I had a size I liked. Then I just finger pressed/pinned it down eyeballing to keep the width about even. Then a quick zig zag stitch along where the fabric came together (and slightly overlapped, so no worries about not catching all the layers and having a mess).
I measured the placement of the handles by pinning and just holding it up to myself to see how it hung (I pinned both palcemats together along the top line between the ears to make sure both sides would match pretty well).
The only major flaw this bag has is with the ears. Since the placemats aren't mirror images of one another, they don't line up perfectly. It's noticable only at the ears but since I didn't stitch all the way up the ears, they kind of flap a bit so the mismatch isn't as noticable. It matches very well along the rest of the bag.
And. . .the bag is really roomy. A bit roomier than I expected.
![]()
There are three magazines and a day planner in it and there's still plenty of room.
Now I don't see this as a very practical every day bag. The outside fabric is kind of like a faux suede so with a TON of wear it would probably give up the ghost. But I'd anticipate this bag to last farily long with moderate use. I also don't think it would wash well AT ALL given the outside fabric on the placemats (so don't get caught in a rain storm!). I think the construction would hold up to moderate use. And if for some reason it all fell apart after only a few uses, the straps could be salvaged (just tear out the seams) and I'd only be out the $1 I paid for the placemats (and about an hour of my time constructing it).
All in all, I'm very pleased with how it turned out and I think it's going to get a lot of attention when I start using it (my mother will adore it--she loves black cats).
Up next? I really need to get to that robot and the embroidery on that last tattoo doll. BUT. . .the fabric I bought to make a skirt arrived yesterday so now I'm all "gotta make a skirt, gotta make a skirt" but I need to get the right size elastic and get the best tutorial (and/or pattern) for my skill level (beginner's beginner) so the super cool BIKE PRINT fabric (Lucy's Crab Shack collection--it's cream color with navy blue cruiser bikes randomly printed all over--which should be very forgiving for making a skirt--no worry about matching the print up on both sides) will have to wait just a wee bit.
EDITED TO ADD: Lucky me, I found a great blog that's having a competition that this project works for so. . .

Check it out and join in!
Wait, let me back up for just one second.
A few weeks ago I was at my local Goodwill (there's one a few blocks from my house--on Saturday's I can go to the farmer's market then over to the Goodwill in one fun walking trip) and found two super cute placemats for only 50 cents each.
Super cute, right?
The minute I saw them I thought, "Those could be a bag."
And a few weeks later, they were.


There are two straps and they're long enough to wear the bag either on one shoulder or across the body.


These stitch closeups are kind of hard to see (what with it being black thread on black pattern fabric) but I used a zig zag stitch to make the straps and to attach them. The straps are from my remnant stash (it's the Ghastlies collection, I think this is called Ghastly Brambles). It's a very light purple with black squiggles all over it. The straps are triple (?) folded? I took the strips (approximately 44 inches long--or whatever the width of the bolt is/was) and a couple inches wide. I didn't measure. I just took the remnant I had and folded it in half then cut on the fold. Then I took each half and folded it in half then brought both sides in until I had a size I liked. Then I just finger pressed/pinned it down eyeballing to keep the width about even. Then a quick zig zag stitch along where the fabric came together (and slightly overlapped, so no worries about not catching all the layers and having a mess).
I measured the placement of the handles by pinning and just holding it up to myself to see how it hung (I pinned both palcemats together along the top line between the ears to make sure both sides would match pretty well).
The only major flaw this bag has is with the ears. Since the placemats aren't mirror images of one another, they don't line up perfectly. It's noticable only at the ears but since I didn't stitch all the way up the ears, they kind of flap a bit so the mismatch isn't as noticable. It matches very well along the rest of the bag.
And. . .the bag is really roomy. A bit roomier than I expected.

There are three magazines and a day planner in it and there's still plenty of room.
Now I don't see this as a very practical every day bag. The outside fabric is kind of like a faux suede so with a TON of wear it would probably give up the ghost. But I'd anticipate this bag to last farily long with moderate use. I also don't think it would wash well AT ALL given the outside fabric on the placemats (so don't get caught in a rain storm!). I think the construction would hold up to moderate use. And if for some reason it all fell apart after only a few uses, the straps could be salvaged (just tear out the seams) and I'd only be out the $1 I paid for the placemats (and about an hour of my time constructing it).
All in all, I'm very pleased with how it turned out and I think it's going to get a lot of attention when I start using it (my mother will adore it--she loves black cats).
Up next? I really need to get to that robot and the embroidery on that last tattoo doll. BUT. . .the fabric I bought to make a skirt arrived yesterday so now I'm all "gotta make a skirt, gotta make a skirt" but I need to get the right size elastic and get the best tutorial (and/or pattern) for my skill level (beginner's beginner) so the super cool BIKE PRINT fabric (Lucy's Crab Shack collection--it's cream color with navy blue cruiser bikes randomly printed all over--which should be very forgiving for making a skirt--no worry about matching the print up on both sides) will have to wait just a wee bit.
EDITED TO ADD: Lucky me, I found a great blog that's having a competition that this project works for so. . .
Check it out and join in!
Thursday, July 12, 2012
Miriam Mermaid
Well, I got miss Miriam done faster than I anticipated.
And I'm thrilled with the results.
![]()
Look at her, smiling so sweetly.
Maybe it's because I didn't make her pose in a pot of cacti. (this pic is outside my office building--I normally take pics at home but it was too early for decent light this morning so I had to wait until I was at work).
Miss Miriam is ready for her closeup.
![]()
You may notice she's sporting a different hair do than the other two mermaids. I went off pattern and made my own do for her and I have to say I'm pretty pleased with the results.
Yes, it has a noticable hump on one side. At first I annoyed but then I realized it's kind of exactly what I want. I know my hair is NEVER perfect (when I pull it back I can never get it perfectly smooth, there is always a hump hiding somewhere) and at least the hump is uniform (since I used the same template to make the front and back.
I was torn on adding a second row of scallop stitches to the bangs, so I left them off. I thought they'd make the forehead area too busy (what with the head band). I also didn't attach the head band all the way along the hair. It's attached at the sides and then stitched down at the flower. I did put a little stitch in it (at first) but hated the way it showed so I pulled it out. I was going to not stitch it down at all but it kept sliding down so it needed some type of anchoring.
![]()
A bit of scallop stitching on the back. Yeah, I'm really into this stitch (and it took a good five minutes or so for me to remember the settings I used to get it--you'd think I'd make a note but you'd be wrong).
The fabric is a very short pile plush (I think it's a polyester mix) that's only fuzzy on one side (and a bit thick). I think I might need to change my needle, it seemed to have a little trouble with the hair (it's probably dull as hell).
I want to use this same brown fabric to make a monkey doll (after I change the needle!). I think it'll make a nice texture.
![]()
Argyle tail!!!
This was a major must have for Miriam. The minute I got this fabric I thought "mermaid tail". That was long before I made the two mermaid sisters (and is why I made them first, so I could get a feel for the pattern so I wouldn't end up wasting any of the lone green argyle fat quarter I had).
The pic doesn't do the color justice. It's a fabulous chartreuse color with blue dashed lines (which I top stitched over with white). I used a ladder stitch to sew the two tail pieces together which made a much nicer join (though I need to remember to be patient and not take large stitches and to kind of back stitch with it, to avoid gaps and too much gathering). I only stitched through one layer on each fin so the stitches wouldn't show through on the front sides.
Miriam is now happily paired off with Molly (the green ocotopus) and them make a fabulous pair, all matchy matchy (I see Miriam as a bit of a preppy gal, so color coordinating is a MUST).
Up next?
Well, I have black thread in my machine so maybe it's time to tackle that placemat bag I've been pondering. Or I could spin up a brown bobbin and get to work on that monkey? Or maybe that egg laying chicken? Or maybe a birthday tin for my mother (who's birthday isn't until October--yeah, I have plenty of time for that one)? Or (if there's something good on t.v.) I could finish up that robot?
Yeah, I think it'll be either the robot or the bag.
And I'm thrilled with the results.

Look at her, smiling so sweetly.
Maybe it's because I didn't make her pose in a pot of cacti. (this pic is outside my office building--I normally take pics at home but it was too early for decent light this morning so I had to wait until I was at work).
Miss Miriam is ready for her closeup.

You may notice she's sporting a different hair do than the other two mermaids. I went off pattern and made my own do for her and I have to say I'm pretty pleased with the results.
Yes, it has a noticable hump on one side. At first I annoyed but then I realized it's kind of exactly what I want. I know my hair is NEVER perfect (when I pull it back I can never get it perfectly smooth, there is always a hump hiding somewhere) and at least the hump is uniform (since I used the same template to make the front and back.
I was torn on adding a second row of scallop stitches to the bangs, so I left them off. I thought they'd make the forehead area too busy (what with the head band). I also didn't attach the head band all the way along the hair. It's attached at the sides and then stitched down at the flower. I did put a little stitch in it (at first) but hated the way it showed so I pulled it out. I was going to not stitch it down at all but it kept sliding down so it needed some type of anchoring.

A bit of scallop stitching on the back. Yeah, I'm really into this stitch (and it took a good five minutes or so for me to remember the settings I used to get it--you'd think I'd make a note but you'd be wrong).
The fabric is a very short pile plush (I think it's a polyester mix) that's only fuzzy on one side (and a bit thick). I think I might need to change my needle, it seemed to have a little trouble with the hair (it's probably dull as hell).
I want to use this same brown fabric to make a monkey doll (after I change the needle!). I think it'll make a nice texture.

Argyle tail!!!
This was a major must have for Miriam. The minute I got this fabric I thought "mermaid tail". That was long before I made the two mermaid sisters (and is why I made them first, so I could get a feel for the pattern so I wouldn't end up wasting any of the lone green argyle fat quarter I had).
The pic doesn't do the color justice. It's a fabulous chartreuse color with blue dashed lines (which I top stitched over with white). I used a ladder stitch to sew the two tail pieces together which made a much nicer join (though I need to remember to be patient and not take large stitches and to kind of back stitch with it, to avoid gaps and too much gathering). I only stitched through one layer on each fin so the stitches wouldn't show through on the front sides.
Miriam is now happily paired off with Molly (the green ocotopus) and them make a fabulous pair, all matchy matchy (I see Miriam as a bit of a preppy gal, so color coordinating is a MUST).
Up next?
Well, I have black thread in my machine so maybe it's time to tackle that placemat bag I've been pondering. Or I could spin up a brown bobbin and get to work on that monkey? Or maybe that egg laying chicken? Or maybe a birthday tin for my mother (who's birthday isn't until October--yeah, I have plenty of time for that one)? Or (if there's something good on t.v.) I could finish up that robot?
Yeah, I think it'll be either the robot or the bag.
Wednesday, July 11, 2012
Preppy Girl (work in progress) and where I sew

This is where I sew.
It's my kitchen table (yes, that's a bag of cat food there at the edge of the table). When it comes to housekeeping I fail spectacularly but I've managed to carve out a few neat and tidy spots where I can sew and get my craft on. (the other place is my t.v. room where I've taken over half of the coffee table and one of my t.v. trays for embroidery and small hand sewing--I've shown it before in "work in progress" shots but the lighting in that room is horrible for pictures so no pic of it today).
Now I will pause a second for this aside.
I can't stand the crafty blogs where folks show off their work area and it's all PERFECT, like Martha Stewart is hiding just out of frame cracking the whip over her minions. Yeah, those pics are pretty but they are LIES. No one is that neat and tidy and perfect on a day to day basis. Yes, some folks have that type A personality where they're painfully neat and tidy and uptight (that's not me) so their work areas just might be that perfect but they are the freaky few.
So that pic there? That's REAL, folks. And I have to work damn hard to keep it that neat (and I'm sure you're like "neat? she calls that neat?"). It kills my wife that I'm crazy protective of this space. He sees a semi-bare flat surface and immediately wants to bomb it with clutter (usually gross clutter like a dirty dish or something greasy from his bike). When that happens I simple utter, "NO." and move the offending item.
But enough about how messy I am and my sad little sewing work area.
What's that there on the table? Is that a work in progress?
Yes. Yes it is.
That's Miriam, the mermaid I've been wanting to make for a while now. I have the body sewn and turned (ready for stuffing and face stitching) and the tails completely sewn (ready for the assembly stage). The tails turned out very well and the argyle was a good choice (if I may say so myself). At the time of that pic I wasn't sure what I wanted to do for the hair (just that I didn't want the hair from the original pattern) but I now think I've figured out what I want to do (and if that doesn't work out how I want, I have a back up idea, too).
I'm hoping to have Miriam done by the weekend and then I can work on the cat placemat bag.
OH, and guess what I bought yesterday? 2 yards of fabulous fabric. Why so much? I'm going to try my hand at. . .wait for it. . .making a SKIRT. (lord help us all!)
Monday, July 9, 2012
Introducing: Violetta!

Extreme closeup!!
Reminds me of the 20,000 leagues under the sea ride at Disney World (when that big ole eye comes right up to your port hole--even though you know it's fake it's creepy as hell).
Violetta (pronounced vee-o-let-a, preferably with a southern drawl) is not creepy.

It was miserably hot this weekend but it gave me nice light to get these pics. Violetta hanging out on my gate.

Ever get that feeling your being watched?
Hee hee. That's my dog (J.T.) behind her. Yes, he's very well behaved, sitting and sitting and sitting. Probably because he's made of concrete (but fools many a neighbor). He's also at least as old as me if not older (I remember sitting on him as a wee kid). He's named for my grandfather, who I inherited him from.
But this is about Violetta.

Get back here, troublemaker!
She scurried off along the chain link fence. Naughty girl.
Now get over here, troublemaker, so we can do some size reference pics (boring!).


Once again I bring out the trusty Altoids' tin for reference. You can see Violetta is much bigger than the octopi but most of her size is legs (which are fairly maliable--no armature in any of them, just stuffed tightly).

Violetta, you're going to be very disappointed.

That tin is empty, my dear.
(I assume squid are as smart and nosey as octopi and I've seen octopi open pop bottles and squeeze inside to check for food--so why wouldn't Violetta want a mint to freshen up her krill breath?).
Crafty chit chat:
This is an easy pattern but a bit tedious. First you have to cut all those legs which takes a bit of time. Then you have to sew them all. The sewing is easy but it's slowed down because you have to stuff as you sew. With there being 10 tentacles total (2 "arms" and 8 "legs") I got a great stuffing technique down by now. Just stitch like the wind down one side of the arm, then as you go around the tip, stitch just a bit and then start stuffing. I also found that my embroidery scissors work well as a stuffing tool (just don't push too hard or you'll stab out the seams). Also, roll the stuffing into little tubes and then fold the tubes over. Put the folded end into the opening. Make the tubes thinner for the more narrow areas, thicker for the wider areas.
The head area stitched and stuffed very quickly and assembling the whole critter was pretty fast, too.
For future squid, I'd widen the head part (the pointed part) at the base (near where the eye area is attached) so there isn't as much of a pinched in look between the head area and the leg skirt (the legs are attached to a strip of felt which is then attached to the head). Also, when stitching the bottom circle on, I'd do it a little different to keep the legs from splaying out so much. I'd also be a bit more careful lining things up. I matched the leg skirt seam up to one side bottom seam but I should have been more concerned with where the arms would land (with the arms on each side of the body). Violetta's arms are just a tiny bit off in that respect (not that bad).
All in all, I'm happy with the results and feel it was worth the work. I'd probably make another for myself (some day--I have a ton of other stuff I want to do first) and hope the person who asked about them (for a commission) likes this pattern (so I don't have to go find something different).
I thought about embellishing the legs (with sequins or some such) but really felt it would be overkill. I think embroidered suckers would look cute (but be more than a bit time consumming--and would cost extra for a commission).
So, what's next? I have a pair of placemats that are begging to become a hand bag.
(edited to add: Find the pattern I used HERE. It's for a giant pillow sized one but I just printed out the pattern image and used it for this smaller version.)
Thursday, July 5, 2012
Bow, wow, WOW!
The puppy work in progress is officially COMPLETE. Well, sewing wise. I have to toss them in the mail tomorrow (but I did text pics to my sister who is very pleased with the results).
Speaking of pics. . .

The original three, Rose, Twinkie, and Licorice (aka Liberace).
Meet. . .

Andy, Abe, and Louise.
*snerk* When I see these two pics I can't help but think of "West Side Story". Two rival puppy gangs meeting up to have a dance off. Wait, if they're dogs they be more likely to have a butt sniff-off and or hump off. Hey, it's what dogs do.
There was no drama.

These six get along famously.
But. . .what are they whispering about.

Good thing I bugged their meeting.

So, Bug, what did you hear?
"Well, it seems they're all excited about a seventh puppy? Do you know anything about that?"
Why yes, yes I do.

They're talking about Kat. She's not going to end up in the same home as the rest, so I'm sure that's what has them all excited. Kat's slated for a long trip to Florida to live with my Aunt (who has a Dachsund named. . .wait for it. . .Kat!).
Ok, about the names. Names are kind of a big deal to me and often times they have some kind of meaning. These puppies are no exception.
Rose is named for her collar. I needed something that went with the butterflies so a flora/flower theme worked. I toyed with Flora, but once I called her Rose that was that.
Twinkie is named for one of the recipients actual dogs. My sister texted me their names and Twinkie is just such a cute name AND I had that awesome yellow felt so I needed to make a Twinkie (and give her a cupcake collar).
Licorice/Liberace was named right on the heels of Twinkie, hence the food based (and not that original) name. But once I put the shiney ric rac on him, I wanted to change his name to Liberace. So now he has two names. Licorice is his given name but, when he's on stage he transforms into LIBERACE (yeah, I fancy him a bit of a lounge singer).
Andy is named for the dearly departed Andy Griffith. And I just like the name Andy.
Abe is named for Abraham Simpson, a huge fan of one of Andy Griffith's most well known characters. . . MAAAT-lock!
Louise is named for the youngest child on my new favorite cartoon show, "Bob's Burgers". Louise isn't my favorite on the show (that honor is reserved for the oldest child, Tina followed closely by Gene--I find Louise to be a bit "too") but Louise *is* my sister's favorite. And I like the name Louise. I was tempted to make Louise a bunny ear hat but I wasn't sure the recipient (a friend of my sister's) would get or appreciate the reference and I didn't feel like going to all the work if it wouldn't amuse anyone but me. So Louise got a bandana (to be different from the others). I didn't embroider it because I don't want to force the recipient to keep the names I've given everyone.
You might notice I tagged this post "orignail pattern" (yes, I noticed the spelling error but I'm keeping it because it makes me laugh). Now that I've altered the existing pattern (found in the Wee Wonderfuls book) as much as I have (giving it a belly gusset so the doll will stand and changing up the tail) I feel this is an "orignail" pattern.
Now that the puppies are done it's time to get back to THE SQUID (I'm calling her Violetta!).
Subscribe to:
Posts (Atom)