Monday, December 19, 2016

What I made for Christmas!


The hubby requested (in a timely fashion, which is a christmas miracle in and of itself) some stuffed toys for The Bratlings (aka his nephews and niece) this year, so I obliged.

First up, for the Wee Brat (the youngest of the group, age approximately 2 years?  I really don't know his exact age nor do I lose sleep not knowing his age. . .he's a toddler that doesn't quite talk yet and is fairly skilled at walking though he bites it pretty good still).  Since the Wee Brat is still a "baby" he gets the simplest gift (much to my thrill!)


Pack Man inspired ghosts.  Like I said, super simple so I had to jazz it up a bit with the fruit print fabric on the back (prints on the front are pointless because it makes the face not as easily visible).  The eyes are just felt that was glued on (when I said simple, I meant it!) should Wee Brat take a gnaw on them, and he's still young enough that's highly likely.

Next up is She Brat (the niece, she's 4-5 years old?  again, not sure and don't really care either.  She's not yet kindergarten age but definitely older than the Wee Brat by a few years, so that age sounds about right)


I force the hubby to choose what to make The Bratlings based on patterns I have on hand (or if he finds a pattern on his own and it's in my skill set).

The "stripper turtle" (as it has be dubbed by me, because Stripper Turtle is fun to say, that would be the s.l.o.w.e.s.t. strip show EVER!) is from the book "Flip Dolls and other Toys that Zip, Stack, Hide, Grab, and Go" by Laura Wilson (no link cuz I ain't making free money for anyone here).  (oh and I think they need to add "strip" to that long ass title).

I've wanted to make that pattern for a bit but was up to my butt crack in other fluff sewing (of easier patterns that I've done before and know).  The pattern is ok but the instructions could be a bit more robust.  There's a lot of "assumption" in the instructions which made it a tiny bit confusing at points.  And sewing the face part of the turtle is a tiny bit tricky (not hard, just tricky because it's small).  I think I got some weird stretch in the fabric, too, because me turtle's face was a bit longer than the ones in the photos.  But I think they used heavier fabric for their turtles.  She still turned out ok, but I'd like to work the pattern a bit more to see if I can get a better result.

OH, and she's made with spinach print fabric and wearing a chocolate candy shell.  I love, love, love picking out fabrics for projects even if the recipients don't really even notice how effing fabulous my choices are (or I forget to point it out, because I'm modest like that).

She has three shells, which are very easy to make (the easiest part of the pattern).

Last but not least, for the O.B. (aka Original Bratling.  You may find it mean that I refer to the children as "bratlings" but it's a total term of affection from me.  Aunt Jenny is just not that into kids to start with and really, kiddos can handle being put in their place.  And all children no matter how special and wonderful and unique a snowflake they are, are brats at some point, so Bratling is a totally appropriate nickname.  That said, I don't refer to them as "bratlings" around their parents because they all as a collection have zero to no sense of humor and would be Deeply Hurt that I call a brat a brat, especially when that brat is THEIR brat. . but trust me, each and everyone of The Bratlings have lived up to their shared group nickname).

Oh, the O.B. used to be the bratling, but when the third kiddo came along I had to re-do my naming structure, so as the oldest the O.B. had to get a name change.  He's 7 (and the original) so he's currently my "favorite" (if I really do have a favorite, which I'm not sure I do).  That's only because he's more interesting than the younger ones because he has a more developed personality (and he's a nice kid).

The O.B. is deep into Pokemon and Jigglypuff is his jam right now.

So this happened.


I jigglied the effing puff out of that Jigglypuff, if I do say so myself.

I used the spider body pattern (from the Sweetbriar Sisters pattern).  It's the "mama" sized which is effing HUGE.  Ok, not huge but super big which was perfect for this project.  Jiggly is made with pick fleece and I just freehanded his features including his hair which turned out so freaking good.  If I made this again, I'd widen the ears a tad (so they didn't stand as tall) and make the back part smaller over all.

I did enlist the hubby to help with the eyes. I whipped up what was close to right and then he helped trim them and get them perfected before I glued them together then on (no annoying stitching for me cuz I'm lazy!).  How much to I love that the mouth is just a little bitty scrap of a scrap?  Right, that's some level ten recycling there, folks.

OH,and Jigglypuff there BOUNCES.  That's only because I stuffed the HELL out of him.  I did not tell O.B. this, lest he start winging Jiggly around the room (which he totally would if he knew he could get away with that crap with me).

Monday, December 5, 2016

Fluff Project and some swaps

I haven't had many finishes to show off here lately.  I share in progress pics of things on instagram.  I also haven't done any swaps in so long but I just did three right in a row so now I finally have something to show off.

Swaps first!

First one was for a Junker Jane style doll.

While you're allowed to make whatever you want, this swap did ask folks to mention if the preferred "creepy" or "cute".  My partner was cool with either one so I did my best to lean on the creepy side.

And this happened:


It may be a bit too subtle, but I had a definite intention with this doll.  Since I was aiming for "creepy" I grabbed the low hanging fruit that is T***p (yes, I'm editing that word because I don't even like to think it let alone type it or say it. . .vulgar word that it is).  This doll is a cross between T***p and that racist frog cartoon (P**e, again, censoring the word because I don't want to be associated with it in any way).  But I did want it to be subtle, too, since I don't know the person it was going to and didn't want to get them all riled up should they be a T supporter.  I'm very pleased with how it turned out.  I think it's creepy without being repulsive and it's just a wee bit whimsical (I won't say "cute" since I know what I was going for and I'd never use "cute" to describe that waste of human flesh or that cartoon character).

Orange skin frog shaped creature in a blue suit, forked lying tongue hanging out of its creepy slit of a mouth.  Dead, black eyes, narrowed in a hateful glare, surrounded by large white circles.  Head of unruly fake looking hair.

Yup, I think I nailed it.

And as if that's not enough, after you handle the doll a bit you just want to wash your hands.  The blue dye on the fabric does come off on your hands (that wasn't part of my original plan, but I did appreciate the irony after the fact).

I was tempted to make the hands super tiny but instead I went a tiny bit more subtle with:


Gold cape.  I mean, come on.  You know if he could get away with wearing a gold cape (a la the wrestling foolishness he used to participate in) he totally would.  And, I could make the cape without having to do a damn thing.  The piece of fabric was already cut in a cape like shape so I just had to sew it to the shoulders.  Doing minimal work, that fits with the theme too!  Go me!

I haven't been rated for the junker jane doll yet so I'm hoping it's just a matter of the recipient being busy and not that they got my joke and were all butthurt over it.  Honestly, too fucking bad if they are.  I made a damn cool junker jane style doll and sent it on time so. . .

Now, a palate cleanser (not that I despise that JJ doll. . .I love it and kind of wanted to keep it but it really does need to go out into the world).

Ok, palate cleanser.

This swap was for either a doll in a costume or an animal in clothing.  I went with animal in clothing.


Polar bear in a tutu and crown, to be specific.

I really wanted to put her in a bikini but after she was all sewn up it just wouldn't work.  There wasn't enough room on the chest for a decent looking bra top and this bear has some serious booty.  So tutu it was.

(side note, the minute I started working with the tulle Gene was up in my grill trying to eat it.  That cat is obsessed with tulle.  Not exaggerating, I couldn't even turn my back on the tulle or he as leaning in trying to bite it).  The wee crown is removable (but not the tutu, that sucker is tied to her waist).

I had the same partner for the tutu bear and another swap for amigurumi fruit/veggie.  So this was the full swap package:


I went super lazy and just gave her one of my sweet pickles.  I managed to get 21 pickles out of the piece of fabric I bought just to make them, so it seemed like it was meant to be.  Then I was left with 10 for fluff and 10 for mirabel.

Speaking of fluff and pickles:


I mailed the bag of 10 to Kristy at the same time I was mailing the swaps.

I also sent her a second bag of goodies:


5 spiders, 2 crabs, 1 chameleon, and 3 zip pouches.

So, 21 more items mailed off to fluff.

As of this post, I have mailed off 41 items to Fluff for 2016.

Waiting to be mailed I have:  5 cats, 5 puppies, 5 ghosts, 4 mama/baby sets, 2 pigs

Still being sewn I have:  3 rabbits, 6 deer

So, if my math is correct, after I get everything in progress done, I'll have 71 items for Fluff (for 2016)

Fluff had to take a short back seat for some Christmas sewing I'm doing.  I'm about half done with that so I'll finish up Fluff sewing right after that.

The Mirabel total might be slightly smaller than that only because I pull 5 for Fluff first for each item I mass produce.  I try to make 10 of each item but sometimes I don't have fabrics that work to make 10 total.  That happened with the Ewoks (I pulled a few of those to give as a gift, so I ended up with less than 10) and the crabs.  Occasionally Mirabel will get more of an item than Fluff, too.  With the crabs, I think Mirabel got more because I was trying to round out the 3 pouches (so added 2 crabs to it to make 5 items, since I still think in "5/month" when it comes to making and didn't feel like making more pouches).

Man, I have to get those damn deer finished.  It's not that I don't want to make them, it's just that more interesting projects came along.  I still need to do faces on them, baste limbs, turn and baste ears/antlers, and then assemble (I might have to put tails on, too, but I think I got that done).  It's just so many steps with that pattern (not hard, just kind of boring).

I'll have all Fluff and Mirabel items mailed out by Mirabel's deadline.  Then I'm going to focus on making sure I get each month done during the actual month so I can have some time for sewing things just for me (I have some quilts I want to make!).

Tuesday, October 25, 2016

Fluff Project and Softies for Mirabel UPDATE

I've been cranking out the stuffies lately.  See, that's what happens when I get behind on my monthly goal for Fluff and I'm anxiously awaiting the "send by" date for the Softies for Mirabel collection via Spoonflower.

So, I sew.


This is the batch I finished a few weeks back (I showed them off as "in progress" in the previous post).  There are 12 puppies, 11 cats, 2 pigs, and 1 deer.

So that means the puppies and cats are totally DONE for both Fluff and Mirabel.

The deer was just a test run on the pattern.  I usually do that, make one all the way through to get a feel for it then start assembly line production of them (ok, I tend to cut everything then make one all the way through then go back and assembly line).


The pigs are from the pattern I got in the mystery bundle.  All the fabric (except the felt bits) were in that bundle, too.  I'll do a "what the bundle made" post to show all the items I made from that purchase once I'm done with all the items.  I have three more animals of this style (bunnies, not pigs) from that same pattern that are cut but I haven't go to sewing on them just yet.

After that massive finish, I got another mess of items done (just in the past few days).  They include:


Four more deer.
(there are 5-7 more of these in progress, I forget now if I cut 10 total or 12, I think it was 12)


Eight mama animals with babies.
These were from a pair of cut and sew panels I bought as a treat.  Sometimes it's just nice to have a simple and fast project like a cut and sew panel.  These ones were a decent deal, too.  Missouri Quilt Co had free shipping (no minimum) so I decided I needed these.  You get four sets per panel, so that means each set came out to be only a few dollars each.  Totally doable.  (you know I'll be watching to snag more of these if they go on sale anywhere. . .this is a really new fabric line, so it might be a while before they go on sale).


Ten ghosts.
That's all I could get out of that remnant of fabric.  It was a little annoying to work with (kind of slippery and stretchy) but they turned out SO cute and just a tiny bit fluffy, silky.  Totally worth the tiny bit of annoyance.  (and shout out to Joann fabric's remnant bin. . .I love it so much!)


Four spiders.
Actually, I finished six but two of them weren't for Fluff/Mirabel so I didn't include them in this post.  I have five more of these to finish (in fact, I just sewed up a pair of them yesterday and they're in the "get stuffed" basket with four crabs and a chameleon).

Let's end this with one final pic.  This is NOT an up to date Mirabel snap.  I didn't include any of the ghosts, spiders, deer, or the mama/baby sets.


That there is:

6 cats
5 weiner dogs
5 chameleons
5 ponies
2 ewoks
6 puppies (I think only 5 are pictured but there are a dozen of those so there should be six for each project)
TOTAL
29

Add to that:
5 ghosts
4 mama/baby sets
(and)
5 spiders (in progress)
6 deer (in progress)

GRAND TOTAL (so far)
49!!!

That's JUST the Mirabel count.  And I have fabrics pulled to make seahorses (hopefully 10 total) and I want to make pickles again (but have to find the dimpled minky at a good price)

What about Fluff?

Well, they got:

5 chameleon
5 ponies
5 weiner dogs
5 ewoks
5 cats
6 puppies
5 ghosts
4 mama/baby sets
(and in progress)
5 spider
6 deer
5 mystery bundle pattern (2 pigs, 3 bunnies)

That's 56 items!  (oh and two pouches)

Holy crap, I'm almost to my yearly goal for Fluff!  I only need to make one more item (after finishing the in progress ones) and I'm GOOD!

BUT. . .2015 I made 68 items for Fluff, so I'd like to at least match that goal.

BUT. . .BUT. . .2015 I only had 35 Mirabel items and I've crushed that already so. . .I think I'm still good.

But I would like to beat 2015's Fluff total if I could.  So, new goal.  70 items for Fluff (for 2016) and 60 items for Mirabel (for 2016).

SO. . .I need (after I finish all in progress items):

11 more for Mirabel
12 more for Fluff

TOTALLY doable.

Thursday, September 22, 2016

2016 Fluff Project: 20 items done (and mailed!)

Long time, no post.  I've been sewing away on Fluff items and FINALLY got around to sending some out.

20 items officially mailed:


5 chameleons
5 ponies
5 dachsunds
5 ewoks

My goal for 2016 is 60 items (that's 5 per month).  So, that means I have to make a minimum of 40 more items in the next 3 months.  CHOP CHOP!

Not to worry, I do have a lot of items in progress.  In fact, my "get stuffed!" basket is pretty full with:


Cats.  11 to be exact


 Puppies (at least 10 of them, there might be a few more, I forget the exact count now)


Pigs!  I'll have a separate post on this pattern and a mini side project/challenge.  Short version is I got a mystery pack from Pink Castle Fabrics when they had a special "personalized mystery pack" deal.  In the pack I got a stuffed toy pattern and a mess of fabric, so I'm trying to see how many items from that pattern (and others) I can make with just the fabric from the pack.  These two pigs are the first "finished" (in quotes because they aren't stuffed, closed, tails attached yet).  I also cut one random chameleon from the green fabric pictured.  I'm hoping to get 3-5 more items from the pattern (it's one pattern that modifies to five different animals) and then use the scraps to make other patterns (if possible).

But that's not all I have in the works!


Deer!  This is the first one that's at the final stage ("get stuffed!").  I have four others that are ready for final assembly and 6 (or so) that are all cut and ready for the next steps (limb/face assembly, then final assembly, then stuff and close).

AND. . .I'm going to make some more of THESE:


Shpiders!  (aka shpidoos).  I got to do pattern testing for Sweet Briar Sisters.  This pattern is quick and easy with great results (I might do a full post on it later) so I'm aiming to make 4-9 more of these as well.

OH, and I have some spare zipper pouches (that I'll round out to 5 total)

SO. . .let's crunch the numbers again:

20 items sent
5 cats
5 puppies
5 pigs (or from that pattern)
5 deer
5 spider
5 pouches

Total:  50 items

So that leaves me needing 10 more items.

I'm not sure what I'll do for those.

But, for anyone reading or doing the math, I'm making 10 of most items.  Where are those extras going?  They're ear marked for Spoonflower's Softies for Mirabel collection.  I emailed them asking if they're doing a collection this year and they said they are and will have more info mid-October.  So I'm trying to stock as many items as possible to send to them.  If for some reason there is no collection, Fluff Project can have all those, too.

So I'm in sewing high gear and I'm really liking it.  Tonight I'll try and get the "final assembly" deer put together to add them to the "get stuffed!' bin.  Then I'll spend some quality time in front of the t.v. working on stuffing.  Some new Netflix arrived so it will be perfect (ok, first I have to finish watching a subtitled movie I started last night, so I won't stuff during it. . .it's too hard to read and stuff at the same time).

Monday, August 22, 2016

Pets on Quilts 2016

It's that time again!

Lily Pad Quilting's Pets on Quilts show.  (go there via the button along the side of the page or click that embedded link. . .go!)

This post is to show off my entry (cats on quilt) and the new quilt I made just for the show.  This show has become a way for me to guarantee I'll make at least one quilt a year (such an overachiever *eyeroll*).  This is my third year in a row participating so this is my third quilt.  Ok, to be honest, it's my second "real" quilt.  The first year I made a little wall hanging quilt but this year I made an adult human sized (read usable) quilt.  Not a lap quilt, either (not that they aren't lovely and technically usable) Hey, when I want to cover up just covering my legs ain't going to cut it.  I need to be covered chin to toes (and ideally, tucked under the feet though my quilts might be a little shy of being able to do that. . .but they are as long as, if not longer than I am tall, so definitely not lap sized).

Ok, let's not fall deeper down the well of how I like to cover up (trust me, I have a lot of peculiar covering habits, including making my husband use his own blankets. . .I swear that's the key to a happy relationship right there) let,s just see cute cats and quilts.


TA DA!

(shout out to my husband who's holding up the quilt.  Oh, he gave me a teen girl worthy eye roll and sigh when I asked him to help me.  He wasn't going to bite, but then I told he wouldn't even have to put on pants to help and that no one would see him in the pic, sans pants, he bit.  HAH, but now everyone knows he's behind the quilt in just a t-shirt and boxers, not that he's never been outside in just his skivvies before. . hell, he's been on the roof in just his skivvies. . .he's classy like that)

Yup, that there is a quilt.  I don't know the exact dimensions but it took just under four yards of fabric for the backing (two, two yard cuts sewed side by side to be wide enough).  I had plenty of over hang all around so I went the lazy route and just trimmed the backing down to 2 inches all around then folded it over to make the binding.  Holy crap, my lazy heart sored at how dang easy that was.  Yes, you get a stitch line all the way around the back of the quilt (because when I'm lazy, I'm super lazy and I machine stitched that lazy binding. . .what, I didn't have time to hand stitch that bad boy, I just finished this quilt YESTERDAY, yester-freaking-day, people. . .the last minute, I use it).

For the quilting, I stitched in the ditch around each of the big heart block units and then around the actual heart.  Then it needed just a bit more stitching so I quilted the heart shape again inside each heart.  You can kind of see it in the photo but I used tan/neutral thread (which I use for just about everything because. . .see above. . .I'm lazy).

The front is scrappy (reds/pinks with low volume white/off whites for the heart blocks. . .then a five inch border in between. . .the border is all the same fabric, a low volume white/white with little x and o's on it).

This is the backing:


I want candy!  I want CA-a-nDY!

I love novelty prints (and candy) and sparkle (there's some gold on some of the candies) so I had to have this fabric for the backing.  It's an off white background (looks white in that pic, but my pics are always crap because the lighting in my house is coal mine bad so. . .yeah).

But, but, but. . .this is supposed to be PETS on quilts. . .


"Get to it, mom."

Yes, Eugene.

He's scowling because I wouldn't let him gnaw on the plastic bag from the padding.

"No, I'm disappointed that you used that huge padding and had a ton of scraps left.  You should have measured and then bought a padding closer to the size you needed."

No, you're not that deep a soul, Gene.  You just wanted to chew that bag.

"Yeah, I did.  You're mean."

Hey, I did let you "help" with the quilt.


"Yeah.  I like being the first to hair up new blankets.  Take THAT, Murray!"

I think you also like the odd smell the padding has.  Anyone else notice that?  I swear, fresh out the package padding smells like dog biscuits.  Like a cracker-y, bland bread smell.  I think it's the starch in it or something.  It's not a bad smell, but definitely a smell.  (again, I'm lazy and don't pre-wash things. . .if I obeyed the quilting police I'd never actually finish anything and as it is now, I finish so few things so. . .YOU'LL NEVER TAKE ME ALIVE, QUILT COPPERS!!!)

Gene definitely likes to get up on the new quilts first.  He likes to roll on them and kick them and. . .


Gene Green?  Nope, that's Gene SIMMONS right there.  Dang, boy, you have a long tongue.

He's not alone in liking to have a good bath on a new quilt.


Murray at least waits until the quilt it truly finished.

He also doesn't wrestle the quilt.  He has a more classic approach to breaking in a new quilt.


Aww, him's tie-tie.

(yes, I really do speak that line out loud to Murray on a regular basis.  And, you have to use your best Rudolph voice, you know, that little childlike voice baby Rudolph. . .from the 1964 cartoon. . .uses the first time he meets Santa. . .what?  like you aren't a weirdo?  yeah, right)


Gene, look here so I can get a super pretty pic of you.

"No thanks, mom.  Murray's up to something on the shanty town and I have to watch."

But not get up to investigate?

"No.  The table is still cleaned off and the new quilt lifts me up just enough I have the perfect perch to watch from here.  And that shanty town is really falling apart.  Maybe you could make a new cover for it?"

Yeah, I've been thinking about re-covering your shanty town for a while now.  Maybe that should be my next project.

"Well, put down that phone and get to it then."

Well, my feline overlords have spoken!

(too bad for them, I have to sew up some stuffed toys first before I even begin thinking about re-covering their shanty town. . .but I might be able to enlist my husband into helping with that project. . he showed interest before in salvaging the original shanty town so. . .we'll see!)

Thanks for visiting the blog.  Make sure to check out all the other folks sharing their fabulous quilts (and even more fabulous pets).


Monday, July 25, 2016

Fluff Project UPDATE (finally got some stuff finished!)

I know, right?!

I've been so half assed with Fluff sewing this year.  I go in these crazy stops and starts but get very few completions under my belt.

Well, I finally got something done (over this past week. . .just took a bit to get it documented here).  Speaking of documenting things here I totally forgot to document the wiener dogs and ponies I finished for Fluff. . .more on that after I show off this patch of finished items.


Bowl of legs.  Mmmm.

I like this pattern because it's easy-ish.  Easy in that the actual sewing is straight forward.  Ish because there's a lot to do for each item (totally worth the work but still a lot of little things).  The body is pretty straight forward (the only "ish" part is dripping a bit of fray stop at two spots. . .totally not a big deal).  The bodies even stuff up fast, which is nice.  The legs aren't hard to do (they sew up easy and even turn/stuff well. . .nice "in front of the t.v." project).  The "ish" is with the buttons.  I sew them on before attaching the legs to the bodies.  Just a quick stitch (kind of like basting) but it's a time eater (not hard, just a time eater).  TOTALLY worth the effort, though.  Trying to attach the legs with loose buttons is a super pain in the butt.  Do. Not. Do. It.  Attaching the legs isn't hard either, just "ish".  Once I get the hang of it (usually takes two or three) it goes really smooth but those first few are annoying.

All that said, I don't want to make it sound like this pattern isn't worth it.  It's a GREAT pattern.  Hell, I wouldn't make it all the time if I hated it.  But if you're going to go to the "ish" of this pattern, you're better off to make a bunch of these at once so you can get the flow of the "ish" steps so they aren't as annoying.  (oh and I almost forgot to give everyone nostrils. . the whole time I felt like I was forgetting something and then I was looking at the pattern and BOOM, nostrils, duh!).


That there is a pyramid of TEN chameleons.  That's what I mean when I say do yourself a favor and just make a mess of these at once.  It's also fun because you get to pick out a mess of different fabrics which breaks up the monotony a bit.

This batch is ready for their closeups.

ROLL CALL!


A pair of neon green twins.  This fabric was begging to be made into chameleons.  They aren't identical twins, though.  They have different buttons.  Similar, but different.  One has slightly lighter buttons but both have lighter colored base with darker stripes.


One orange batik and one funky geometric print.  Batik has a very basic button since she's so fabulous she doesn't need a flashy button.  Geometric (which I think is a cotton+steel print, if memory serves) has some fancier buttons.  They were kind of heavy, too.


Two more pairs.  Floral and fireworks.  The florals have different buttons.  One has a flower shaped button (so cute!) and the other has a light gray button.


Mugging for the camera!  The fireworks chameleons have different buttons, too.  One has a very basic semi-clear button and the other has a red rimmed button.  (and yes, they have nostrils you just can't see them)


Last but not least, the lone blue chameleon (I think that's a hand dyed fabric) with blue buttons and a very rare celery chameleon.  He has green legs because I didn't have enough celery fabric to make the legs.  I think it works but I'm not sold on mis-matched legs for every chameleon.  Bright yellow buttons for that fancy fellow.

What's next?

Well, I have two other patterns in progress right now.  First will be the cats.


I have ten of these (in different fabrics) about half done.  They are ready to have the limbs/tails turned and stuffed.  Then basted to the front body and the whole thing assembled.  Then turn and stuff the body (and close).  So I'd say that is about half done.

Then I have ten dogs that are a few steps behind that (they need faces added, then they'll be ready for final assembly, turning, stuffing, and closing.

THEN, I have a deer pattern picked out for the next item.  No steps have been done on them yet (just some preliminary fabric selections).

So what's the yearly count for Fluff?

5 Ewoks (documented here)
5 chameleons (documented here)
5 wiener dogs (need to share here)
5 ponies (need to share here)
Total:  20 items
Goal:  60 items

Time to get going.

But first I need to pause to finish a quilt I want to get done for the Pets on Quilts show.  Hoping to get that ready for final hand stitching on the binding before I go on vacation (next week).  That's a lofty goal but the show isn't until August (in the teens) so I still have time.  The top is done, the backing fabric selected (just have to piece it together, it's not wide enough) and then get my sandwich on.  The quilting will be straight line so it should go quickly.  Then I need to make the binding and put it on.  Ok, so when I see how much I still have to do I feel extra lazy for not even looking at it this weekend.  The heat had me just melted on my couch, snoozing away.  SO LAZY!!

Friday, July 8, 2016

Quilts for Pulse Blocks

After the Pulse nightclub massacre (side note, that was a hate crime not some terrorism b.s.  I get so miffed when the news tries to make it into a "ooh, big bad brown terrorists!" thing when it was just a straight up homegrown hate crime. .. ok, mini rant over) the Orlando Modern Quilt Guild put out a call for quilts/tops/blocks to make quilts for survivors, family members, first responders, and those affected.

Details HERE.

They wanted to keep a heart/rainbow theme and offer THIS pattern as a jumping off point for folks (they'll take any quilt/top/blocks that are heart/rainbow, though).  (they prefer the 10 inch size of that block)

Seeing how easy the block was AND that it could be made from scrap sizes of fabric, I was TOTALLY in.

I just mailed these 13 blocks out today.


You can get three of these blocks (the color part) from one FQ.  So there are three of each of these.  I did go and buy a bit of fabric for this project.  I don't have a lot of true white on white fabric (I have low volume but a lot of it is black on white or gray on white) and when I found a white heart on white background fabric at Equilter AND I got a $10 gift certificate for doing a survey I figured what the hell.  I only ended up paying 93 cents for a half yard of fabric.  Hell yes!  (and there was a 5 inch strip left that I can keep for me. .. yes, it always ends up being about me).


Used scraps for these three.  So I got one purple, two green, and one pink.  One of the greens has a different light fabric.  I didn't have enough of the two light fabrics I used (the heart print and this other print I bought to use in a cat themed quilt and/or have just to have some white on white fabric).  Again, I ended up still having a five inch strip left of the non-heart light fabric, which is perfect because the project I was thinking of using it for calls for five inch charms.  I love when things work out like that.


I only have one each of these.  The star fabric there just wasn't enough to make another block (which was a shame because that's sparkly and sparkly is the best) and the ostriches I didn't have enough of the heart/light fabric to make another (I have a bunch of that ostrich print because it's awesome).


Just had to enbiggen that there ostrich block to show it off a bit more.  I just love it!  You can see the heart print, too.  I think I have to get a bit more of that fabric the next time I shop.  See how easy this block was (the only tiny tricky bit is, if you're working with a directional print you have to pay attention that it's sewn on properly. .. but that applies pretty much any time you use a directional print) I kind of want to use it to make a cat themed quilt.  I already have a pattern to make a much larger heart (that's what I'm using to make my Pets on Quilts submission) but this would be cool, too.  And show off my funky cat fabrics a lot better since the heart uses more of each fabric (the other pattern uses 5 inch charms so each fabric has less space to pop).

That's what's up next, the Pets on Quilts submission.  I need to sash the blocks, get my backing fabric, and put it together.  Chop, chop.

For a Swap: Scallop Bag


Made this bag for a swap.  We all had to use THIS pattern.

My partner likes fall colors so I went hard core fall.


A few notes about the pattern.  I'm not a fan of how the bottom row of scallops get caught in the bottom seam.  It's designed that way but I just don't think I like the look that much (I don't hate it but it just feels "wrong" to have the scallops caught in the bottom seam, like you sewed it incorrectly).

This bag also takes a pretty good bit of fabric so it gets a wee bit bulky when sewing.  Nothing too crazy but just a note.  The biggest snag for me was the handles.  I wanted them to match the body fabric but they are WOF long.  I was working with a scrap of that body fabric so I simply did not have enough.  Had to make a special purchase to get more (no biggie).  Since I was getting more handle fabric, I splurged to get some perfect lining fabric, too.  I was tempted to make a patchwork lining using the scallop fabrics but when I spied that tree fabric I had to get it for the lining.

I do really like the top stitching along the top of the bag (you stitch the lining down along the top and it gives a great look and is super easy).  I also really like the way the handles look once attached but they were a tiny bit tricky to work on the machine.  But part of that could have been me being dumb (sometimes I have to do something ass backwards once to realize I'm doing it the "dumb way").


See, that fabric is the BOMB.  And you can see the top stitching.  I don't know what it is but that top stitching just looks more professional versus "homemade".  Yes, it's a simple bag that is meant to be more of a homemade look but that little touch just makes it look like you really put some effort into the bag.

I don't know that I'd make this pattern again just for no reason.  It requires larger cuts for the body/lining/handles and I don't have 1/2 yard cuts in my stash (as much as I have fat quarters) and it requires home decor weight for the outside body fabric.  You can use regular cotton (the bag I got from my partner was made that way and it was perfect) but the home decor/canvas does give it a more sturdy appearance.  There's no lining/stabilizing in this so it's a floppy bag.  It's also not super roomy for the amount of fabric you have to use to make it.  (I'm thinking for charity sewing it might not be a good choice unless you wanted to make more special bags versus churning out as many bags as possible with the fabric you have. . .that's why I prefer the Green Bag Lady pattern for making true work horse style grocery bags, you get the most bang for your fabric).  That said, these would be cute bags to make for girly girls.  They'd be so cute done in princess prints or some such cuteness (yes, I totally thought of making a cat themed one, it would rock as a crazy cat lady bag).

What's up next?

Well, I'm not doing as many swaps right now.  I need to focus on my Fluff Sewing (I'm so behind. . .some many "in progress" things but not much actually finished) and I want to make a quilt for the Pets on Quilt show (in August) and I'm getting my vacation on the first week of August so. . .yeah, I need to focus on non-swap stuff right now.  First will be to get that quilt done.  The top is very close to done (just have to add some sashing between the blocks).  Then I can buy the backing fabric (need to measure the top first) then just finish it up.  I also have chameleons, puppies, and cats in progress for Fluff (and Mirabel) and then want to whip up some deer.  And 2 more zipper pouches (I had three left over from another project so I'll just round that out to make 5 items for my monthly sewing goal).  Busy, busy, busy.

Wednesday, June 1, 2016

Swap Stuff: Patches and Stuffies and Bags, OH MY!

Time to show off two recently completed swaps.

WARNING:  SPOILERS AHEAD

(one of these hasn't been received by my partner yet but I have a few minutes to post this so I have to post while I can).

First up, a lone patch (this was already received):


The swap was a dictionary dip swap.  Just so happened, that was my idea for a swap, too (I don't host much, but I share ideas).  The dictionary dip is just like it sounds.  Randomly open the dictionary and put your finger down on the page.  The word you land on is the one you use as your prompt for your patch.

(I used to do dictionary dips all the time when I was deep into playing Sims 2.  I got some of the best names that way, including a Zweiback).

My dip word was "vacancy".  Ok, true confession, I did a best out of three.  I've always done dips that way (when I would dip for writing prompts, sometimes I'd do three and try to work them all into the writing).

This fabric scrap was PERFECT for that dip.  I just love having so much odd fabric in my stash.  Scrap packs for the win, y'all!

OK, next up is the swap that I just mailed out today.  I showed a few teaser pics of things on my instagram (@madameugly) but I'm showing it ALL here.


The swap was a Fandom in a Bag swap.  I like these but usually I wait to sign up to see what other folks have chosen as their fandom (the premise is, your partner tells you the fandom they like and you craft based on that).

For this swap you had to make a bag, two patches, a stuffie, and one additional item of your choice.

I got lucky.  My fandom was EASY (and something I also like!).  South Park!


For the bag you could just use the theme of the fandom.  (the example given was Harry Potter, and if you couldn't get Harry Potter fabric you could use "magic" themed fabric instead. . .or buy a bag in that theme. . .the bag didn't need to be hand made).

I was originally going to make a Terrence and Phillip bag (applique or some such) but I just wasn't in love with the idea.  While I was picking in my stash for fabric to make my original idea, I remembered I had t.v. fabric.  I knew I had to use it.  When I was looking for the lining fabric I discovered I still had enough of the punctuation fabric.


Punctuation = cartoon curses!

So the bag practically made itself (yup, used the Green Bag Lady pattern only a bit smaller).

Next up, the patches:


I LOVE THESE PATCHES.

They fucking rock.

(yes, I'm modest too!)


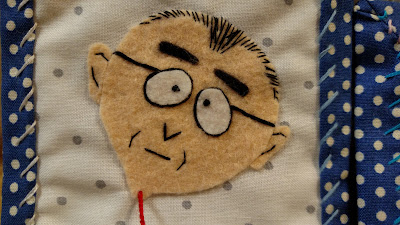
Mr. Mackey turned out JUST the way I wanted him to.  Sometimes you try to make your own version of some character and they really look like "fan art". You know what I mean, they're just a tiny bit "off".  Good and all that, but not quite there.  I think this Mr. Mackey is as spot on as possible.

(the only "flaw" is he should have stubble. . .the episode where he gets high and thinks his head is a giant balloon, he had stubble. . .I didn't realize that until I was completely done with the patch and was just looking at some South Park stuff online.  I thought it would bug me that I missed that detail but really, this patch turned out so well I'm ok with it.)

Ok, I know I should be such a braggart about it.  It really doesn't take a genius to trace a image from the internet and use it as a template to cut out felt and glue it down to some fabric.  Then add some embroidery.  It's really just advanced tracing.  But even if it is "easy" like tracing, you have to be careful and pay attention to detail.  I think I nailed the detail pretty well (ok, now I'm sounding obnoxious. . .I'll stop).


The second patch is so simple it's almost criminal.

Just some hand lettering with heat set fabric marker.  I almost felt like I was cheating with that one, but I brought it with everything else that I thought it was ok to be "weak" with the second patch.

Next up. . .I'm not use if this is the stuffie or the "other item".  Doesn't really matter.


It's Mr. Hat!

(bonus of Gene creeping him like a super creepy feline creeper, even giving the stink eye. . .nice).

(oh, he does have his mustache under the hat rim, the pic is just weak. . .empty puppets are hard to photograph)

This was trickier than I thought.  I totally had a "that's going to be sooo simple" attitude so you know that means I had to make some mistakes and re-do some stuff.

First, I made the body in the wrong color.  Yup, straight up made a green body.

Second, the body shape was all wrong.  I made a classic "little kid draws a ghost" hand puppet shape with the arms up.  Mr. Hat is not shaped like that.  His arms jut right out from his body at right angles.

Third, I didn't keep in mind that he has flesh tone hands and face.

So the first run at the body was just all wrong (it was still a good generic hand puppet all in green, but useless for what I needed).

Once I had the right colors, things went smoother.  No issues with making the body.  Even got the had going fairly well.  But (as you can see) I hit a tiny snag with the rim.  I just could not get that bastard to lay as flat as I wanted.  Looking back I see two things I could have done.

One, make it two parts (and put the seams at the sides).  I did it as one continuous circle with is what caused the waviness.  I thought about trying to fix it after the puppet was completely done but that would have lead to there being a fugly as hell seam right in the front of the rim which I think would be worse than the waviness.

I also could have made the rim on cardboard.  That would have forced me to make the darts (take up the slack, whatever it's called) as I sewed and pretty much guaranteed a really flat rim but I knew I was going to work with cardboard for the other stuffie based item (and working with cardboard gets annoying. . .and it makes thing harder to ship because you don't want to crush the cardboard).

So, Mr. Hat has one major flaw but he still looks pretty good.

Last but certainly not least. . .


HOWDY HO!!


Gee, Naomi, you smell so nice and flowery!   (Naomi is my partner for this swap. . .my sister said my partner was going to hankey their pants when they saw this. . .that's the ultimate compliment right there).

Mr. Hankey was pretty easy to make.  I just got out my favorite shit fabric (yes, I've used this fabric to make a turd before. . and pretzels. . .but not a turd pretzel. . .ewww!), drew up a pattern and that really was that.  He's a turd.  Turd are easy.

The only tricky part was making sure the glue held his face to the turd fabric.  It's kind of slick pile and I had to do some touch up gluing after the first round (to make sure the edges were really down so the whole face wouldn't peel up).

You can't see it in the photo (because I'm a lazy photographer) but he does have a black mouth with a red tongue.  The pic kind of makes it look like he only has big red kissy lips but that is NOT true.

I wish I had shorter pile pipe cleaners for the arms.  They do make less shaggy pipe cleaners but I couldn't find them (and you know I waited until the last minute to work on this project).  I had one low pile pipe cleaner in my stash but the damn thing was white.  NOT acceptable.

I just poked a small hole on each side of the turd and threaded the pipe cleaner through.  Bend the ends to make a small bulge (and fold down any jabby bits) and then sew the mittens around the bulge (I knew glue alone wouldn't do it, so I didn't bother with glue at all. . .glue never holds on pipe cleaners).


That there mug is why I wasn't keen to use cardboard on Mr. Hat.  I made Mr. Hat first and KNEW this mug was going to be cardboard-tacular (it's fully filled with cardboard, side, base, and handle).  So I was saving my annoyance to get through this mug since I knew the cardboard would make the mug so much better (than just doing double layer felt).  It made packing the swap a little more challenging but I had some bubble wrap to fill it with and then took some scraps of the t.v. and punctuation fabric and made a little wad to support the handle (so it wouldn't crush).  I also packed the box tightly so there won't be a lot of shifting.

I LOVED doing this swap.  Everything turned out so well and I'm so proud to give every item to my partner.  She always makes great swaps, so she's worth the effort (and, as I've already established, I seem to enjoy bragging about my mad craft-tacular skills, y'all!).

Next up?

A bag swap and fluff sewing.  I have chameleons and cats in progress and puppies cut (but nothing more done on them yet).   I need to get caught up on Fluff!