Showing posts with label patchwork. Show all posts

Monday, June 19, 2017

For a swap: Patches!

Since these have safely arrived at their new home, I can now show them off in all their glory.  (I did just a wee peek at them on my instagram because I'm an attention whore).


That's the pic I shared on instagram.  It's the back for THIS:


Ahhhh!  Freaky eyes!

That's a piece of a washcloth (never used, don't get all grossed out) and I gave the seahorse and whale some wacky bead eyes then added a big ole tacky turtle bead.  I bought this kids type bead grab bag (so it was all plastic beads shaped like animals, pony beads, and those plastic beads that look like gems) and I've been trying to use some of the cute animals beads for this latest round of color themed patches (in case you didn't notice, this month is green).

You have to make two patches per color so. . .


I give you patch numero dose.

What the hell is that, you ask?

HAH!  (that's me laughing at you because I get it, it's a weird patch)

That there is a pair of turtles racing to a sequin an bead finish line.

LIE (you say).  That's just some green bumps.

NO. . .look closer. . .(said in my best Rafiki voice).


Great, a crappy pic, so helpful, right?

Yes, it's a bit overexposed but you can see the wee little embroidered legs/head/tail-i-o next to the green bump.  So that makes it a turtle.  *sticks out tongue*.  I had these wool balls in my crafty crap collection and I cut one in half and VIOLA turtle shells were born.  Sewed them down to the patch with some embroidery floss (that's the yellow lines) then embroidered the body parts around them.  Then add the sequin and bead finish line and DONE.


That's the back.

Shame on me for not ironing the fabric but it was the only bit of fabric that needed ironing and I just could. not. force myself to set up the ironing board and fire up the iron (including adding water so I could have some steam) just to get that one wee not-quite-a-crease out of that fabric.  It's well established that I'm lazy so. . .there's some more proof for you.

The next colors are blue, purple, and then rainbow.  I'm really liking making patches again.  It's fun going through my little three drawer storage container and picking out random things to make patches with.  I already pulled some items for the next patches (but I have to make a tattooed ninni monster first. . .I'm making good progress on it already).

Next up?  Fluff Project report!

Monday, November 16, 2015

2015 Quilting Goals: Drunkard's Wife QAL

I decided to do a quilt along to force myself to work on my quilting skills.  That and I happened to stumble onto Sew Scatterbrained's blog (via IG).  She's doing the work of setting the QAL up so all I have to do is play along (no signing up or any of that, which is just my style).

I got all caught up (there were only two blocks to do) this weekend.


The fun twist with these is you're supposed to make an error (because you're drunk, right?  yeah, that's too dangerous for me to mix alcohol and fast moving needles, thankyouverymuch.  that and alcohol makes me sleepy, again, not good to be drowsy when playing with fast moving needles and rolling cutting implements).


This was a churn dash (I believe that's the correct term) block and I deliberately put one corner and one of the "two bar" pieces on wrong.  You really notice teh corner error but the bar takes longer to notice.

OH and double challenge for this, I'm trying to use up three scrap packs I bought on a lark from Pink Castle Fabrics.  They had a bundle sale (they do that a lot) so I grabbed a cool, a warm, and a neutral.


And the other block.  I don't remember if this has a "real" name (I know all of the blocks are standard patterns, nothing too outrageous though the next block looks complicated and I'm worried I'll really cock it up good just due to incompetence).

That block is supposed to have all the points the same so it makes a starburst in the middle.  But I deliberately turned the two side ones to make stripes instead.  I really like the starburst way and this alternative version.

My only problem is these are supposed to finish at 12.5 inches (pre-trim) and mine simply do not.  I know I cut everything accurately so it has to be my seam allowance.  I consistently used the same for each seam and I did check it before I started BUT (now that I'm thinking about it and given my general fail at math and mathy related things) I could have messed that up.  I really did measure it with a ruler and all that but I could have measured wrong.  I'm just going to keep making them all the wrong size and then trim them all the same when I go to put them together.  No harm, no foul I suppose.

See, I can't even pull this off when SOBER.  Maybe I should have a little nip of gin before I try the next one.

Thursday, January 29, 2015

2015 Quilty Goal: Half Square Triangles

Making some progress on practicing other types of blocks.

Buoyed by the success of my first stab at playing with half square triangles (that patch I made), I decided to give pinwheels a try.

Missouri Star Quilt Company's youtube channel is great for all the learnings.  They had a "cheater" way to make pinwheels and damn it all, it was SUPER EASY.


These are super scrappy.  I just grabbed up some charms from my big pile of 5 inchers.  I kind of tried to make them play nicely with each other but as you can see some definitely look more "pinwheel" than others.  Higher contrast between fabrics is better.


This one isn't very pinwheel.  The fabrics are both too low volume-ish for the blades to stand out.  But I was able to use up a charm that had a big ole cross on it so that was good.  I'm not a fan of super religious fabric (like with crosses and that).


This one is definitely very pinwheel.  My shitty lighting doesn't do the color justice (of course).  The purples are really deep and pretty.


I thought this one would be cuter since it was chipmunks and some tree print but it's a bit too choppy to really stand out as a classic pinwheel.


My favorite.  It's super patterned but there's good light/dark contrast so it looks very pinwheel.

If I may brag, my points all meet up damn well, too.

While the tutorial is super simple, I did find I had to pay super close attention when I was pressing the seams on each piece.  Had to make sure they went in opposite directions so the diagonal seams would nest when I joined them.

Now I want to hack up all my 5" charms and make a super fugly pinwheel quilt top.  I also kind of what to try making super tiny pinwheels using some of my 2.5" charms.  That might not work out, but I think I will try it once just for shits and giggles.

Monday, September 22, 2014

For a Swap: Purple Dotee


It's for the rainbow/color series.  Purple this time.  For this series I'm doing patchwork for each doll.  I wanted something different so I used the bunny pattern I have (from the Fluff Project bunnies) which worked really well.


Tail in the back, of course.

I also figured out a smarter way to do the patchwork, too.  At least for these dolls where I trace the shape onto a double layer of fabric then sew right on the line and then trim it out.  I made a sheet of patchwork and then sewed the ends to each other to make a tube.  Then I could roll it around to find the best placement for the pattern piece because I really wanted to preserve this:


I just had to have that scrap whole on the bunny.  It's just kind of cool and I really like it.  Sewing the fabric end to end made that possible and I think I wasted less of the patchwork in the long run.

This one will get mailed out shortly.  I want to get one more patch finished then I can mail out this bunny, the two patches I showed off previously, and the new patch.  But I have to draw up my design for that patch, first.


Wednesday, July 23, 2014

I Made a Quilt!!!

Holy crap, just like that I made a quilt.

Not a full sized one.  It's probably what would be considered a doll quilt.  I made it for an art quilt swap and the only real requirement (aside from it being cat themed) was a size min and max.  I think the min was 6 x 6 and the max was 15 x 15.  Mine came in right around the max (didn't get an exact measurement on it, just held it next to my 12.5 square ruler and it was at least an inch larger).


I'm not 100% done with it just yet.  I think I'm going to add a few cat buttons and/or some small felt cats (on pin backs).  But I was so happy to get the actual quilt part done I had to show it off now.


I put my fabric stash and my new walking foot to good use.

I deliberately stash cat fabrics because I like them and I want to make myself a full sized cat themed quilt.  In fact, seeing how cute this one is, I might just do the same for my scrappy kitty quilt (only larger).

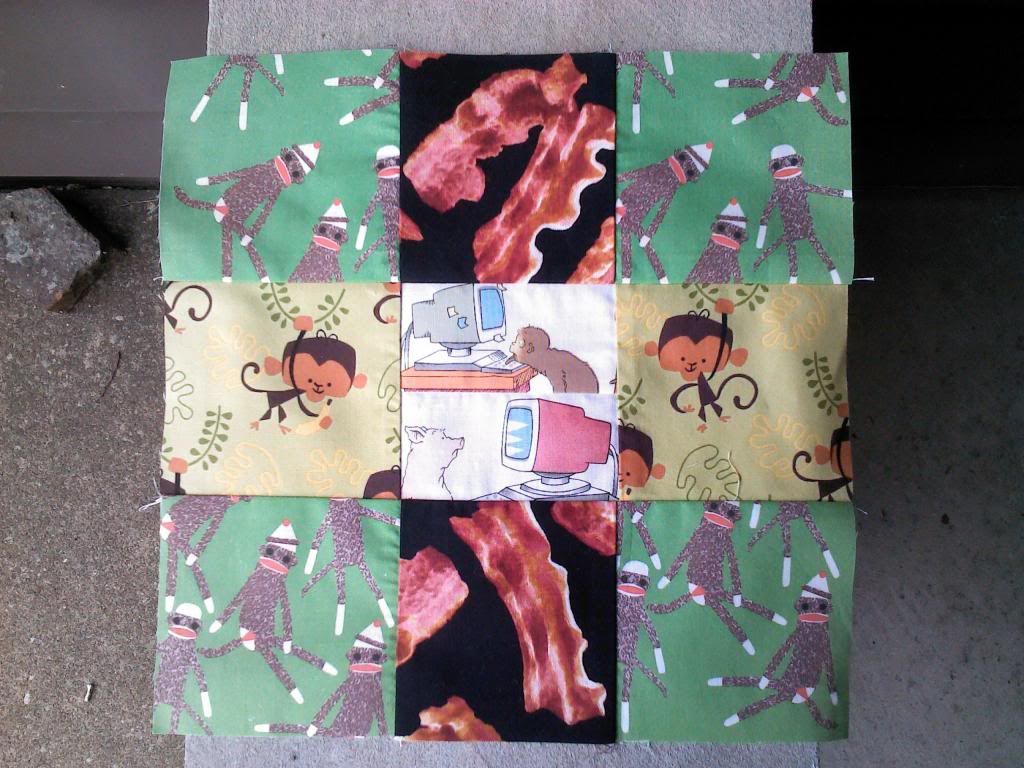
I used 4 inch patches and just did a generic light/dark checkerboard arrangement.  It worked out well because I had four of each light and dark.  I had a few other fabrics but they didn't quite meet the requirements.  One was christmas themed and a few were too busy (wouldn't make for nice small patches) and some were pink/blue based.  I do have this super funky fabulous cat panel set and I was *this* close to using one of the panels but I was in love with the idea of making a "real" quilt so I'm saving the panels for my own use.  I think I'm going to take each panel and make a little art quilt with each of them.


Ok, technically the fabric there in the upper right corner is a super light yellow.  Probably the lightest yellow I've ever seen.  But the pattern was perfect for small fussy cutting.  And SO CUTE.  It's so much more cute than I originally thought (and I thought it was super cute or I wouldn't have bought it).

The black cats in the upper left has been featured here before.  I used it to make a pouch and a dotee doll before.  I love that fabric and bought a yard of it back in the day and don't regret it.

The bottom left fabric is so adorable it gives me pains.  The cats are all little doodles based on the fabric designer/artist's fingerprints.  There are so many cute images, like a cat licking its belly and one cat rolled over on its back and you can see it's wee little nips.  So effing cute (and makes me jealous that I can't make super cute doodles like that).

The bottom right fabric was a whim purchase and it turned out to be a really nice quality fabric.  I just liked the stylized look of the cats.  They remind me of the porcelain statues you find in vintage stores (right next to the ceramic poodles!).


Top left fabric (fat black cats) has been featured before too.  I used it on a patch and the more I use it the more I like it.  The only negative thing about it is it's so dark.  The purple is really deep.

Top right and bottom left were from the same cat fabric buying splurge I had months ago (yes, my whole order from fabric.com was totally cat fabrics).  I like the Japanese feel of the top right one and the bottom left one reminds me a bit of the Happy Drawing books/fabric line.  Same kind of style to them.

The bottom right fabric is also a halloween print.  It's all the same black cat doing crazy and sometimes sinister things (like harassing a rat or tossing a bird in the air or just scowling).  I don't think it's from the Ghastlies line but it sure reminds me of it.

I'm so happy with how the backing/binding fabric looks, too.  I had pulled two different fish bone print fabrics (one white with black bones, one black with gold bones) but the first fabric I thought of was this yarn print.  The bone prints were just too light/dark against the patchwork.  The yarn was a nice neutral but still super cute (and busy, I like busy).

I just quilted along the seams, nothing fancy.  The binding is wrapped around and (if I may brag) the mitered corners look excellent.  I have to say, all the patch making really helped me with this quilt.

For future quilts (bigger ones) I'm not sure I'd do wrap around binding.  I'm thinking I want to try quilt as you go.  I think I'll do that for my (never going to be done) postage stamp quilt.  That might encourage me to work on it again.  I could practice my free motion quilting on each little section AND use up some of my oddball fat quarters (some of the fug-o ones I have that I'm wondering what the hell I'll ever use them for).

But first, I want to stitch up some stuff for the Fluff Project.  I'll show that off in the next post.

Wednesday, April 30, 2014

Fluff Project Update (and a quilt block I made)

Just some random stuff I'm either finished with or just about finished with.

First, the full on finish.


Sew at Home Mummy made a blog post about a friend who's doing a blog hop/block sharing project via their blog (confused yet?).  You could be part of the blog hop OR just make a block (or two) and send them to Erin at Sew at Home Mummy and she would get them to the person hosting the hop for inclusion into quilts she's making to donate to a cancer charity/hospital. (really, if you want the full story with all the details check out the above link, I'm just doing a fast and loose summary here).

SO. . .I made a pink block to help out with the charity quilt(s) this blogger is planning to make.

I was going to make a bigger block but when I started pawing through my stash I realized I don't have much in the pink family.  Wouldn't you know, back when I was doing that series of swaps for stash builders, I got flaked on for the pink.  At the time I wasn't that worked up over it since pink's not a big color for me but. . .since I only had a few FQ of pinks and they didn't really work well together I was about to just scrap the plan to make a block when. . .

I was going through my 2.5 inch charms (just playing with them) and LIGHTBULB MOMENT I realized I had some nice pinks in the mix and could just pull some of them to make a decent sized block and the problem would be all solved.

So that's what I did.  One block made from 2.5 inch charms.  I tried to make all the pinks go with each other.  I did try to alternate really light with darker.  I think it turned out well.  I really like the "faith/hope" text charm.

And, it was good practice for my postage stamp quilt (and made me want to work with it some more but I have so many other things that are more pressing to do first, like swaps!).

After I got the block done, it was time to give some attention to the Fluff Project.


Cute little girly girls!

I was really worried these wouldn't work out.  That they would look dumb or cheap when finished but they really look cute.


Gossip girl!

Look at the girl on the left trying to pretend like she's not listening.  Mmm, hmm.  We know you like what you're hearing.  (wonder what's being said!)


These ladies are a little better behaved.  Though the one in the middle looks a little TOO innocent.  I bet she did something naughty and we just haven't discovered it yet.

I just have to close up each of these dolls and then they are ready to join the bunnies in the holding box.

That will bring my total finished toys to 16.  Sweet 16!

I'm aiming to do 40 toys for this quarter's challenge so I'm doing well on that front.  I also have fabrics pulled to try and make some puppies and some dinosaurs (both My Funny Buddy patterns) but I need to do a lone practice of each one before I decide if I can do a small assembly line of them.  I think both will make the cut but you never know.

Tuesday, February 25, 2014

Wacky 9 Patch Quilt Blocks

Another swap DONE.


Set of wacky 9 patch blocks.

Two sets to trade, one for me.

The closeups are the ones I kept.


The pic doesn't do it justice.  The solid color is a tan but the woven looking print.  The dots on the purple fabric are about the same shade which pairs with the tan in the bigger dot print.


Again, the colors aren't popping due to my sad photography skills (and using my phone).  The rose print is a creamy shade which goes well with the book print (I used that one on a recent patch and pulls from the shiny gold accents in the music fabric.

All three of the fabrics on the music/books/roses block are from one of my more recent scrap pack purchases (perhaps the last one I got right before I went on my buying fast?  can't remember what store that one was from but the box was really good).

That's all I have today.

Tonight I start sewing on the pouches for this quarter's Hopeful Threads project.  I want to get that box out the door by the end of the week.  I grabbed up a big priority box when I was at the post office this morning, so I'll pack all the extras tonight and then just pop the pouches in as I finish them.  Can't wait to have that project DONE.

Then I have to work on an art doll and my multi-media curse project.  I know what I'm doing for my curse but the dolls is still up in the air.  We'll see what comes.

Friday, December 20, 2013

For a Swap: Holiday Dotee

Been a while since I've made a dotee.

I still love them but swaps (in general) are less this time of year so my dotee making has slowed, too.

This one was for a Holiday Dotee swap.  You just had to make a dotee that represented the holidays (to you).

I toyed with making a gingerbread man or a tray of little kawaii cookies (I almost went with with that idea but the thought of doing something so structured bored me--making the baking sheet would be boring sewing).  Then I started pawing through my mass of fabric and I was reminded of some great vintage Christmas fabrics I have.


So I had to take them and make some patchwork fabric.


See, those are some cute fabrics.

Then I had to figure out the face.  I started by making a felt/embroidered one but it just wasn't whimsical enough.  It was kind of scary/mean looking which was clearly not what I'm going for (though all my faces tend to look that way, what's that about?).  So I tucked it aside for some future project and in doing that I spied my pom poms and the rest is dotee history.

THAT face is what I wanted.  Cute and kind of silly and a bit wonky (the wonkiness was pure accident, the face went on a tiny bit crooked but once I saw it it worked with a little off center stitched mouth).


See, cute and kind of silly and a bit childlike.  And just covered with all things I think of when I think "holiday".  We have santa.  We have poinsettias.  We have ever green boughs and little berries.  We have toys.  And on the back is non-patchwork fabric that has a snowman and jingle bells and sleighs and snow and. . .yeah, holiday-a-rama.

Then I had to gussy the doll up so I added gold and silver and red and jingle bells and sparkle (tinsel hair?  yes please!).  I was *this close* to adding glitter but glitter is a hot button thing so I decided against it (I like it in rational amounts but some folks despise it and I get that so, I always err on the side of no glitter).


The fabric in the background is what I wrapped it in (and loosely tied it with a bit of the same gold ribbon I used for the hanger.


And last but not least, a little deer on the tail.  I've been wondering what I'd use this little cutie for and this was PERFECT.  You can't have "holiday" without a reindeer!  (and I finally used some ribbon I've had in my craft hoard for a long while, which is always a bonus).

I'm so happy how this one turned out.  It was such a refreshing change from what I've been working on.  Which is?  Potholders.  And last night those bad boys were giving me the business (hello seam ripper, my old friend) so doing this project first and having success kept me from having a tizzy of a tantrum when the pot holders got the better of me (well, the potholders themselves are fine, it's the bias tape binding that had me in less than a festive holiday spirit).

I'll show off the potholders (and some other christmas gift stuff I made) at a later date.  I need to get good pictures of it.  And I'm still not sure the potholders will make the gift cut.  I'm not totally happy with the one I finished so. . .we'll see!

Wednesday, November 20, 2013

Crafty Day: Quilt Blocks Galore

Yesterday I took off work to burn a vacation day (they collect so fast, I get to the point I have to use em or lose em) and I got my sewing ON.

First, I cut up four yards of fabric into fat quarters.  But that's boring so no pics.

Then I got some quilt blocks sewn for a few swaps.


First up, a round of crazy 9 patch.  The swaps call for two blocks to two partners.  These are the ones I shipped out (each set makes three, I keep one set).

I really like both sets but the lighter colored one is my favorite.  It's so low volume and modern.  I really like these blocks in general, too.  They're fast and easy to make and make a nice finished product.  It also helps me use up some fabric I otherwise would have turned my nose up at.  Like the brown blocks.  I really didn't like the floral print or the checks but together with that pastoral print and they work.  And using them in these blocks just about used them all up, so it's a win/win for me.

Next up. . .


Polaroid blocks.

The swap was two partners, two blocks each.  But I made an extra one for each partner.  It's really not that big a deal to make an extra, and I liked all these fabrics and wanted to use them for polaroids.  (they look really crooked in the pic but that's just the way I have them siting on the table, they really aren't made poorly).

I really love the opossum one.  That fabric still makes me laugh.

I'm still not sure I'm making this block right/well.  They always seem a little warbly.  Not exactly crooked but just wavy at times.  I think it's a combination of the white strips stretching a tiny bit when sewing and my seams no being pressed quite right.  But the more I make them the better I get so that's good.

Yesterday I also pulled fabrics for a set of green Teesha patches (and started figuring out what I want to do with them) and finished up some panel dolls (I'll show those off in a separate post--it was too dark to get pics once I had them done yesterday).

What's next?

Well, the set of green teesha's and then I HAVE to get the Teesha comic at least started.  I think that swap is stumping all involved since the hostess decided to move the ship date out to January.  I have a good idea but I really need to plan it out so I do all the steps in the right order to get a nice finished product.

Sadly, I don't think I'll get a baby quilt sewn for Hopeful Threads challenge this month.  November just zoomed by.  BUT, I will have something for the Fluff Project and I have a quilt in my craft room that I can re-gift to this month's challenge (I've been looking for a new home for it and this is perfect).

I also need to decide if I'm going to make something for my sister this year or not.  I have an idea but I'm not sure I've committed to it just yet.  I need to think about it a bit more.

OH, and I won't be having a giveaway this month.  I just ran out of time.  But I will have one in December (and might even participate in the Sew Mama Sew giveaway thingy).

Monday, November 4, 2013

Quilt Blocks

The last thing I finished up (sort of) this weekend.

It started out as pre-working for a swap but. . .


I don't think I made these quite right and I just couldn't get them "crazy" enough.

The swap was for crazy quilt blocks made with foundation piecing.  I got the technique down but the sizing may not be quite right.  The block on the left is definitely too small.  The finished block was supposed to be 12.5 inches.  But I cut my foundation fabric to 12.5 so once I got all the piecing done the block was too small.

Ok, no problem.  That could just be a practice block.  I didn't embellish it at all and cut out new foundation fabric (about an inch larger) for the next block.


That's the second stab at the block.  The size was right but as I was embellishing it I realized. . .I'm not good at crazy embellishment.  I added some ribbon here and there and some random embroidery but I didn't really want to add all kinds of buttons and stuff.  Because I had used wild fabrics I didn't feel like hiding them under a bunch of junk.

Then it sunk in that maybe I wasn't ready to participate in a crazy quilt block swap.  So I dropped the swap before it assigned partners (the host was taking forever to assign, which was kind of a red flag, too--best to just cut my losses on that swap).


Not that these blocks are "losses".  I love how they turned out.  I love this technique for using up scraps.  On a smaller scale, you really could use up some scraps.  These larger ones tend to make a bit more scrap than I like.  That's always been my beef with paper piecing (which this pretty much is just without the paper--I found the paper aspect of paper piecing super annoying).  But if these blocks were smaller they would be practical for scrap busting.

See that chipmunk there in the center?  Yeah, I was all about that fabric this weekend.

OH, and while I was pawing through my scraps I found two fun pieces to use for some polaroid blocks.  Now those I'm really enjoying.

Wednesday, October 9, 2013

For a Swap: TM patches ORANGE

I told you, I was super productive yesterday.  I got my Dios de los Muertos stuff done, cut a butt load of 2.5 inch charms (no pics of that. . .those are for a the swap that happens at the Curious Quilter blog), and . . .

I finished my TM (Teesha Moore) style rainbow patch swap.  This color theme was ORANGE.


Yup, lot of orange going on there!

All swaps in this series call for three patches in any size.  I'm still stuck in a square/rectangle vortex.  I may branch out to other shapes but for now I'm content to stick with the easier shape.


The "juicy" fabric was just folded over and then sewn down to the orange girl fabric.  It covers up some writing on the fabric (side bar:  I hate when super cute Japanese fabrics have to have advertising/branding writing on them, that's what the selvage is for, folks).  I didn't add many embellishments to either patch, just a bit of embroidery.  Had to put french knots on them (I swear, I use frenchies on every set of patches).  Then just highlight the lines on the bat's wings and add a line to the leaf on orange head girl.


This is my favorite of the bunch.  At first I was just going to make a flower patch and then make a bonus patch featuring a flying pig.  But then I realized the pig would fit on the flower fabric and it would look all cute like it was a bumble bee so. . .


There you have it.

The pigs and the wings are from the same fabric.  The wings are actually flowers from the pig fabric but I cut them and put them as wings.  Aren't I just so durn creative.  (and modest too!).

Again, I just did some very basic embroidery embellishments on it (mostly to secure the fabric to the felt and to give it a little pop).


Backing fabrics.  I love that carrot print fabric (it's the back of the "juicy" patch).  The bat and dots fabrics were both from the 12 lb fabric remnant box (so I'm counting this patch as part of the sewing challenge!).  The backing fabric for the pig patch is a loose weave kind of burlap feeling fabric.  It was a one of those $1.99 discontinued samples you can get at Joann's (or used to be able to, can you still buy those?)

So, what's next on the crafting agenda?

Those darn skeleton cats (well, at least one cat--I might just make one full sized doll instead of three little ones).  Then I need to make two sushi themed zipper pouches.  Then get some Fluff Project sewing done.  I finally decided what pattern I want to try out (MONSTERS!) and it looks like it will be a fairly straight forward project.  I'd like to have at least 3 monsters to send at the end of the month (ideally, three monsters and three ghosts--the ghosts should be faster to make).

Then I have to cut some yardage into fat quarters, make a few dotee dolls, and make a comic strip TM patch (but those aren't due until November, so let's not get ahead of ourselves).

Happy Sewing!

Tuesday, September 17, 2013

Made for Swaps: Dotee and Quilt Blocks

Time to show off some stuff I made for swaps.

First up, a dotee.


The title was Dotee with a Butterfly.  You just had to make sure a butterfly was prominent on the body of the dotee.  I received this fabric as an extra in another swap and it was just SO perfect.  The only problem was figuring out how to make the body.  I decided on a free form body that kind of ended up looking like a Shmoo.  I embroidered eyes on the face but it was just so flat.  Then I remembered I had a set of charms that are different glasses, so I added some sunglasses and that was it.  Perfect.

The flower on the front is a crocheted applique I also got as an extra (a while ago).  It just looked so cute next to the butterfly I had to add it.  That and the doll needed a bit of bling.  The tail features butterfly beads.  Overall it's not one of my most fancy dotees but I thin it's darn cute and a very "classic" style dotee.

Next up, Wacky 9 patch quilt blocks.


Hee hee, this is upside down (but you can still get the picture--double pun!).  I made two sets of three, but I'm only showing off the two I'm keeping.  No need to see all of them since one of each set shows clearly what fabrics I used.  Both sets are made from fabrics from the 12 pound fabric remnant box (purchased for the FY14 Charity Sewing Challenge).

For the record, I'm not a huge fan of civil war reproduction fabrics.  They're just so dull and matronly to me.  They do look nice together but I can't see myself ever seeking them out to make stuff.

The center fabric on the top block is very cute.  It's made to look like a cross stitch sampler.  I'm not a big fan of the other fabrics it's paired with.  Like I said, they go well together but on their own they are old lady boring.  As a whole, I like the bottom block the best out of the pair.  Each of the fabrics in the bottom block are nice on their own and they work well together, too.  And, the middle fabric is actually little tiny stars.  I think all three of these are technically christmas/winter fabrics but they didn't scream "christmas" to me so I went with them.  The flower print is the most "christmas" of them but the flowers aren't totally poinsettia so I think it will be ok.   (the only "rule" about these blocks is no blatantly seasonal and no religious).

Next up, Polaroid Blocks.


I only needed to make one for each of my two partners but I just couldn't bare to separate the cute kitties so I'm sending them both to my own partner (who really likes cats).  Also, the gray kitty one is kind of wonky.  I'm not sure if it really is constructed wrong (like the fabric was cut a tiny bit too short and then I used a tiny bit too big of a seam allowance or what) but overall the block is smaller than the others.  I think when the are all trimmed they can be made more even.  Good thing these are supposed to be sent untrimmed.

This was my first time making this type of block and it was super easy.  (maybe that's what's wrong with the gray kitty--it may have been my very first stab at this block).  The best part was, I have a butt load of 2.5 inch charms for my postage stamp quilt, so I didn't have to cut any of those.  Just cut the 1 inch strips (for the top and sides) adn 1.5 inch strips for the bottom and good to go.  The only "rules" for this swap were to use white as the edge fabrics and to not trim after you're done.

I'll be mailing all these out by the end of the week.  I just need to pack up the wacky 9 blocks and then cut some fat quarters for another swap so I can take a bunch of swaps to the post office at the same time.

Linked up at Cat Patches.

Monday, August 26, 2013

Quilt Blocks

I totally forgot to post this last week.

I'm in a recurring swap on swap bot where we swap Crazy 9 patch blocks.  I've been trying to use fabric from the 12 lb fabric remnant box.  Technically it's not "charity" sewing but I'm still counting it in the FY14 Charity Sewing Challenge.  (and for the record, charity sewing that I do out of my stash counts, too--but the focus really is to use that remnant box).

Ok, blah blah over, let's see the blocks.


The top block contains two stash fabrics and one remnant box fabric (the smaller dots are from the box).  The bottom block is all remnant box fabrics.

This set was for the second round of the swap.


This top block has two (I think) remnant box fabrics and the birds are from my stash.
The bottom block has one box fabric (I think the white is from the box) and two stash fabrics.

This set was for the first round of the swap (hence the fabrics that don't quite work--the animal/cowboy fabric one was the first I ever made of this type of block).

So, these represent round 1 and 2 of this swap.  Round three's fabrics have been chosen and cut and they're all from the box (and they coordinate really well).  I'll show them off once I have them sewn.

I just might have to include some of these fabrics in the next giveaway, huh?

Tuesday, July 23, 2013

Busy, Busy Weekend

Lots to show off in this post.  I was a busy little sewing bee this weekend.

First, I cut 5.5 yards of fabric into fat quarters.  That was all for swaps.

Second, I made a quilt block for a memorial quilt for the family of a woman on the Regretsy forums (who passed away suddenly).  I wasn't personal friends with her (Hermit the Frog/Hooker Monkey) but she did have a lot of personal friends on the site and her posts were always really funny.  Full of monkey gifs and just really fun stuff.  She will be missed.


Of course, lots of monkey images.  She also had a fondness for bacon (so needed some of that).  And in the center I was lucky enough to find an image of a monkey using a computer.  This came from some scrap fabric I've had for a while.  Remember that box of scraps I won about a year ago?  That huge box of scraps and "I Spy Quilts" book?  Yeah, it's from that.  And it was the ONLY monkey image left.  It was right on the cut edge and I was worried it would just fall apart when I washed the fabric (I normally don't pre-wash but for this project it was a must).  So I went out and got a lingerie bag to wash my pre-cut fabric.  I used the trick of pinning the small pieces together with a safety pin.  I took the long strip with the monkey image and folded it over before pinning it, so it wouldn't be able to flop around as much and unravel.  Then I used the gentle setting on my washing machine.  I had very little fraying from any of the fabric.  (oh, and I used a color catcher sheet--love those--but nothing ran).

The green sock monkey fabric is from a fat quarter I've had in my stash for (no exaggerating) years.  It's a Heidi Kenney FQ from Spoonflower.  I paid a premium for it so I was always waiting for the "perfect" project for it.  I'm so happy I had it waiting for me.  This was the perfect project.  And I still have some left over (though it's a bit creased in spots).

Last but not least, I sewed up a mess of fabric bags.  EIGHT to be exact.


Those four are already sold.  Remember that bag I made for a Regretsy swap?  Well it was a hit on the forums and some other folks wanted some.  So I bought some more Star Trek fabric (got it on sale!) JUST to make bags.

Those were $6 each plus $3 domestic shipping.  Not super profitable for anything but that wasn't really my goal.  I just wanted to make back what I paid for the fabric and make a tiny bit for the time it took to make them.  I'll use any "profit" to offset the cost of any charity sewing I do (I'll be sending a box of stuffed toys out next week--got to get cracking on that).


These are left over.  I'm going to save them for now.  There's rumblings there might be a charity sale at the Regretsy forums so these will be great for that.  I still have a yard of each fabric, so I could make 8 more bags (each bag takes a half yard).

Last but not least, I bought myself something super cute and it arrived yesterday (when I was making bags).


EEEE!!!

How freaking cute is that cactus!!

He comes out of his pot, too (he has great spindly legs!).

I'm so happy I bought him.  I got him from a Regretsy person.  Check out her etsy shop HERE.

It was a great (long) weekend.  I love taking a day off from work just so I can sew.  Now it's time to head over to the post office and mail out a sack of swaps.