Showing posts with label 2015 Fluff Project. Show all posts

Monday, November 30, 2015

2015 Fluff Project Goal: MET!!

I just wanted to make this official (even though I know I showed these items off before).

I MET MY 2015 FLUFF PROJECT YEARLY GOAL

I set out to make a minimum of 5 items each month and a week ago (or so) I mailed out two bags of items which marked the completion of my 2015 bare minimum goal.


I got back up mailing stuff out but those two pics show my quota (plus a few extras) for September, October, November, and December.

I feel like I cheated for December because I made the pickles and they were SUPER easy, so I'm working on a few more (more involved) items for December.  I have three gingerbread men in progress right now so I want to (at bare minimum) get them done by the end of the year.  Then I'm going to make a Fluff Project year in review post and give a grand total (I know it's over quota a bit but not a ton).

I'm also hoping to get a few of the Ric Rac guinea pig pattern guinea pigs done for Fluff for December, too.  I'm set to make a pair for my friend's girls but if the pattern proves too fussy, I'm not going to push to get some made for Fluff (for this year).  I'll save the pattern and make a few for Fluff next year.

I have so many patterns I want to get to making, I'll have plenty to keep me busy for 2016.  (lots of Dolls and Daydreams patterns. . .they just had a sale and I snagged three more patterns from that).

Monday, November 16, 2015

Sewing for Charity: Softies for Mirabel and Fluff Project (updates!)

I've kicked it into high gear to make sure I have something to send to Spoonflower for their Softies for Mirabel drive.

Here's what I have so far:


Sweet and sour pickles!

It's a free pattern courtesy of While She Naps' Abby Glassenberg.  HERE.

The original pattern was for felt with french knot bumps and felt eyes.  I mixed it up a bit with textured fleece/minky (got it in the remnant bin and it made 13 total pickles and there is a bit still left over--my first test pickle is not shown here but it turned out great so it's part of the donation pile)

I also subbed out small safety eyes and then did embroidered mouths.


Half dozen for Softies for Mirabel and half dozen for Fluff Project.  The extra will go to Mirabel (yes, I was tempted to keep it but these are so easy to make I could make more for me any time I want so no need to keep the tester since it turned out perfect).

More pics because I can (the color is a minty green despite what these pics show--I still have horrible lighting in my kitchen and I'm too lazy to make a light box and all that shit).


Holding it in my hand to show the size.  It's small but even with the small size was not hard to sew at all.  The pattern is three pieces (to get the good shape) which had me worried it would be a pain to sew (more dimensional stuff can be a pain in the ass and when I want to assembly sew for charity sometimes I prefer patterns of least resistance).  I was also concerned the eyes wouldn't fit but they did.

TIP:  Put the eyes on after you sew the pickle but before you stuff.  That's not normally how you put on safety eyes but since this sucker is small, the stems of the eyes would get in the way.  And you won't have to fight with them getting too close to the edge.  That's a super pain in the ass when you're making something and the safety eyes are already on and when you're trying to do the seam the eye is all in the way.  No, just no.  Put the mouth on after you stuff but before you close (so you can best hide the knots).


Pickles aren't the only thing I'm up to.

(I'd like to note that since I made 6 pickles for Fluff Project, technically I've met my five stuffed toys for December goal AND met my yearly goal, too. . .but I still want to make some other stuff for Fluff if possible and I've already started on something else for Fluff).

I've also been cranking out stuff JUST for Softies for Mirabel.


I got all that done this weekend.  The crabs (also an Abby Glassenberg free pattern. . .I think I forgot to link it before so HERE it is--I make mine with quilting cotton not fleece but that's my only change--I just don't like fleece for small fussy pieces since it stretches a lot and annoys me).

The snail is one I've done for Fluff Project before, so the TWELVE here are all for Mirabel.  I'm going to googly eye them all since I love that look.  Now I just need to close the crabs (then they are DONE) and finish up the snails (close the bodies, put on eyes and mouth, and attach shell to body).


"Mom, hurry up and leave the room, I want to nose around in that scrap bin and see what I can find to eat!"

Yes, Murray likes to dine at the scrap bin buffet.  Butt.  I have to dump it every time I sew (or make sure there isn't anything desirable like long pieces of thread or crinkly plastic or paper or cardboard. . .you get the idea. . .in there).  I can only leave a few fabric pieces (not bits, they have to be larger pieces, I like to save them to test my machine when I have to change thread) in there since that's the only thing he seems to not care about, though he'll still get up on the table and rummage about.  I think he's part raccoon.  OH and I have to cover everything too, especially if there are little bits cut out.  If they don't actively cart them off, they'll push them off the table and play with them (meaning they get lost) or just generally get into shit.  Cats, gotta love them.  (or just not have them because you're never going to win with them.  Never.)

Friday, November 6, 2015

FLUFF PROJECT: October and November DONE!

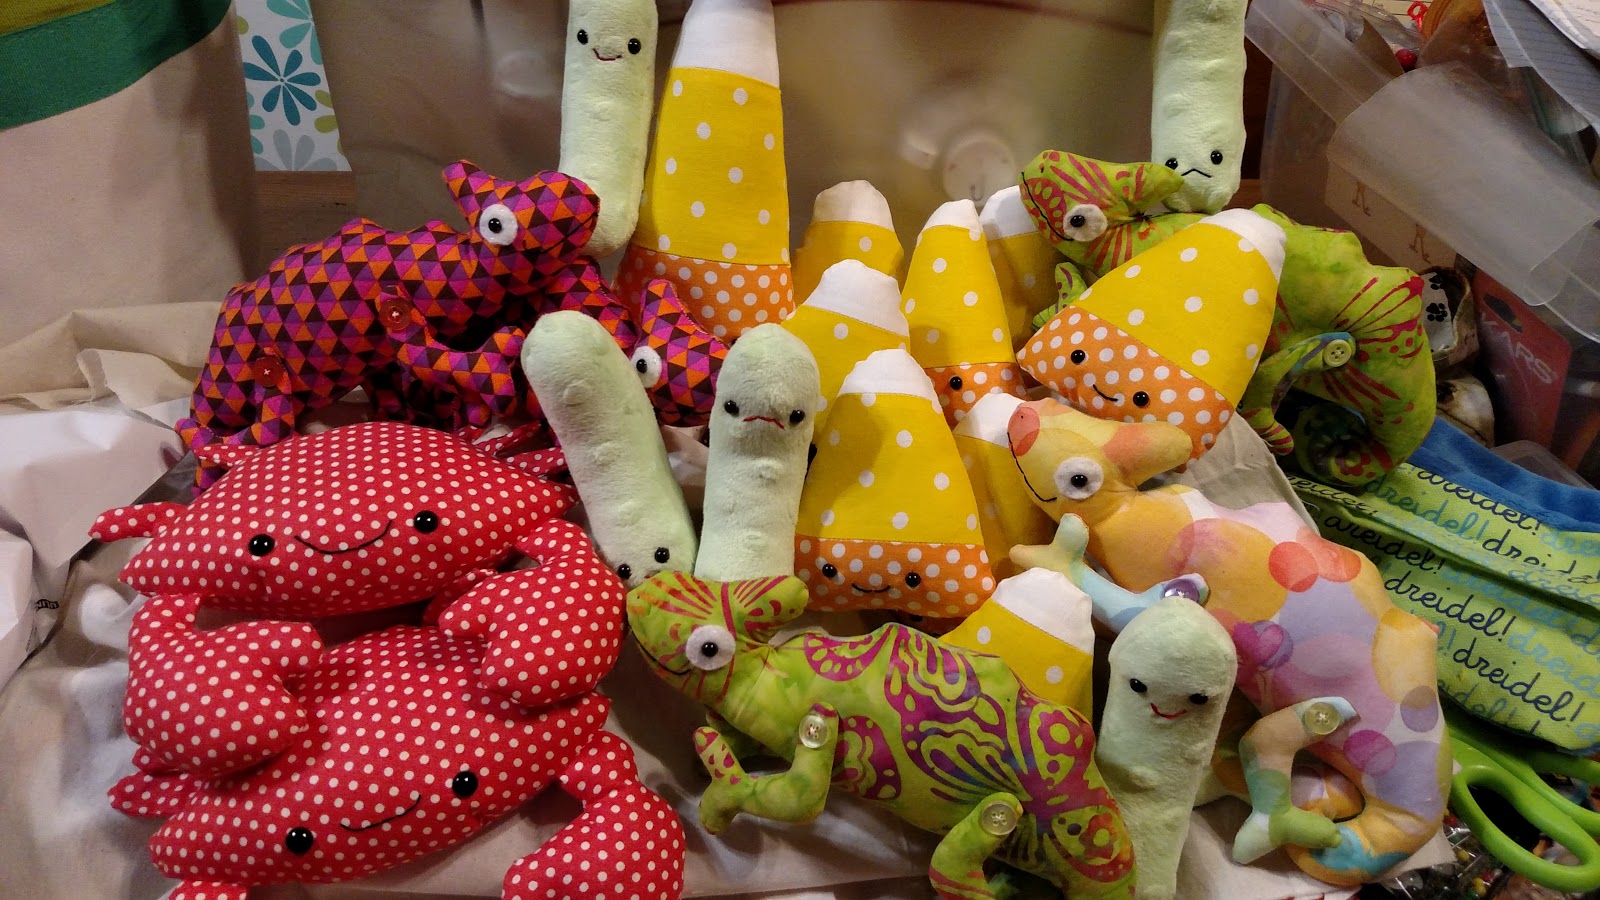
Holy crap on a cracker, I'm AHEAD on Fluff Project stuff.  Yes, I finally got the crabs and the chameleons done so that gets me all caught up.

Blah, blah, blah, pics or it didn't happen.


Crabs and chameleons attacking my sewing machine!


Aww, too cute to eat.

Yes, yes, yes, I know my quota is five items a month and there are only four crabs here.  Rest assured that after I took these pics (and realized I failed basic counting *headdesk*) I sat down and made ONE CRAB straight through.  Yes, I actually completed a project (every. step. even closing it up!) in one go.  It was shocking, trust me.  So I DO have five crabs (but that last one just didn't want his pic taken!)

Chameleon close up time.


Looking all innocent as they crawl all over my sewing machine.


Get down here you naughty lizards!

I was so tempted to keep the first one of these I made (still might!) but I wanted to have five for Fluff so unless I make more chameleons (which I'm thinking about doing for Mirabel) then there will be no chameleons for me.  If I do keep one, it will be one of the green batik ones.  I really love that fabric for this project.

Speaking of fabric, again I have to point out that my crazy fabric stash made these wild chameleons possible.  They also made the variety possible.  Since I have a lot of fat quarters in my stash, small projects like these are perfect.  If memory serves, I can get two chameleons from one FQ (with some left over but I don't think enough to make one full toy).  Since I don't (as a rule) hoard batiks, I can rid myself of them in the perfect way.  (yes, I said rid myself of them.  I still don't like batiks much even though time and again I've used them for projects I love including not only these chameleons but some other fluff toys and the backing of my Ollie Memorial Quilt. . .yeah, what's up with that?)

Now I just need to make December's Five for Fluff and I've met my yearly goal (actually, I'll have exceeded it by a few since I made some extras here and there).

BUT. .. I need to get the stuffies for Mirabel done (and mailed before December 1) first.  I think I'm going to see how many crabs I can get out of the last of that polka dot fabric (I'm guessing at least 3).  Then I want to double dip and make some bacon and eggs (and take pics as I do so I can get that long neglected tutorial done before the year is up).  I also want to try out this idea I have for pickles.  I have a promising pattern but it was for a felt pickle and I want to use fleece so I'll have to see if that will work out for me.  But first I need to make my final decisions on what I'm doing so I can put together a felt order.  I need black felt so I'll just go through and see what other colors I could use (because paying shipping just for one color is nuts).  I know white will be on the list, too, since it gets used a TON.  (hmm, I also want to make some more jelly fish, too. . .maybe I'll do that first since those are pretty easy. . .and the stuff to make them is already at my work table).

Ok, that's all I got for now.

Thursday, October 8, 2015

Fluff Project: September Items DONE!

Yes, yes, it's now October but I didn't show off the September offerings for the Fluff Project.  Why?  Because I didn't have them totally done until last night.

True confession:  I don't enjoy ladder stitching toys closed.  It's not hard but I just don't like it.  More to the point, I don't like STARTING it.  I'm fine once I'm in the middle of closing up a bunch of stuff but getting started on that step is just a huge hurdle for me.  I probably have some kind of hang up about actually finishing a project or something but I don't feel like psycho analyzing it.  It's just how I am so I have to just live with it (and "force" myself to do the last step).

Blah, blah, blah, SHOW US THE FLUFF!!!


Candy corns, y'all!

NINE candy corns.  Woot!  I love going over my 5 fluff minimum requirement for the month.  These little buggers were easy (once I got the size of the strips all set and fiddled with the pattern so the corns weren't too pointy or sagged in along the sides--fatter is better on the pattern).

You'll notice one of the corns is not like the others.  He was a test corn that I deemed acceptable to donate but I didn't like that style so I re-worked the pattern to make a more stumpy corn.  It felt wrong to waste this corn just because he's a different shape.  I do not body shame my candy corns, thank you very much.


Orange ones and. . .


brown ones, just like the real thing.

ONLY CUTER!


Super simple "pattern", too.  I got the basic idea from the internet (shocking!).  Then I just had to figure out the size of each of the different colored strips for the size of the body template I ultimately decided on.  I had to draw the body shape a few times to get it the way I wanted.  If you plan to draw up one yourself, I recommend you make your body shape "fatter" than you think you want.  I noticed when I drew it exactly like I wanted the finished product, that finished product turned out with sunk in sides (like bowed in) which made the points all funky.  So make the sides a little more bowed out then you think will work and then you'll get a finished corn that's almost straight (to slightly bowed out) on the sides which is more like a candy corn.

Here's the kicker.  I think I may have lost the template I used (which had the strip sizes on it).  I don't think I tossed it, I bet it's just in the random pile of paper/cardboard templates I have.  I need to find it so I can officially make a nice pattern piece from cardboard for this (and write down the strip requirements right on the pattern).

I may make a few more of these once I get the chameleons and crabs done.  I have just a little bit of that yellow left so I'm tempted to make corns until I use it up.

What's up next?  Well, finishing those chameleons and crabs (that will be for October and November's offerings).  Then I want to make something Christmas themed.  I have an elf pattern I've been keen to try and a gingerbread man.  Maybe a couple of each of those.  Hmm, maybe christmas candy corn?  Who knows!


Tuesday, August 11, 2015

Fluff Project: July/August DONE

I did a double up on the Fluff Project again.  July and August together.

I made five mermaids and six snails.

Ladies first!


All the single ladies. . .all the single ladies!

(this is a free pattern from Blue Whimsy

Selfie time!


I wish I'd been brave enough to set the pony tail higher on more than just this blue haired gal.  It's a great look.  But maybe it is better that only Blue got it.  It makes her extra special.


Purple was the first mermaid I finished.  She's just so matchy/matchy.  Very prim and proper.


Green hair is bright and fun.  Her tail/body color just reminds me of goldfish.


Brown/red hair is super cute (I have a weakness for the redheads, I won't lie).  It's not just her reddish/brown hair, it's her body/tail fabric.


Peek-a-boo, I see you!  With just a bit of fussy cutting you get a walrus on your tail.  Koo-koo-ka-chu!


NARWHAL Y'all!  See why I really like my redhead girl?  (and what about that wee birdy on the back of her tail, too freaking cute).

Last but not least is the fanciest of the group, Blondie.


Yeah, her fabric is styling!  Look at that octopus peeking out on her tail!


There it is again on her back.  Blondie looks all sweet and innocent, but piss her off and she'll unleash the kracken.  LOOK OUT!

I really like this pattern.  It's fairly simple and makes a nice sized toy, not too big so you can use fat quarters to make it but not so small you get annoyed sewing it by machine.  My only problem (and it's mine, not the pattern) is with the light colored skin fabrics.  I think I need to put some stabilizer on the back at the face to help block out the stitching.  The really light fabrics show the floss tails (even when I keep the tails tiny).  Live and learn on that one.  (I'll have to try using a double layer of fabric or putting a stabilizer, next time)

Next up. . .snails.


Another free pattern.  I've made this pattern before for a swap, so I knew it was easy.  I wanted easy this time around (so I could mass produce).

These little buggers are small enough you can use scraps on them.  In fact, most of the fabrics here were from my scrap bucket.


Blue shell and love snail were from scraps.  The middle snail's shell was from the same fabric I used for the orange tail mermaid.  It was a large scale print that looked hand dyed (might have been) and had a lot of large patches of different colors.  I got it in a remnant/scrap box and it turned out to be perfect for a lot of projects.


Orange shell was from scraps (and the body was from the same fabric as green shell snail and orange tail mermaid).  Guitar snail (aka Slow Hand) was from scraps (body) and some gifted fabric from Kristy (who runs the Fluff Project).  Flower snail's body is scrap (yes, same as Slow Hand) and so is the shell.


It's actually two different floral prints.  I didn't have enough of either of them to make a full shell but they work very well together.  I was worried Flower snail would look too "old lady" but once I slapped the google eyes on that feeling was long gone.  Google eyes make everything fun and kiddie centric.  The original pattern has the face all on the body (with the nubs as horns) but forget that noise.  Snails need eyes on stalks.  End of discussion.  So, these snails are NOT baby safe but screw the babies.  They get everything.  Lets make toys for kids who know better than to gnaw on everything, right?  Right!  But if you're all about the babies (poo on them!) you could make this without any face at all and it would still be cute (but not as cute as google eyes, so take THAT, you spoiled "gonna choke on that!" babies).

Ok, enough baby bashing (for now).  What else am I up to?  I'm finishing up my quilt for the Pets on Quilts contest (my cats are "helping" a lot which means I have a very hairy quilt, not that I'm worried about it, it's going to get hairy no matter what if it's in my house).  Then I need to focus on some swap items (which includes an art doll where I just might paint on fabric--reading up on that process now) and then make some medical belts for my pops.  That's a super boring project (what? it is!) so I'm not super interested in it.  I know once I get into it I'll be interested but it's just not interesting in the beginning (and I have time sensitive items to get done first).  Then I need to start thinking about the next round of Fluff items.  I'm thinking candy corn and. . .crap, I forgot the other idea I had (good thing I wrote it down on my chalkboard at home).  And I promise I will get that bacon and egg tutorial up someday (maybe after the quilt and a few swaps. .. so maybe this month).

Friday, June 5, 2015

Fluff Project: May/June DONE!

Guess what?

I didn't make mermaids for May/June (like I thought I was going to).  So I've pushed them back to July.

BUT. . .I did get May/June done.


Bacon and eggs!

That's one big breakfast right there.

We need some portion control!   (sing that to the tune of Prince's "Pussy Control". ..aaah, portion con-trol!)


Cute little sets!

Or, if you're watching the waistline, a small breakfast?


Though who really eats only ONE strip of bacon?  I guess if it was as big as this bacon one would be plenty.  (bacon is roughly 12 inches long or so)

Both bacon and eggs are original patterns.  Super simple, too.

The eggs are just a circle (used a drinking glass to get a good circle) cut from yellow fleece.  Add a face (eyes are felt, mouth is embroidery).  Using the circle as a guide, free hand draw the egg white portion onto the back of the white fleece and cut out leaving a seam allowance around the drawn line.  Sew the yellow circle to the cut out white part (lightly stuffing as you go).  Then sew the cut white part down to another piece of fleece (right sides together).  Trim and turn the whole egg right side out.  Then top stitch the around the yellow circle and hand stitch the opening closed.

The bacon I had to make a template for (after I made one free hand and the fat stripes didn't line up like I wanted them too--but it still looked good but not how I wanted it to look).  From cardboard I cut a wavy line.  Then I used the cut off bit to make the same wave on the other side of the bacon.  Then I used the cut bit of cardboard to make a fat template (so the wave on the fat would match the wave on the meat).  Cut out two meat (red) and four fat (white) paying attention that you're cutting mirror images (so the waves line up properly).  Top stitch two fat stripes to each meat piece.  I did one side completely and then the other (so I could make sure the fats would line up as best I could).  When spacing the fats, make sure you don't put them too close to the edge of the meat (don't want the fats getting caught in the seam).  Pin a lot so the fats don't shift on you as you top stitch.  Cut out two felt eyes and sew them to one of the two meat/fat pieces (I just pick the nicest of the pair), making sure the eyes won't get caught in the side seams.  Add the mouth.  Put a face side and a blank side together (right sides together) and sew leaving an opening to turn (I left the opening at either the top or bottom between the fat lines).  Trim and turn right side out (making sure to roll the seams really well to get them as flat as possible so the wave shows).  Pin along the fats so they line up as best as possible then top stitch down both sides of each fat wave.  There will be a lot of bulk at the  ends, so you can stop before the thick seam bulk if you want.  Hand stitch the opening shut.

Fleece works GREAT for these.  Felt would be a bit too rough and stiff.  Fleece is also good price wise.  You can find decent pieces in the remnant bin but even if you have to buy it it's not expensive.  Felt (I like wool blend) would get pricey.  I'm sure fleece has a right and wrong side but for these I like having the fuzzier side of the fleece as the "right" side.  That light fuzziness adds to the cuteness a LOT.

The eggs are super fast to make.  The bacon takes a bit more time (to get the fats all lined up nicely) but they're not time consuming either.

I had a first making these, too.  I broke a needle.  Scared the crap out of me but didn't cause any issues (just turned my machine upside down and shook the piece out).

I'd love to make more kawaii food for the Fluff Project.  My sister says, "TOAST!".  That would be cute (with a little pat of butter on it that has the wee face!).  But toast would involve so odd sewing (sewing "walls" where you have to attach a long strip to a flat piece) which I'm not keen on fussing with right now.

I'll mail these out before I go on vacation and then I can get down to making the mermaids I said I'd make!

Wednesday, May 6, 2015

Fluff Project: April Items DONE

Ok, technically I finished them a few days ago (in May) but I'm not going to lose any sleep over that small fact.

For April, I made teddy bears.


Six teddy bears, to be exact.

They're all from the same fabric which was about a yard of brown flannel (with a slight mottling to it) I scored at the Salvation Army fabric sale.  It's a special event the sal army has where they sell JUST fabric and notions.  It's just this side of crazy (they only let so many folks into the building at a time and there was a big ass line) but an organized kind of crazy that works for me.

Did I mention I got the fabric for about a buck (or maybe a buck and a half).  So, say, $1.50 for enough fabric to make six stuffed toys.  The felt on their faces was cut mostly from scraps and the stuffing, thread, and embroidery floss I always have on hand (so I never really factor it into charity stuff).

These six bears are joining all the other stuffies I've made so far this year.  I put them all in one box (a box from the big ass bags of stuffing I buy!) and hope to get them mailed on Saturday.


"Hey, mom, what's this?"

*sigh*  Murray, you're not supposed to be on any of the tables let alone the one I'm sitting at trying to work.

"Well, what is that?"

It's a brush to get your hair off everything.  You shed like it's your life's work.  Just being this close to the toys will have them sprinkled with hairs.


"You mean THOSE?  Yeah, I got my hair on those.  You'll need to use the brush on them again.  Probably twice before you put them in the box.  Oh, and Eugene chewed part of the box."

Yes, I noticed that.  You are both ever so helpful.

YES, I have to lint roller every toy I finish because Murray's hairs are everywhere.  Even after a good rollering I'm sure they still end up with at least a few hairs on them.  Hey, I'm a crazy cat lady.  That's the price you pay when you have cat children.

And Eugene really did chew the box I'm mailing them in.  There were handle holes (with little flaps that can get pushed in to make the handle holes) and Gene chewed the crap out of one of the flaps.  Or maybe it was Murray?  Safe money is on Eugene for that one.  He loves to chew cardboard (the thought of that makes my teeth want to crawl out of my head).

So, what's on the Fluff list for May?  I have no freaking clue.  I'm tempted to revisit one of the baby friendly patterns I have (like the little horses or dinosaurs) because I can churn out a lot of those really easily.  I just need to go up to my craft room and thumb through all the patterns and see what strikes my fancy (but I really think a super simple one is going to win).

Tuesday, March 31, 2015

March Fluff Project: DONE

Yesterday was a sew-cation from work (I routinely have to use a random vacay day or risk not accruing more vacay--can't be missing out on paid time off work now can I?)

So yesterday was earmarked to finish up the March Fluff Project sewing I'd been lingering over for some time (I swear, I cut these out at the beginning of the month and there they sat on my table until yesterday).


There they are, the catch of the day.

Three whales and three sharks.  I'm such a good fisherwoman!

Well, Jodie from Ric Rac (or jodiericrac on instagram--I'm all about the instagram lately) is the awesome fisherwoman.


She gave me a free copy of her latest (still not yet released) pattern.

She was showing it off over on instagram and I commented (to Kristy of Hopeful Threads) about how it looked like a great Fluff idea and didn't Jodie go and hook me up with a freebie when she heard what the Fluff project is.

How's that for being a super great person, huh?  Big giant THANK YOU to Jodie for a great pattern.

Since I'm talking about it I'll do a bit of a review of it.  First, it's definitely beginner friendly.  It explains how to the do the embroidery on the faces and all that (which you might not get on non-beginner patterns, they'd assume you knew how to do that).  The pattern is nice and big which is great for a beginner but it also works well if you shrink it a bit (print it scaled to the page instead of spread out over the page).  I showed off a shark I made using the smaller size and it turned out great (didn't do a smaller whale).

The only problem a beginner might have (and this would only be if they were a super "never sewed anything before" beginner) is with easing the curves.  The curves aren't severe, but there is a nice wavy one on the sharks side that you have to ease a bit so you don't get folded puckers.  And sewing the bottom of the whale to the top takes a bit of easing, too.  Again, not that big of a deal but if you were a totally raw beginner it could be frustrating.  I know I'm not a raw beginner and I find easing to be bothersome until I get the feel for it again (I have to do a practice one to get the feel then I'm good).

All easing aside, all my water loving friends turned out GREAT.


Whale PILE!

You can see these really are a good size.  Not huge but definitely a nice big size which makes them not only easier to sew but also super huggable.

I loved picking out the fabrics for these.  This is where having a decent stash paid off.  The only thing I had to buy for this project was some more safety eyes.  And that was only to make sure I didn't run out (so I bought extras to re-stock my eye stash).


This one is totally batik.  I didn't do a contrasting belly/under fins for this one and it looks really good.  I'm still not a huge batik fan but they have turned out to be very nice for stuffie projects.  Maybe someday I'll really love them but that day is not today.


Bad photo (dark) but this blue is lighter than it looks and the paisleys are dark.  On its own, this fabric was heinously ugly.  But used for a stuffie it works well.


This fabric is brighter than it looks here.  I had to do a pink mouth so it would show up!

Next, the sharks!


I stuck with gray/dark colors for all of them but I think for the next round (I do think I'm going to do another set of these for April for the Sew Mama Sew toy drive) I'll get more colorful.


Composition book cover fabric.  I really love that fabric.  I had a half yard of it and between this shark and the kitty I made with it, it's getting used down really well.  Who you gonna call?  Stash busters!

I did something weird when sewing this one (not sure what) so he has a bit of a pronounced nose.  I kind of like it.  It makes him look even cuter.


Stripes and polka dots, together at last!

I was bored of plain white for the bottoms so I had to mix it up a bit.  I used solid white on the composition book cover shark because it's a dingier shade (off white) so the polka dots didn't look right against it.  But the dots look great on the lighter gray sharks.


This fabric was MADE for sea loving critters.  This shark just looks so proud of himself.

SO. . .now I have a garbage bag full of fluff I need to mail off to Kristy.  I think I'll do that in the next week or so.  It makes sense to mail every three months or so, so critter aren't hanging out in my house tempting my cats to get hair on them.  (for the record, I use a lint roller on every toy before I pack it up and I store them in a sealed bag while they wait--but my white cat Murray sheds like he's getting paid by the hair to lose it, so hair does get on them a bit despite my best efforts).

What's next for Fluff?  Well, I need to pick out a pattern for April.  Hmm, I wonder what I haven't used yet. . .