Friday, October 30, 2015

For a swap: OTT Halloween/Fall theme

I love OTT swaps (that's one tiny thing).  You have to make one item that's 4 inches or smaller based on the theme.

Since it's Halloween season, I had to do a Halloween OTT.


Wooo-oooh!  Haunted graveyard!


I love this silly little thing (even though the fake turf has a smell to it, like tires but not overpowering)


Felt tombstones with embroidered RIP, lightly stuffed and sewn (by hand) to the fake grass.  I was surprised (and pleased) the grass was so easy to sew through.


Two tiny ghosts haunting the place.  They aren't attached (and I almost lost them while I was making this. . .and of course the cats were all about this project between that fake grass and wee little felt things, Gene was convinced this was for him, as all things should be).


The lawn is 4 inches square and the tombstones are around 1 inch high.  I machine stitched (with a zig zag) the grass to a piece of soft green fabric from my stash.  It's plushie-ish fabric that I've used for things before.  I just didn't want the ugly back of the grass showing (along with my stitches) and I thought the backing might help stabilize the grass where I had cut it.  It was fraying a tiny bit (and leaving rubbery crumbs).

If I would have thought about it a bit more (I got this one done last minute even though I had the idea for a good week or so) I would have gotten an old coaster or some cork for the backing and just hot glued the cork to the grass.  A backing really is a must to help the grass lay super flat.  It was a small roll I got in the dollar zone at Target and this is the first chance I've had to use it.  I think I might need to make a TM style patch with some of it now that I know what it's like to work with.  I think if I sewed it to the batting first, then attached embellishments through the grass/batting combo it would be plenty sturdy (not a lot of crumbs).

I also made an itty bitty (2 inches) ghost for another swap but forgot to get a pic of it. It wasn't super fancy but it was cute.  I love tiny plushies.

What's up next?  I have three Disney theme patches to churn out this weekend and then (finally) finish up some Fluff Project items.  I only have one more crab to close up and one more chameleon.  Then it's just attach legs to the chameleons and add their mouths/nostrils.  If my calculations are correct, the chameleons and crabs should have me all caught up so all I need to produce is my quota for December (5 items).  WOOT!

Speaking of charity sewing, I want to make a few things for the Mirabel Foundation.  I've heard of them before but they're in Australia so the cost of shipping something to them was just prohibitive.  BUT, Spoonflower is acting as a collection point for them (they are stateside) so I should be able to put together a few things to send to them.  Ooh, maybe I should double dip and make some bacon and eggs (and get tutorial pics while I do it).  Hey, hey, hey, that's a great idea.

Time to get sewing!

Friday, October 23, 2015

For swaps: Two stuffies!

These are both going to the same person.  I love when I can do that.

Fall/Halloween theme ninni


Candy corn ninni!

I was still in a candy corn state of mind when I made him.


Stars in your eyes?  NOPE!  Jack-o-lanterns!

Super simple ninni but I like the way he looks.  Simple doesn't automatically mean "cop out".

Next is the stuffie for the Day of the Dead Sugar Skull swap.


BAM!  Made that pic nice and big (yes I did).

Can I just say, I love this face.  It's cute but not overly cute.  It's also just a tiny bit wonky so it definitely has a handmade look to it (his nose is a bit off center. . .hell, everything is just a bit off center).

He's felt with embroidery, sequins, and beads.  The nose is fill stitch as are the pupils of the eyes (the yellow under the flower sequin).  The purple on the eyes is felt held down in the center with the fill stitch and then around the edges with looser stitches.  So the felt does curl and wave a bit which is what I wanted (I wanted the eyes to be very flower like).

And. . .the back.


I couldn't just leave it blank, now could I?


I'm not religious but for some reason I do like the burning heart of god imagery you find on sugar skulls and skeletons for Day of the Dead.  The heart is felt (stitched on) and the flames are all fill stitch.  I'm still getting the hang of getting the best direction when it comes to large swatches of fill stitch.  You can see the orange is a little goofy (on the left side).  Should have gone in the other direction (like the right side).  But I'm still super happy with how it turned out.  I went back and forth on adding something to the heart (you see thorns wrapped around them a lot and sometimes a crown) but I wasn't sure I could pull it off (and have it look like actual thorns) so I decided to quit while I was ahead.

The skull has blanket stitch around the edges and for the life of me I can never remember how to do it.  I have to look it up (sometimes multiple times) every time I do it.  Which isn't often (which is probably why I haven't committed it to memory).

The whole skull is 5-ish inches (bit wider at the widest spot, bit shorter along the narrow part of the jaw).

I think my partner will dig it.  I know I do.

What else am I up to?

Well, I'm traveling this weekend so I decided to drag my Fluff Project items along in the hopes I'll close them all up.  Then I just need to attach the legs to the chameleons and add their mouths and that whole pile will be DONE.  Then I need to work on some swaps that need to go out by Halloween.  Good times!

Thursday, October 8, 2015

For a swap: Merit Badge

This is going out in the mail tomorrow.

(and how duhr am I, I have to email my pics to myself from my phone and I was wondering why this email didn't arrive and it's because I sent it to my friend.  DUH!)

Ok, pic or it didn't happen.


It's another merit badge swap (this pic is so bad. . .lord, I just keep failing!).

My swap partner is a fan of Orange is the New Black so I decided to use a great quote from Red (one of my favorite characters).

It's true.  You can't do shit with "I"m sorry".

I love making these badges.  They're quick and turn out so well.

This one turned out even better than the last because I drew a "stitch to" line just inside the raw edge so I could keep the edge stitches more even.  The lettering stitches are a little wonky in places (the 't' in can't is kind of bad) but over all I like the look.  It does look like my printing (which shows me I have lousy penmanship!  so much for all those remedial writing classes I had to do in elementary school.  Come to think about those, I just realized what that really was.  It was trying to force me to write with my right hand, not my left.  Damn, elementary school effed up my chances at being ambidextrous.  So I'm working on that now.  I've been practicing printing with my left hand and I was surprised to see it's not as hard as I thought and pretty legible, too.  It's just weird to write and have your hand rub over the writing.  I thought I would have had more problem remembering to make the letter in the right direction, but my brain is totally ok on making things in the correct direction using my left hand.  SEE, I was meant to be a lefty.  Not surprised, my dad is a lefty)

Fluff Project: September Items DONE!

Yes, yes, it's now October but I didn't show off the September offerings for the Fluff Project.  Why?  Because I didn't have them totally done until last night.

True confession:  I don't enjoy ladder stitching toys closed.  It's not hard but I just don't like it.  More to the point, I don't like STARTING it.  I'm fine once I'm in the middle of closing up a bunch of stuff but getting started on that step is just a huge hurdle for me.  I probably have some kind of hang up about actually finishing a project or something but I don't feel like psycho analyzing it.  It's just how I am so I have to just live with it (and "force" myself to do the last step).

Blah, blah, blah, SHOW US THE FLUFF!!!


Candy corns, y'all!

NINE candy corns.  Woot!  I love going over my 5 fluff minimum requirement for the month.  These little buggers were easy (once I got the size of the strips all set and fiddled with the pattern so the corns weren't too pointy or sagged in along the sides--fatter is better on the pattern).

You'll notice one of the corns is not like the others.  He was a test corn that I deemed acceptable to donate but I didn't like that style so I re-worked the pattern to make a more stumpy corn.  It felt wrong to waste this corn just because he's a different shape.  I do not body shame my candy corns, thank you very much.


Orange ones and. . .


brown ones, just like the real thing.

ONLY CUTER!


Super simple "pattern", too.  I got the basic idea from the internet (shocking!).  Then I just had to figure out the size of each of the different colored strips for the size of the body template I ultimately decided on.  I had to draw the body shape a few times to get it the way I wanted.  If you plan to draw up one yourself, I recommend you make your body shape "fatter" than you think you want.  I noticed when I drew it exactly like I wanted the finished product, that finished product turned out with sunk in sides (like bowed in) which made the points all funky.  So make the sides a little more bowed out then you think will work and then you'll get a finished corn that's almost straight (to slightly bowed out) on the sides which is more like a candy corn.

Here's the kicker.  I think I may have lost the template I used (which had the strip sizes on it).  I don't think I tossed it, I bet it's just in the random pile of paper/cardboard templates I have.  I need to find it so I can officially make a nice pattern piece from cardboard for this (and write down the strip requirements right on the pattern).

I may make a few more of these once I get the chameleons and crabs done.  I have just a little bit of that yellow left so I'm tempted to make corns until I use it up.

What's up next?  Well, finishing those chameleons and crabs (that will be for October and November's offerings).  Then I want to make something Christmas themed.  I have an elf pattern I've been keen to try and a gingerbread man.  Maybe a couple of each of those.  Hmm, maybe christmas candy corn?  Who knows!


Monday, September 28, 2015

For a Swap: Disney Patches (G, H, I)

Finally DONE (and about to be mailed this week).

I dragged my feet on these for a while.  I'm like that.  I make a good go at a project then just stop on it (usually when I only have a few steps to go to be done).  What's that about?  That's where swaps help because I have deadlines.

Anyway. . .

These are for the next round of Disney theme patches (for letters G, H, and I).

I'm on an embroidery kick and I'm totally fine with it.


I had a deliberate Fantasia theme for these.

I love Fantasia.

I'm not going to show them off in alphabetical order. I'm going to show them off least to most fancy (in my opinion).

First up is for H.


This represents the ballerina Hippos from Fantasia.  I had an image of the hippo but it was really large and I already had a very large patch in this set so I decided to do a more symbolic patch for this (that and I didn't want to do crayon tinting again and the idea of fully stitching out the hippo made me bored and tired).

So you get a pair of toe shoes (in felt) with vintage ribbon ties and a wee little tu-tu in netting.  (Eugene totally tried to eat it, too.  I was sitting right at the table doing the pics and he jumped up and without missing a beat opened his mouth to give it a gnaw--so bad!  He did not bite it at all because I grabbed him and put him on the floor)


The back.  I knew I had to use this cute ballerina fabric for this patch.

Next up is for I.


Ice fairies from Fantasia.

I took a tiny bit of liberty on this since technically they are always referred to as "winter fairies".  But they are making ice as they skate, so they are ice fairies to me.


I used some winter fabric that had the shiny snowflakes printed on it then made some tiny little fairy type forms next to them (so the flakes look a bit like wings, though that fairy on the left looks kind of like the flake is crashing down on him, poor guy).  Then I added some little icy skate marks using some shiny floss.  I really like how this one turned out.  It's a little bit weird, which I really like.


The back (a different shiny snowflake fabric).

Last is my favorite of the group, it's for G.


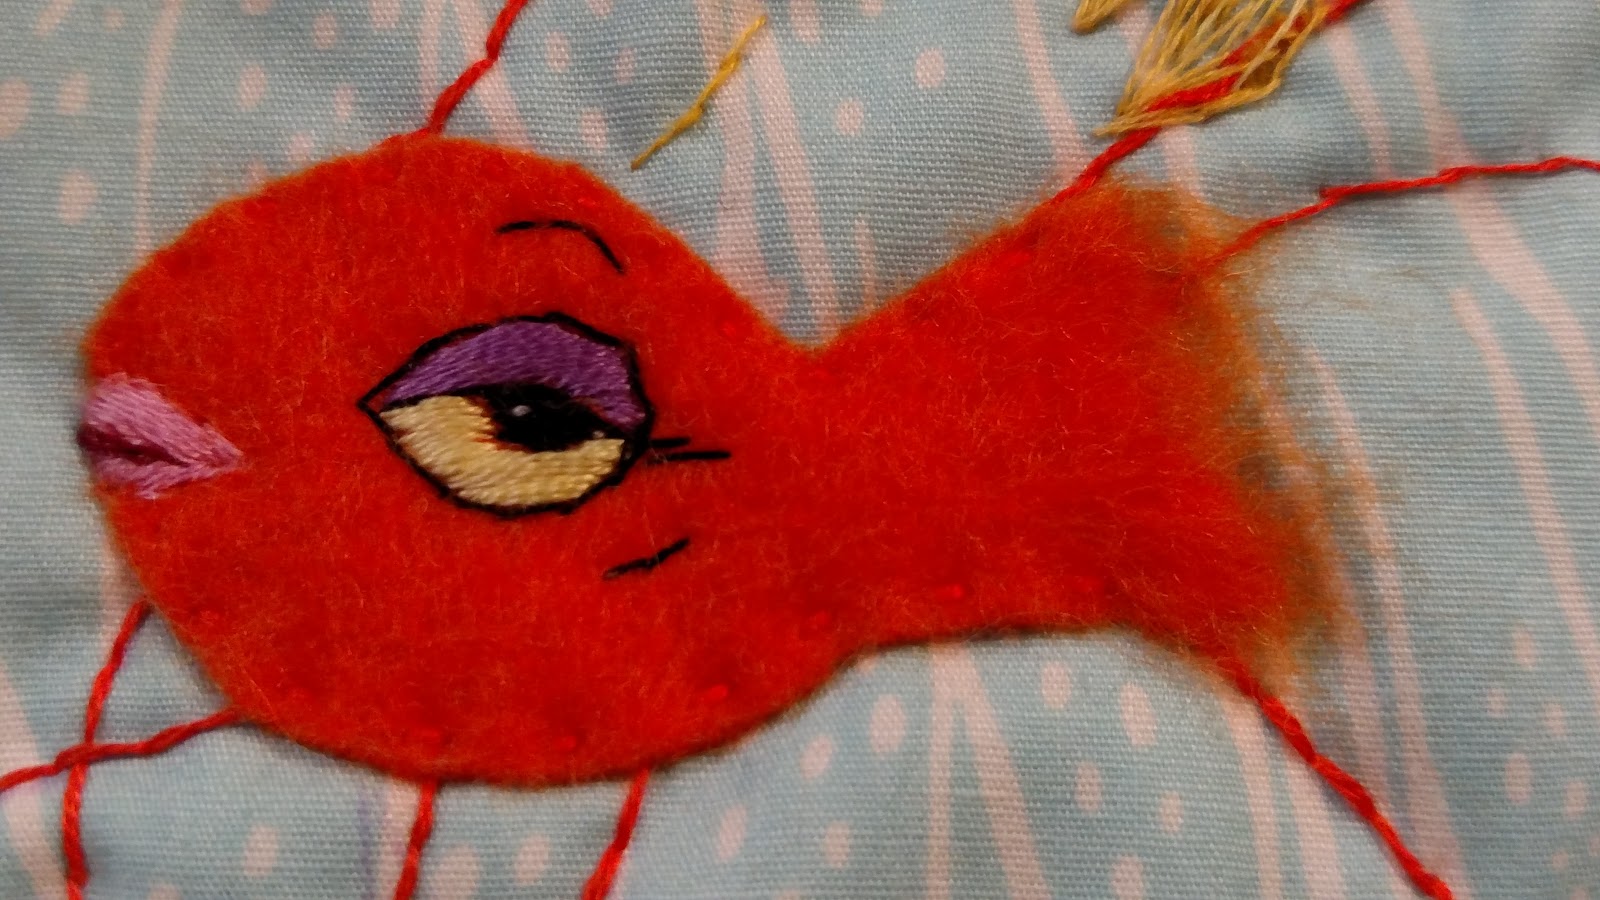
The sultry goldfish from Fantasia.

This is pulled from a still from the movie (that I found online).  Not traced, though.  I cut the body of the fish from the image to get the body size/shape right for the felt body.  Then I freehanded the fins (with a disappearing fabric marker) then stitched them.


Varigated (too lazy to check that spelling) floss for the ends of the fins.

Close up time!


Free handed the face, too, which I think turned out REALLY well.  The eye is definitely sultry.  The lips aren't quite as puckery as the real fish, but still really good.

For the end of the body (where the tail begins) I took a metal bristle brush (yes, my cats brush but it was clean) and fuzzed out the felt to get the smudged color appearance.

The body is stitched down (versus glue--I used glue for the ballet shoes).


The back.  How freaking cute is that fabric?  Right!?  So perfect.

I have to admit, I'm really proud of my fabric stash for this set.  All the backing fabrics work perfectly with their subjects.

What am I up to next?  Well I have a few Halloween/fall themed swaps to do and then the next round of Disney patches (I only have an idea for one of them).  I also need to get caught up on Fluff sewing (I have a pile of in progress stuff I just need to finish, but I already discussed how that's my pattern).

Thursday, September 24, 2015

For Swaps: Patch and an Art Doll

Damn, I meant to post this sooner but all the sudden I have to WORK at my job (what?!) so I have next to no goof off time.  I decided to just make posting this one of my "to do" items so I'd get it done.

OK, here we go.

First up, a patch (for the monthly swap I do all the time)


Super simple.  My partner likes skeletons and all that, so I just trotted out some of my favorite fabric and added a tiny bit of embellishment.  The fabric is so cool I wanted to just let it speak for itself.

The back:


That was just a scrap from my scrap bin but it really works with the front fabric.  I swear, sometimes I spend more time figuring out the backing fabric than making the front!

Next up is the art doll I made for the HallowMuertes Art Doll swap.  For that swap you could make it halloween or dios de los muertos themed.


Hello Mr. Skeleton man!


He's mostly a Dios de los Muertos skeleton guy but he's not a mariachi or anything special like that.  Just a guy in a suit.  Kind of Jack Skellington but not.

I used a pattern someone sent me in a swap from years ago.  I've used this pattern before to make an art doll but I never painted a doll.  This guy is totally painted.

I made the body in scraps of cotton and muslin (which is technically cotton) and then gave them all a base coat with white paint mixed with fabric medium.  Then I put on the top coat of black (with no medium) then added the embellishments using paint pens.


Smile for the camera!

He has a cute face that's very simple in design.  I didn't want to mess it up so I kept it simple.


The black paint pen is just shiny enough that it stands out against the more matte acrylic black paint.  So I could use it to make the shaping of the coat.  I debated giving him lapels but there wasn't really enough room on the body to make them turn out well, so I decided against it.


His limbs are button joints and do move.  They also scrape against the body a bit so over time there should be some nice wear as the limbs rub the paint along the body.  I didn't seal the whole doll for two reasons.  One, I wasn't sure exactly the best product to use and I didn't want to mess up the doll after I had him all finished (sewing the limbs on was literally painful--my fingers were sore jabbing the needle through the painted fabric).  Second reason not to seal was I wanted the doll to show wear as it happened.  I could have distressed it before hand but I'm lazy and (well, that's mostly the reason) I like the idea of the doll showing natural wear, just like an olden days doll!

I LOVED making this dolls (except attaching the limbs, I put that step off for ever because I knew it would be boring and annoying--it wasn't as bad as I thought but it was boring as hell).

I love how he turned out and after working with this pattern again I think I could edit this pattern a bit to make different body shapes (I'd start by trimming those feet down a bit--this pattern was for an "acrobat" doll so I get why the feet are super huge and it's not bad for this dolls but smaller would be better).

Both of these are off to their new homes Friday.

What else am I up to?  I need to get my latest round of Disney patches done (they are going to turn out very nice) and get my Fluff sewing done (have a bunch of stuff started, very little finished. . .story of my life) and then some other swaps.

Tuesday, September 8, 2015

Let's Book It: September (and an item for a swap)

No, I didn't forget about the Let's Book It Challenge.  I just had to put it on the back burner because I didn't have time to make random things from books.  I need to be able to double dip for this challenge to work for me.

(wait, I just realized I have been double dipping with some of the Fluff Project stuff but. . .well, a lot of those are "books" but freebies I printed out from the internet so. . .eh, it doesn't matter).

THIS project was from an actual book I paid actual money for so it really fits the Book part of the Book It Challenge.  So I'm feeling all official n'at.


That's the aforementioned book.

Let me just pause to say it is one of the cutest things I have ever had the privilege to look upon.  And I look at tons of cute all the dang time, so that's saying something.  This book made my sister lament that she needed to learn to embroider.  Yeah, it's THAT kind of book.

And when they say "teeny tiny" they ain't blowing smoke up your skirt.


That's the embroidered merit badge I made for a swap next to the image I used (and edited) from the book.

I made my cat into a cool hoola hooping puss.  Because that's how I am.


EXTREME CLOSE UP!

That bad boy is a mere 2 inches in size.  TWO STINKING INCHES!!  See, that's teeny tiny.

The edge stitching is a little rough but I'll improve on that (this was the first time I ever made a badge like this).


What?  You have to wear it so it has to have a pin on the back.

The only downside of this book?  Now I want to embroider every thing in my life with teeny tiny animals.  EVERY THING!