Thursday, October 8, 2015

Fluff Project: September Items DONE!

Yes, yes, it's now October but I didn't show off the September offerings for the Fluff Project.  Why?  Because I didn't have them totally done until last night.

True confession:  I don't enjoy ladder stitching toys closed.  It's not hard but I just don't like it.  More to the point, I don't like STARTING it.  I'm fine once I'm in the middle of closing up a bunch of stuff but getting started on that step is just a huge hurdle for me.  I probably have some kind of hang up about actually finishing a project or something but I don't feel like psycho analyzing it.  It's just how I am so I have to just live with it (and "force" myself to do the last step).

Blah, blah, blah, SHOW US THE FLUFF!!!


Candy corns, y'all!

NINE candy corns.  Woot!  I love going over my 5 fluff minimum requirement for the month.  These little buggers were easy (once I got the size of the strips all set and fiddled with the pattern so the corns weren't too pointy or sagged in along the sides--fatter is better on the pattern).

You'll notice one of the corns is not like the others.  He was a test corn that I deemed acceptable to donate but I didn't like that style so I re-worked the pattern to make a more stumpy corn.  It felt wrong to waste this corn just because he's a different shape.  I do not body shame my candy corns, thank you very much.


Orange ones and. . .


brown ones, just like the real thing.

ONLY CUTER!


Super simple "pattern", too.  I got the basic idea from the internet (shocking!).  Then I just had to figure out the size of each of the different colored strips for the size of the body template I ultimately decided on.  I had to draw the body shape a few times to get it the way I wanted.  If you plan to draw up one yourself, I recommend you make your body shape "fatter" than you think you want.  I noticed when I drew it exactly like I wanted the finished product, that finished product turned out with sunk in sides (like bowed in) which made the points all funky.  So make the sides a little more bowed out then you think will work and then you'll get a finished corn that's almost straight (to slightly bowed out) on the sides which is more like a candy corn.

Here's the kicker.  I think I may have lost the template I used (which had the strip sizes on it).  I don't think I tossed it, I bet it's just in the random pile of paper/cardboard templates I have.  I need to find it so I can officially make a nice pattern piece from cardboard for this (and write down the strip requirements right on the pattern).

I may make a few more of these once I get the chameleons and crabs done.  I have just a little bit of that yellow left so I'm tempted to make corns until I use it up.

What's up next?  Well, finishing those chameleons and crabs (that will be for October and November's offerings).  Then I want to make something Christmas themed.  I have an elf pattern I've been keen to try and a gingerbread man.  Maybe a couple of each of those.  Hmm, maybe christmas candy corn?  Who knows!


Monday, September 28, 2015

For a Swap: Disney Patches (G, H, I)

Finally DONE (and about to be mailed this week).

I dragged my feet on these for a while.  I'm like that.  I make a good go at a project then just stop on it (usually when I only have a few steps to go to be done).  What's that about?  That's where swaps help because I have deadlines.

Anyway. . .

These are for the next round of Disney theme patches (for letters G, H, and I).

I'm on an embroidery kick and I'm totally fine with it.


I had a deliberate Fantasia theme for these.

I love Fantasia.

I'm not going to show them off in alphabetical order. I'm going to show them off least to most fancy (in my opinion).

First up is for H.


This represents the ballerina Hippos from Fantasia.  I had an image of the hippo but it was really large and I already had a very large patch in this set so I decided to do a more symbolic patch for this (that and I didn't want to do crayon tinting again and the idea of fully stitching out the hippo made me bored and tired).

So you get a pair of toe shoes (in felt) with vintage ribbon ties and a wee little tu-tu in netting.  (Eugene totally tried to eat it, too.  I was sitting right at the table doing the pics and he jumped up and without missing a beat opened his mouth to give it a gnaw--so bad!  He did not bite it at all because I grabbed him and put him on the floor)


The back.  I knew I had to use this cute ballerina fabric for this patch.

Next up is for I.


Ice fairies from Fantasia.

I took a tiny bit of liberty on this since technically they are always referred to as "winter fairies".  But they are making ice as they skate, so they are ice fairies to me.


I used some winter fabric that had the shiny snowflakes printed on it then made some tiny little fairy type forms next to them (so the flakes look a bit like wings, though that fairy on the left looks kind of like the flake is crashing down on him, poor guy).  Then I added some little icy skate marks using some shiny floss.  I really like how this one turned out.  It's a little bit weird, which I really like.


The back (a different shiny snowflake fabric).

Last is my favorite of the group, it's for G.


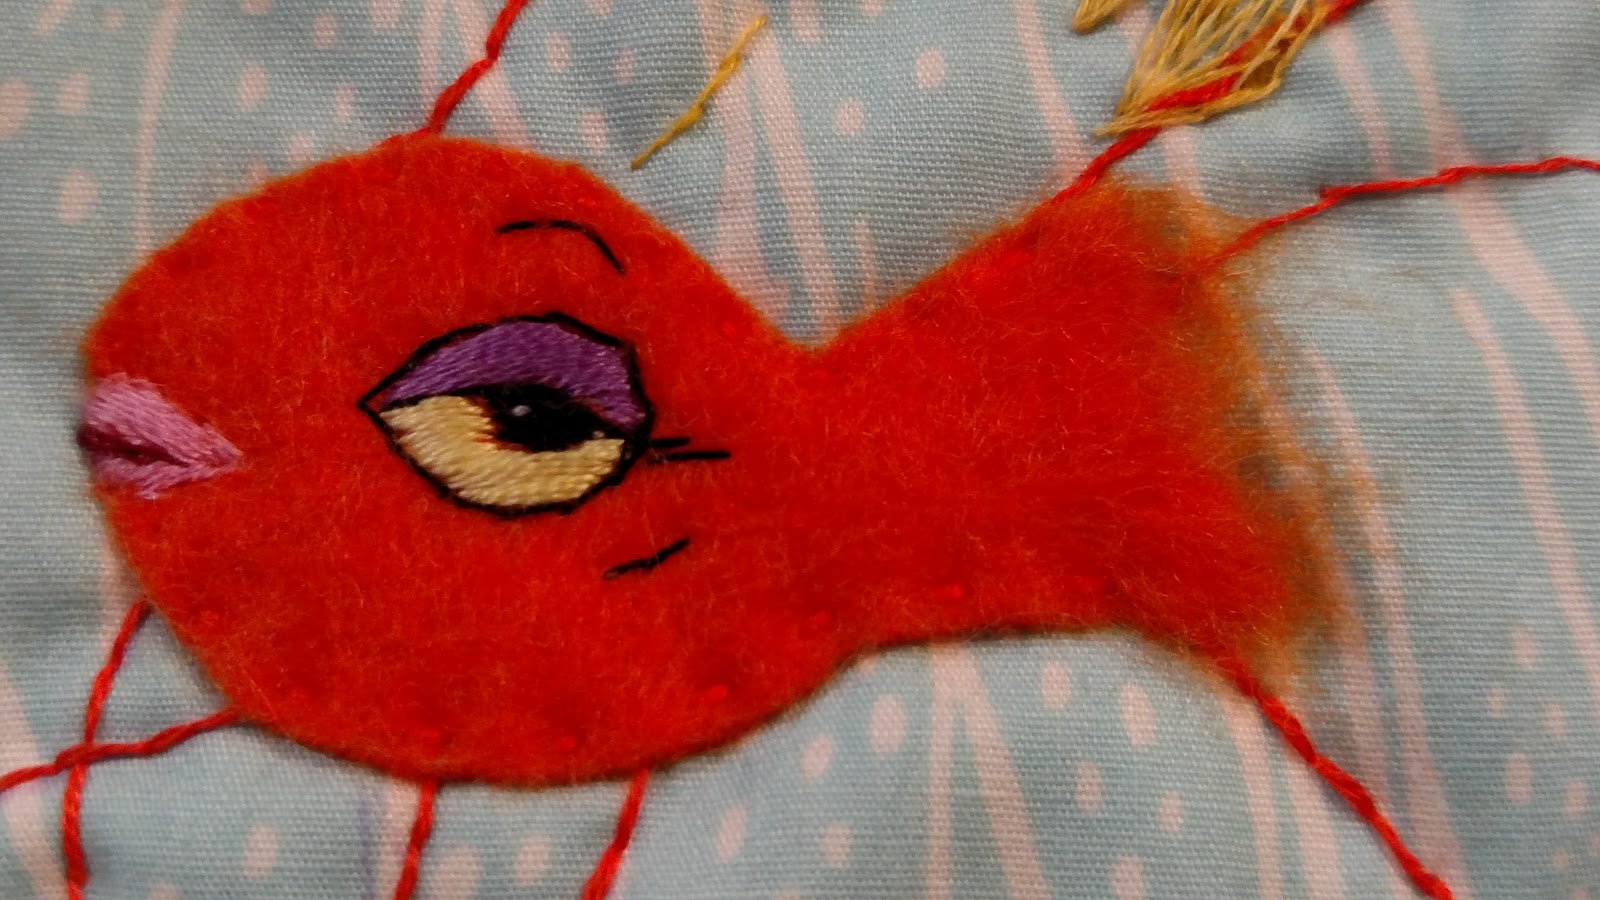
The sultry goldfish from Fantasia.

This is pulled from a still from the movie (that I found online).  Not traced, though.  I cut the body of the fish from the image to get the body size/shape right for the felt body.  Then I freehanded the fins (with a disappearing fabric marker) then stitched them.


Varigated (too lazy to check that spelling) floss for the ends of the fins.

Close up time!


Free handed the face, too, which I think turned out REALLY well.  The eye is definitely sultry.  The lips aren't quite as puckery as the real fish, but still really good.

For the end of the body (where the tail begins) I took a metal bristle brush (yes, my cats brush but it was clean) and fuzzed out the felt to get the smudged color appearance.

The body is stitched down (versus glue--I used glue for the ballet shoes).


The back.  How freaking cute is that fabric?  Right!?  So perfect.

I have to admit, I'm really proud of my fabric stash for this set.  All the backing fabrics work perfectly with their subjects.

What am I up to next?  Well I have a few Halloween/fall themed swaps to do and then the next round of Disney patches (I only have an idea for one of them).  I also need to get caught up on Fluff sewing (I have a pile of in progress stuff I just need to finish, but I already discussed how that's my pattern).

Thursday, September 24, 2015

For Swaps: Patch and an Art Doll

Damn, I meant to post this sooner but all the sudden I have to WORK at my job (what?!) so I have next to no goof off time.  I decided to just make posting this one of my "to do" items so I'd get it done.

OK, here we go.

First up, a patch (for the monthly swap I do all the time)


Super simple.  My partner likes skeletons and all that, so I just trotted out some of my favorite fabric and added a tiny bit of embellishment.  The fabric is so cool I wanted to just let it speak for itself.

The back:


That was just a scrap from my scrap bin but it really works with the front fabric.  I swear, sometimes I spend more time figuring out the backing fabric than making the front!

Next up is the art doll I made for the HallowMuertes Art Doll swap.  For that swap you could make it halloween or dios de los muertos themed.


Hello Mr. Skeleton man!


He's mostly a Dios de los Muertos skeleton guy but he's not a mariachi or anything special like that.  Just a guy in a suit.  Kind of Jack Skellington but not.

I used a pattern someone sent me in a swap from years ago.  I've used this pattern before to make an art doll but I never painted a doll.  This guy is totally painted.

I made the body in scraps of cotton and muslin (which is technically cotton) and then gave them all a base coat with white paint mixed with fabric medium.  Then I put on the top coat of black (with no medium) then added the embellishments using paint pens.


Smile for the camera!

He has a cute face that's very simple in design.  I didn't want to mess it up so I kept it simple.


The black paint pen is just shiny enough that it stands out against the more matte acrylic black paint.  So I could use it to make the shaping of the coat.  I debated giving him lapels but there wasn't really enough room on the body to make them turn out well, so I decided against it.


His limbs are button joints and do move.  They also scrape against the body a bit so over time there should be some nice wear as the limbs rub the paint along the body.  I didn't seal the whole doll for two reasons.  One, I wasn't sure exactly the best product to use and I didn't want to mess up the doll after I had him all finished (sewing the limbs on was literally painful--my fingers were sore jabbing the needle through the painted fabric).  Second reason not to seal was I wanted the doll to show wear as it happened.  I could have distressed it before hand but I'm lazy and (well, that's mostly the reason) I like the idea of the doll showing natural wear, just like an olden days doll!

I LOVED making this dolls (except attaching the limbs, I put that step off for ever because I knew it would be boring and annoying--it wasn't as bad as I thought but it was boring as hell).

I love how he turned out and after working with this pattern again I think I could edit this pattern a bit to make different body shapes (I'd start by trimming those feet down a bit--this pattern was for an "acrobat" doll so I get why the feet are super huge and it's not bad for this dolls but smaller would be better).

Both of these are off to their new homes Friday.

What else am I up to?  I need to get my latest round of Disney patches done (they are going to turn out very nice) and get my Fluff sewing done (have a bunch of stuff started, very little finished. . .story of my life) and then some other swaps.

Tuesday, September 8, 2015

Let's Book It: September (and an item for a swap)

No, I didn't forget about the Let's Book It Challenge.  I just had to put it on the back burner because I didn't have time to make random things from books.  I need to be able to double dip for this challenge to work for me.

(wait, I just realized I have been double dipping with some of the Fluff Project stuff but. . .well, a lot of those are "books" but freebies I printed out from the internet so. . .eh, it doesn't matter).

THIS project was from an actual book I paid actual money for so it really fits the Book part of the Book It Challenge.  So I'm feeling all official n'at.


That's the aforementioned book.

Let me just pause to say it is one of the cutest things I have ever had the privilege to look upon.  And I look at tons of cute all the dang time, so that's saying something.  This book made my sister lament that she needed to learn to embroider.  Yeah, it's THAT kind of book.

And when they say "teeny tiny" they ain't blowing smoke up your skirt.


That's the embroidered merit badge I made for a swap next to the image I used (and edited) from the book.

I made my cat into a cool hoola hooping puss.  Because that's how I am.


EXTREME CLOSE UP!

That bad boy is a mere 2 inches in size.  TWO STINKING INCHES!!  See, that's teeny tiny.

The edge stitching is a little rough but I'll improve on that (this was the first time I ever made a badge like this).


What?  You have to wear it so it has to have a pin on the back.

The only downside of this book?  Now I want to embroider every thing in my life with teeny tiny animals.  EVERY THING!

For a Swap: Ninni w/a Costume

This is getting mailed out this week.

Ninni in a costume.


A very rare mer-ninni.


Naked ninni!

The tail is (as the pic shows) removable.

(oh and fun fact, these are fabrics left over from the very first giant squid I ever made--I love that sushi fabric so much!)


The tail is lined with linen to give it a bit more stability for all the scallop stitching (machine stitches for the win!).


I was going to attempt an elastic waist but after I got it almost done I realized it didn't need it (which was a relief).  I was also planning a bra top but the ninni's body is so squat there just simply wasn't room.

This was fun to figure out and not that frustrating.  I made a test one in linen first and I think that made all the difference.

Friday, August 28, 2015

Stuff for swaps: Stuffie and some patches

Showing off two swaps today.  I went right up to the last minute getting these done (the patches I finished last night and I mailed them out today, one day before the deadline. . .last minute for the win!).

First up. . .hmmm, lets go with the aforementioned patches.  These were for the Disney alphabet ongoing swap.  This swap was the D, E, and F group.


The whole group together (like I mentioned, I finished these last night so this pic is a bit dark, I tried to make the rest a bit better but I have little patience for pictures sometimes).

For the letter D:  Dumbo

At first I was going to embroider/crayon tint this super cute image I found of a sweet baby Dumbo in the bath.  But then I had another idea.


It's his magic feather!

This was such a simple idea I almost felt like I was cheating with it.  But I like doing at least one non-literal patch for each group (like the Cruella Deville patch from the first batch) and this was perfect.

Don't fret, it's a craft feather not one I found while out on my walks (I see a lot of feathers in the cemetery but I can only imagine what's crawling on them or how they'd smell. . .guh-ross)


The backing fabric even keeps with the theme.  Aww, mama and baby elephant.

Embarrassing fact:  Dumbo is the only movie that can make me cry just thinking or talking about it.  Not every time, but if I get really thinking about it tears will come.  And not just a simple welling up thing.  I can full out bawl just thinking about it.  And, Dumbo is the only movie I ever saw my father cry over.  That scene when they take away the mother (when she rocks baby Dumbo in her trunk. . .crap, I'm getting misty just typing about it). . .that's some hardcore Disney emotional manipulation right there.  That's the stuff that effs with you as a kid and you carry that for the rest of your damn life.  Disney is good for that, which is kind of dick move.

Phew, I need a second. . .excellent.  I didn't need to grab a tissue but I was very close.

Ok, next up.

For the letter E:  Evinrude the outboard dragonfly from The Rescuers.

(side note:  what is it with typing rescuers?  I want to add another 'er'.)

Anyway, Evinrude is awesome so I had to do him in full on embroidery.  Which led me to wonder why I don't do this more.  I was kind of intimidated by fill stitching but it's not that big a deal at all.


I used single strand for the majority of it (I did use double strand for some of the outline stitching but none of the fill if memory serves).

Varigated thread for the sweater because I didn't have a solid blue that was a close enough match to the pic I was using for reference.


I'm really over the moon about how it turned out.  Even the pupils look good.  I wasn't sure how to do them since they are so small and an outline stitch would make them look jaggy.  So I just freehand fill stitched them and they're not bad at all.

After stitching up Evinrude I was in a total embroidery mood.  But I was having problems deciding on what to do for F.

First I thought I was going to do Fifi, the feather duster from Beauty and the Beast.   True confession, I didn't realize she even had a name it's been so freaking long since I watched Beauty and the Beast.  But that idea was just kind of boring to me, mostly because there's not a lot of color variety on Fifi (all earth tones, *yawn*)

While I was trying to convince myself to just do Fifi and get it over with I started to get this word ringing in my head.  Ferdinand.  Ferdinand.  Ferdinand.  So I hit up google to see if there was something Disney that had the name Ferdinand.

BAM, there was.

F = Ferdinand the bull


This pic doesn't do him justice.  That's Ferdinand just having a sit and sniffing a flower.  He's crayon tinted with single strand outline.  The backing fabric was a scrap from the other swap I'm about to show off.

Guilty Pleasure swap

This swap was a partner's choice swap.  So you had to make something from the guilty pleasure (tv/movie) they listed.

My partner listed. . .well, I think you can guess.


*singing*  Who lives in a pineapple under the sea. . .

This was NOT what I had originally planned to make.  I was going to make an embroidered/crayon tinted (or maybe felt applique) patch of Gary the snail.  But then I got thinking that was kind of a cheap item to send when we had around a month to make this swap.  That coincided with a sudden obsession to make the pineapple house.  I blame Funky Friends Factory for that.  I've been checking out the patterns there and remember she had a pineapple.  And it was a freaking fabulous looking pineapple.  I knew I could probably rig up my own version of a pineapple but I knew it wouldn't be nearly as cool as the one at FFF, so. . .I had to get the pattern and make the pineapple house.

That lead to a whole debacle, too.  FFF is located in Australia.  Now even though I was only buying a PDF download (for a whopping $12.99) my bank shut down my debit card for fraud when they saw the charge.  While I appreciate them looking out for me (they are super on top of the fraud stuff) it did put me in a pickle when, after I bought the pattern in the morning, I went to Jimmy John's for a sub and my card wouldn't work.  I had just enough cash to cover my bill (so I was spared embarrassment) but then I did get embarrassed (a tiny bit) when my auto payment via paypal (to My Paper Crane for my plush of the month box) wouldn't go through and Heidi sent me a nice "oopsie, you no pay-ee" email.  But I got it all sorted out and no harm, no foul.

Did I mention that I decided to get the pattern after I realized I had that fabric in my stash.  I thought I had something that looked "really pineapple" but I didn't want to bother buying the pattern if I didn't have fabric already on hand I wanted to use.  And it was just enough fabric, too.  It was slightly bigger than a fat quarter but since the print is directional I couldn't just cut mamby pampy like I'm want to do (minding the grain, of course).  I had just enough left over that I could have re-made only ONE piece should it get messed up.  Thankfully, I had no issues with any of the pineapple construction.  The details were easy, too.


The scale is kind of wonky (that door knob type contraption there is probably a bit big but it looks pretty cool so I'm ok with it.

All the details are felt and embroidery.


Porthole windows with french knot rivets and a little shine for visual interest.  I only put two window on the house because I couldn't get any good images of the back of the house to know if it had windows back there.  How many windows do you need in a pineapple anyway?  Exactly.


Chimney.  Again, the scale is a little wonky because the chimney is a bit largish but it works.  I noticed (when image searching) that Spongebob isn't super consistent even with something very static like the house.  I found images with only one window on the front and some shots of it were wonkier than other (guess that's because it is "under the sea". . .or the artists are just lazy which I can totally appreciate).

Oh, the chimney.  It has a pipe cleaner and bit of polyfil inside it and the top is deliberately wider than the bottom.  Eugene went nutso when I stole one of "his" pipe cleaners (because any and all pipe cleaners in the house are his, even if they have not yet been officially given to him to play with) for this project.  Cats aren't much into sharing which should shock no one.


I think my swap partner will dig it.  I know I dig it and that's usually a good sign.

I had to laugh when I saw the selvage on that green polka dot fabric.  It's Cotton + Steel.  I follow a lot of quilty blogs and all that and folks were popping boners over C+S and making these big ass quilts and fancy quilty things.  And here I'm using the lone FQ I had of it (which came in my "color of the month" FQ bundle I did for a year) to make leaves for a Sponge Bob house.  HAH!  But I really like good quality fabric and C+S is good quality.  I liked quite a few of the funky prints they had, too.  Not going to lie.  But if you've ever hung out around the hardcore quilty blogs a lot of the writers fancy themselves beyond frou-frou (and perfect) so this is probably far from a "worthy" project for the fabrics they shill.  Especially when it's paired with some no name ass fabrics I got in scrap bundles.  GASP!

What's next for me?  Well, I still need to do that bacon and eggs tutorial (no, I haven't forgotten about it).  First I need to make a Ninni in a Costume (for a swap) and figure out exactly what I'm making for my HallowMuertes doll swap.  But I'll probably finish up my practice chameleon first (just need to stuff and assemble him) and maybe get a few more Fluff items churned out.  I have jelly fish on the Fluff agenda and they're not that complicated.

Thursday, August 20, 2015

For a Swap: Two Patches

This pair of patches are for two different swaps.  One is a cat themed swap and the other is just the regular monthly patch swap.


I had some decent sized scraps after cutting this fabric (which I love) for the backing on the Ollie Memorial Quilt.  So I decided to double dip a bit and make two similar patches.  They weren't going to the same person (one is going to the Netherlands and the other to Australia) so why not.

I cut up the scraps and sewed the images back together to make a little four patch block that I then quilted (still had the walking foot on my machine!) to the batting and backing fabric.


I really love the funky eye beads I put on this one.  And the flower on the white cat.  But I love this fabric so much it hardly needed any embellishment.


Just a pair of pompoms and a fish on this one.

I was tempted to add more embellishment like some embroidery and all that but I realized I just wanted the fabric to shine for these.


I'm super thrilled that I could use the selvage as the best part of the embellishment.  Its selvages like this one that make me understand why folks save selvages.  I don't normally but this one was just too cute.  I wasn't sure what I'd ever use it for and then low and behold I used it right away.  I don't normally have much selvages to save, either.  I get a lot of fat quarters or smaller cuts and sometimes the cute part of the selvage isn't on the fabric I get.

I'm going to buy up some more of this print.  I like it that much.  I found it at this little online store that focuses on cat fabrics.  They have the blenders that go with it, too.  I'm trying not to buy just to hoard but I'm making a big ass exception for this fabric (it's called Prisma Cats by Moda and it's the cat's meow for sure).

What else am I up to?  I have a set of Disney theme patches in the works and the "guilty pleasure" swap.  Of course, I had one idea for the guilty pleasure swap and then it seemed kind of overly simple and just weak and now I have a new idea and if I don't make it I'll be pissed (just got a pattern for the base part, so I'm totally committed to this idea).