Wednesday, May 27, 2015

REVIEW: Equilter Food Theme Booty Pack

I had a $5 coupon for Equilter (from doing one of their surveys) so that meant it was time to treat myself to a Booty Pack (aka themed scrap pack).

Booty. . .booty. . .booty pack, y'all!

As the title noted, it was a food themed one.

I love food themed fabrics, especially ones that have realistic looking foods on them.

BONANZA!


S'mores, cookies, crackers, and potatoes.  All realistic style.

Let me pause to note how much I wanted that s'more fabric (I'd seen it before) but I just couldn't justify buying it for no reason.  SCORE, now I have a nice sized piece of it along with some kick ass cookies and crackers!

The other fabric in that pic is like a strip from a panel.  I think I might make at least one of the images into a patch.


These are the biggest of the cuts.  The biggest one has to be almost a full panel.  It has really big images that resemble food/drink signs.  It's really nice and might be fun to embroidery over.

LOVE the coffee fabric which goes so well with the cookies!  And the fruit/veg fabric is super nice, too.  Very muted tones.

Rating:  A+
They shipped it super fast and since I had the $5 coupon I only paid 95 cents for shipping, which is perfect.  (I've noted before that the price of the booty packs is very reasonable BUT not if that's the only thing you're buying.  The shipping makes it too expensive.  So I say get a booty pack when you have a discount code that helps offset the shipping or if you're making a bigger purchase, add one in as a little treat).

Patch for a Swap and Some Randomness

I've been making things lately but nothing is totally finished so I can't show it off yet.  Except this patch.


It's just a random one for the monthly swap in one of my swapping groups.  I did it puffy style (the "more teesha" style) and I like how it turned out.

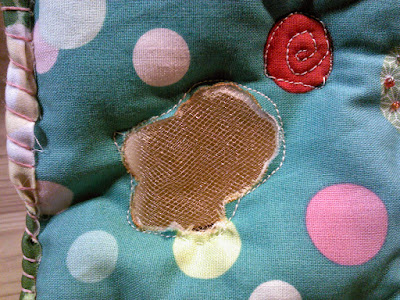
I was just obsessed with doing a peek-a-boo window (reverse applique?) type thing.


Peek-a-boo!

Then, right after I made the window (it's to layers of mesh) I wished I had put some beads inside it so they could roll around in there.  Next time!

Then I just did a bit of free motion quilting (see that wonky swirl up and to the right of the window).


And some hand embroidery with a sequin.  Gotta have some sequins.


I just couldn't let go of having beads on this, so I had to add them, too.  (I tried to see if I could sew them to the mesh but it just didn't work for me so I scrapped that idea. . .but I still want to do them trapped in the mesh so they can slide around).


And the back.  I wanted a bright fabric so it would make the border pop.  Mission accomplished.

All the fabric was just random scraps so I think this patch was truly in the spirit of Teesha Moore patches.  (hee hee, the double circle free motion quilting kind of looks like a butt!)

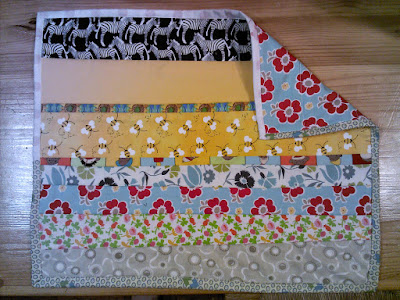
In Randomness news, I also made a practice quilt.  Ok, quilt-let?  (maybe the word "placemat" is more accurate, but I made it as a practice quilt so I'm using the word quilt even if the finished project is really small).


I'll be making a lap sized quilt for a swap (using the quilt as you go tutorial from Missouri Quilt Co's youtube channel) but since I'm still a fairly raw beginner at doing a full quilt (I've only ever made one small wall hanging one) I wanted to get the feel of all the processes before I started out on the big quilt (it's not huge, but it is decent sized at 36x48).

So I raided my scraps for the strips and got a FQ-ish sized piece of fabric for the back and just made a little sampler.  Doing the assembly was easy since it is quilt as you go (so you have the backing, pad, and top together the whole time).  The binding wasn't bad, either.  I think the messiness I encountered when attaching it (I didn't quite keep "in the ditch" in some spots!) is due to the shape not being even.  Since I was doing this as a practice, I wasn't super careful or concerned about the edges being absolutely straight which made the binding get a little wonky along the way.  That and I got one of the corners goofy (need to look at a few tutorials to freshen my mind about how to do the mitre. . .I understand it but when I go to execute it I always want to do something backwards. . .same with joining strips to make one long strip, I ALWAYS do it wrong the first time, ALWAYS).

So, I made a little practice quilt-let which is now something for my cats to sit on.  I put it on the floor for them and they both had to put their holes right on it.  That is a sign that they approve, putting their hole on something (yes, that includes putting their hole on YOU).

Now I need to make the real quilt (fabric strips are already prepped and I'm waiting for my batting to arrive since I thought I had the right size only to find out I didn't *headdesk*) and I'm working on a few other swaps.

Next up on the blog?  Fabric review!

Wednesday, May 13, 2015

For Swaps: Embroidery and a stuffie


First up is the embroidery hoop I made for the "negative space" swap.  You just had to make an embroidered design where you focused on the negative space, not the actual image.  Easy peasy.

But. . .boring.

I love, love, love how this turned out but I had a hard time keeping interested in it to get it finished.


I blame the heap of french knots.  They look cool but they are boring as boring can get to make.  But I'm glad I went with the french knots, which was my original plan.  It's worth how dull the project can get for the results.

Next up is a stuffie I made for a kawaii "food with a face" swap.


Cute fried egg!

So damn EASY, too (over easy?  hee hee, egg pun!)

I traced a glass for the circle for the yolk.  Then add two free form cut eyes (just used a scrap of felt).  Attach the eyes and then add the little white stitch to each.  Embroider the mouth (though you could do that at the very end, too).

Cut out a random egg white shape.  Attach the yolk to the right side of the white, stuffing lightly as you attach it (using a zig zag top stitch).  Then sew the cut out white to another piece of white fleece.  With odd ball shapes, I found it's easier to cut one out and then sew it to a non-cut piece versus cutting two identical ones and then fighting with the edge as you sew.  Fleece is stretchy, so having a bit of wiggle room with the non-cut piece of white fleece was nice.  (oh and use a zig zag to sew the two whites together--zig zag and a ball point needle for the win when it comes to fleece).  Turn the egg right side out and then use a straight stitch to stitch around the yolk (to really make it pop).  Hand stitch the opening along the white and your are DONE!


That's a BIG egg right there (that's a full sized dinner plate, not a saucer).

I want to make more of these or the Fluff Project.  But I kind of want to make bacon, too.  So I think I'll have to get some red fleece and make up some nice floppy bacon to go with the eggs.  Or maybe add arms and leg to the egg (and the bacon) so they can hold hands?  We'll see how that works out.

Speaking of the Fluff Project, I'm going to make up some mermaids for May/June, too.  I decided to combine May and June  since I'll be vacationing at the end of June. So I want to get 10 stuffies mailed out before I go on vacation.  Doing eggs (or eggs and bacon) will be FAST.  (the egg I made took about half an hour start to finish, once I had the steps all figured out--I did make a test egg that wasn't nearly as cute--I might give that to my cats to play with).

Wednesday, May 6, 2015

Fabric Review: Missouri Quilt Co order

(note:  I do reviews just because I like to, not for compensation)

I've purchased from Missouri Quilt Co once before but didn't think to review them because I mostly do reviews for scrap pack purchases (because it's fun to show off what I got).  The time I bought from them before, I did buy some fabric but it was just yardage (actual full yards, a rarity for me) so it wasn't anything that exciting to talk about.

They had a "free shipping" deal again (they have daily deals and sometimes they make free shipping, with no minimum purchase requirements as the deal) so I decided to grab up some smaller cuts of some fabrics I like (and I'm going to use for a quilt swap I'm doing).

True confession, the first time I ordered from them I didn't realize I could order smaller cuts (because I didn't look close enough--most places will sell smaller than a full yard, duh!) but I didn't care that much because I really liked the fabric I was buying (it was Star Wars and Wonder Woman fabrics).

Blah, blah, all this lead up is to say this:

Missouri Quilt Co gives very generous cuts.


That pic is all the fabric I bought.  I bought a lot of 1/4 yard cuts (only three cuts were half yards) and as I was unpacking them I noticed they varied in size a LOT.  So, being the uptight type that I am, I got out my measuring tape to make sure the smallest one wasn't under 1/4 yard.  I was delighted to see that the smallest one (that's the one right there on the top of that stack in the pic) was 1/4 of an inch larger than 1/4 yard.  The rest of my 1/4 yard cuts were MUCH bigger.  I didn't measure them all to see exactly how generous, but I'd guess an inch or two on most of my 1/4 yards.  That's really generous.  You'd expect maybe one or two to be a little bit bigger but really only ONE of my 1/4 yard cuts was "exact".  Two others were very close (but still bigger) and the rest were at least an inch or more bigger.  And it looks like they were all cut neatly, too.  Sometimes places give you a lot extra because they cut poorly, so you have to lose a ton of fabric to get it nicely squared up (fabric.com is bad for that--especially on panels--they cut into the panel images a lot, very disappointing).  

So I was super happy with how generous the cuts were on an order that I got free shipping on AND the majority of my fabrics were also on sale (and the majority are Cotton+Steel which I've been waiting to get--I like to wait and make sure I really want stuff before I buy it and also to see if it goes on sale a bit).  

So if you're buying, I highly recommend Missouri Quilt Co (or maybe they go by Missouri Star Quilt Co--I see their website is Missouri Quilt Co but the masthead has "star").  Sign up for their emails, too.  Then you can get the deal of the day (and not miss the free shipping when it comes around).

OH, and they also have tons of free tutorials on their youtube channel.  I'm going to use one (the "quilt as you go" one) for the quilt I'm making for a swap.


Fluff Project: April Items DONE

Ok, technically I finished them a few days ago (in May) but I'm not going to lose any sleep over that small fact.

For April, I made teddy bears.


Six teddy bears, to be exact.

They're all from the same fabric which was about a yard of brown flannel (with a slight mottling to it) I scored at the Salvation Army fabric sale.  It's a special event the sal army has where they sell JUST fabric and notions.  It's just this side of crazy (they only let so many folks into the building at a time and there was a big ass line) but an organized kind of crazy that works for me.

Did I mention I got the fabric for about a buck (or maybe a buck and a half).  So, say, $1.50 for enough fabric to make six stuffed toys.  The felt on their faces was cut mostly from scraps and the stuffing, thread, and embroidery floss I always have on hand (so I never really factor it into charity stuff).

These six bears are joining all the other stuffies I've made so far this year.  I put them all in one box (a box from the big ass bags of stuffing I buy!) and hope to get them mailed on Saturday.


"Hey, mom, what's this?"

*sigh*  Murray, you're not supposed to be on any of the tables let alone the one I'm sitting at trying to work.

"Well, what is that?"

It's a brush to get your hair off everything.  You shed like it's your life's work.  Just being this close to the toys will have them sprinkled with hairs.


"You mean THOSE?  Yeah, I got my hair on those.  You'll need to use the brush on them again.  Probably twice before you put them in the box.  Oh, and Eugene chewed part of the box."

Yes, I noticed that.  You are both ever so helpful.

YES, I have to lint roller every toy I finish because Murray's hairs are everywhere.  Even after a good rollering I'm sure they still end up with at least a few hairs on them.  Hey, I'm a crazy cat lady.  That's the price you pay when you have cat children.

And Eugene really did chew the box I'm mailing them in.  There were handle holes (with little flaps that can get pushed in to make the handle holes) and Gene chewed the crap out of one of the flaps.  Or maybe it was Murray?  Safe money is on Eugene for that one.  He loves to chew cardboard (the thought of that makes my teeth want to crawl out of my head).

So, what's on the Fluff list for May?  I have no freaking clue.  I'm tempted to revisit one of the baby friendly patterns I have (like the little horses or dinosaurs) because I can churn out a lot of those really easily.  I just need to go up to my craft room and thumb through all the patterns and see what strikes my fancy (but I really think a super simple one is going to win).

Tuesday, May 5, 2015

For a Swap: RICKY SPANISH!


BAM, I just put the pic right there with no intro or anything.  Why?  Because that's how Ricky Spanish would do it, y'all.

My task for this swap was to use the Ninni pattern and do a design of my partner's choice.  My partner is super fun and all about American Dad (as am I) and she threw down the gauntlet to make Roger Smith as his alter ego, Ricky Spanish.

CHALLENGE ACCEPTED AND MET!


Down to the creepy bad teenage facial hair mustache.

Transferring Roger's unique physique to the ninni shape wasn't hard but it was awkward.  Roger is rarely (meaning never) shown face on.  You always see him in at least 3/4 profile because he really has no lips or facial features (no nose at all unless he's wearing his Kevin Bacon nose).  Kind of like how you never see a Simpson's character face on due to their odd proportions and all that.  But this works even though it looks really odd.


Gave him his full outfit of shirt, vest, pants, and belt.  Even worked a wee belly button in there, too.  The shirt is cut down from one of my undershirts.  The vest is felt.  The pants are a repurposed head band (so not denim, but still works) and the belt is ribbon with a paper clip bent for the buckle (compliments of my sister).  Belt loops are just embroidery floss.


And, of course, there's a full wig including the little shaved part on the side.


Yarn for the wig, which is attached. I need to work on making removable wigs for toys but. . .yeah, I have a lot going on and that's really not high on my list right now.

I'm super happy with how this doll turned out.  There's a new ninni swap up now, where you make it in the animal of your partner's choice.  It'll be fun to see what things folks want.