Monday, April 29, 2013

NotoriouS.q.u.i.d.

What can I say?  I have a thing for naming my giant squids after The Notorious B.I.G.

The first squid was Biggie Smalls.

This is NotoriouS.q.u.i.d.


Just chilling in my kitchen, swiping dust bunnies out from under the edges of the cabinets.

He got a lot of smiles when he made his debut at Art All Night this weekend.  He also irked a few folks who weren't exactly sure the best way to display him.  He ended up lashed to a cross bar in one of the painting display kiosks, with his long/arm tentacles hanging down to kind of tap folks on their heads.  And even with Art All Night being held in a filthy warehouse and frequented by crazy drunks (they did cut down on folks coming in with open containers), he survived mostly unscathed. His hands did get a bit of dirt but it should clean well enough.  I'm not overly worried about it.  It gives him character.  I knew when I gave him white her sides (on his tentacles) he was going to need to pack a few Shout wipes!


Close up of his fabrics (with half way decent lighting--a squidy miracle right there!).

I'm happy to report I have a nice bit of each left over because I didn't make ANY sewing errors.  WOOT!! And I was able to get the fabric for around $6/yard (yes, even the fancy lobster print--it's so cute I could spit).

I'm happy I made him and showed him off.  And now I have a giant squid in my collection should I ever want/need new pics should anyone ever want one made for them.  (though I would sell NotoriouS.q.u.i.d. if someone wanted him, dusty limbs and all).

What's up next?

How about a little felt unicorn farting a rainbow.

On a fascinator style hat.

Think I'm kidding?  My sister's birthday/Derby party is this weekend and I've already started my sewing.  The unicorn is coming along nicely, we'll see how the rainbow fart goes.

Friday, April 26, 2013

For a swap: Dorothy Dotee

YES, I got this one done last night so I could add it to the group of packages headed to the post office later this morning.

Wizard of Oz Dotee:  Dorothy


I laugh every time I see her.  She's just not the typical Dorothy.  That's thanks to my wanting to (mostly) use things from my stash (though I did buy two things specifically for this dotee).

Let's start from the top and work our way down.  This Dorothy's hair?  WOW!  It's just very "wind blown" thanks to the fuzzy yarn I used.  I like the yarn and the effect but it was a bit of a challenge to work with.  Just fuzzing out all over the place.

Next up, the dress.  I simply didn't have any plain blue gingham.  I had a small piece of light purple gingham (not really enough) and some green gingham (with really big checks) and that was it.  Well, except for this blue with flowers.  So this Dorothy is adding a splash of fun to her dress, which ended up working out well since I had pink ribbon for hair bows and for the hanger.  Color coordination for the win.  (I added a bit of lace to the top of the dress just for some extra pizzazz).

What is this Dorothy doing right?


Ruby red slippers?  CHECK.

This is one of the two things I bought just for this doll.  It thought it was just glitter coated ribbon but it was better (and less messy) than that.  It's not merely glitter glued on, it's textured ribbon, so the sparkly is little loops of tinsel-like product that gives a glittery effect without nearly as much shedding (it does shed a tiny bit when you cut it but not a lot).

The other thing she's doing right?


. . .and her little dog, too!

I bought this shank button just for this dotee.  I could have just made a little dog but this button was just too cute to resist (and so much easier than making a wee fabric dog--especially if we're going to have a Toto dotee--the idea has been put out there to add Toto to the character list).

The tail is also a bit of "right", too.  I used yellow (and a few white/off white) to make a tribute to the yellow brick road.  I also thought about making a tail using green (for the emerald city) but it would have clashed too much (and I was already pretty proud of my decent color coordination).

Seeing as this Dorothy is kind of odd, I'm hoping my swap partner likes it.  This doll is definitely in the more "classic" style.  OH, and I got to try out my fabric pens.  I like the job they did.  The face is cute and simple, which works well for this style of doll.

She's off to see the wizard. . . .

Thursday, April 25, 2013

Progress Report: Little Portraits

Update time.

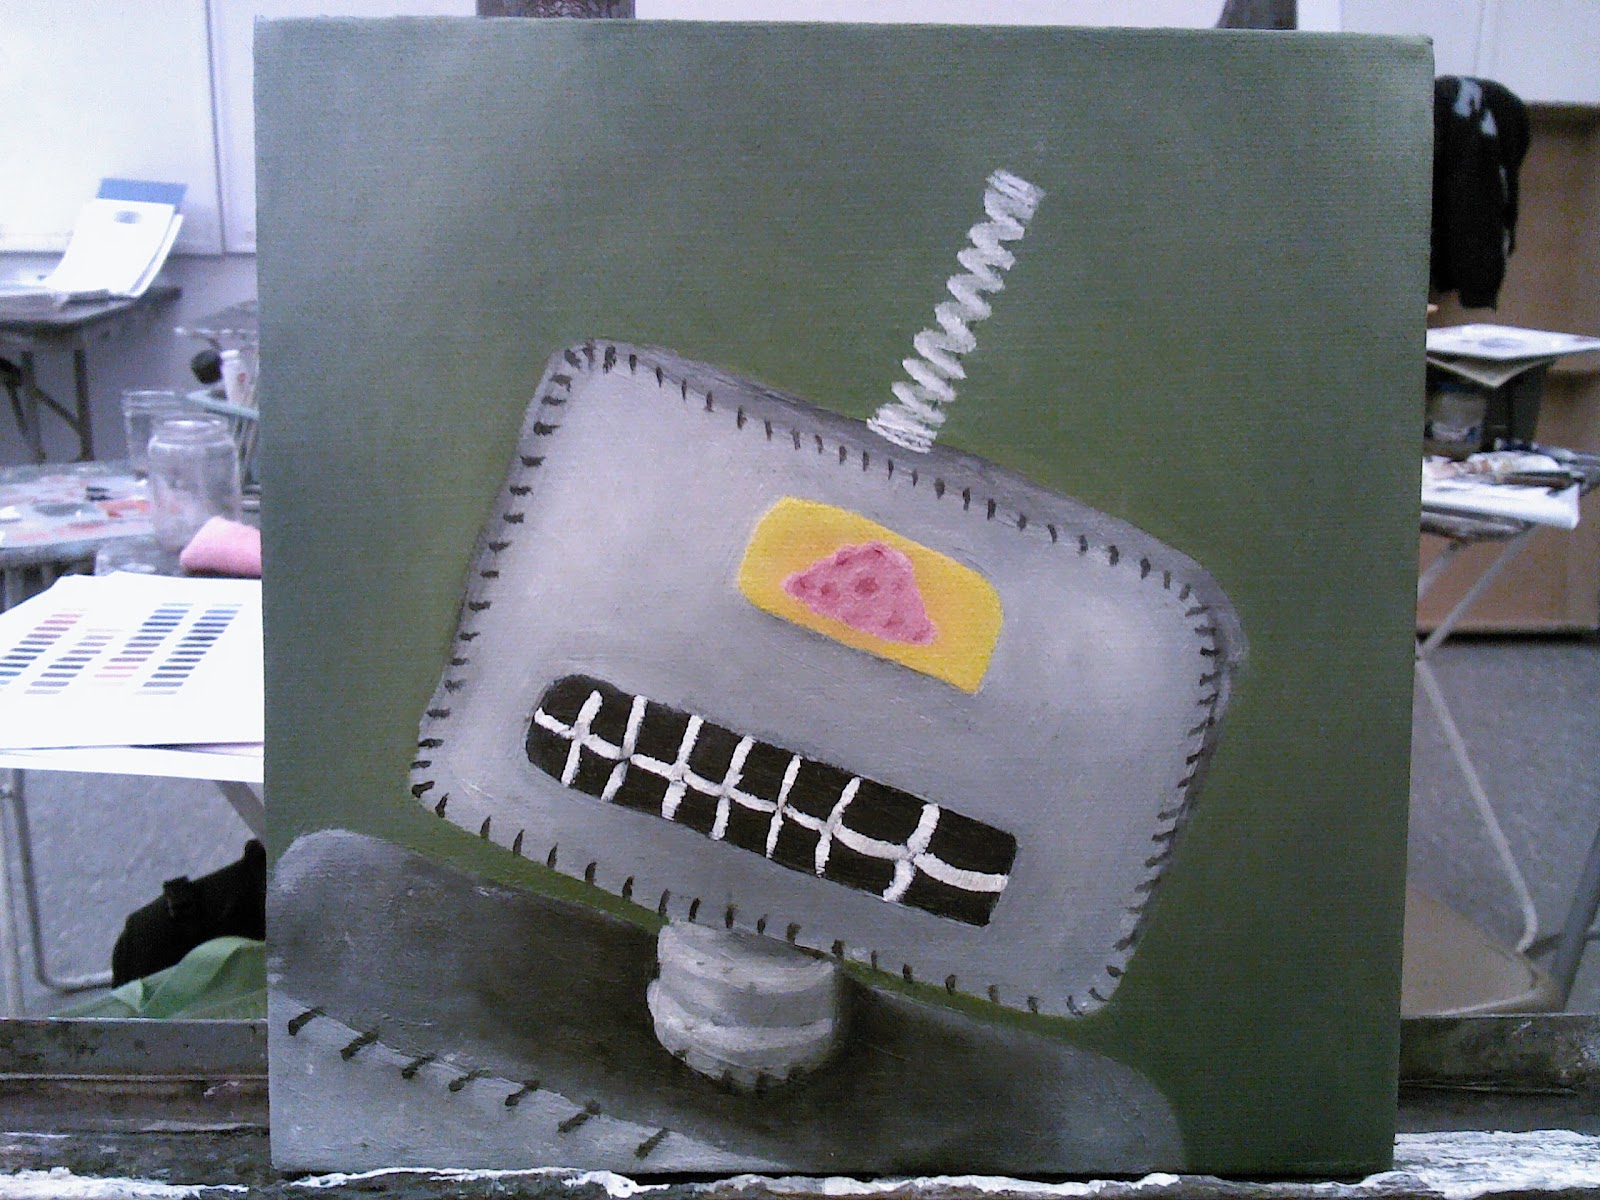
First up, Mr. Roboto.

BEFORE:


AFTER:

The changes are going to get more and more subtle.  Lot of shading and what not.  But I still need to do a lot of work on the eye and antenna, so those changes are fairly obvious.

Priscilla.

BEFORE:


AFTER:

Same story with Priscilla.  The changes are going to get more and more subtle from here on out.  Still a lot of work to do on the eye patch and a lot of shading work.  I'm really happy with how her eye is coming along and how that one circle (the one that was missing in the "before" shot) turned out.  When you're up on it (looking really close) it's warbly and ugly, but when you're at a proper distance from the canvas it looks decent.  It kind of conveys the shape of the head.  I'm pleased with it.

Since these two canvases are small and don't have a lot left on them, I had to start on my next canvas.  I decided to use one of the extra 8x8 canvases to do something completely different.  I've been wanting to do some truly abstract pieces so I think I'll use the two 8x8s I already have for experimenting with texture and blending.  I want to work some fibers (from scrap fabric/thread) into the paint and just play.  It will most likely be a disgusting mess but it should be something fun and different (while I'm trying to figure out what I want to do next).


The new painting doesn't look like much yet (and probably won't ever look like anything exactly).  I just used paint that was already on my palette and then added in some straight white to get some peaks and chunks of paint.  I think I want to add touches of color to the tips of the peaks once the white is dry.  And (like I already said) add in fibers from my sewing projects.  I think that will kind of keep these paintings in my theme, which is making paintings of other things I have made.  I like that idea.  AND, it will use up some stuff I just throw out anyway.  Love that.


Wednesday, April 24, 2013

Dotee Dolls: Some I've made recently

Now that I've shown off what I've received as of late, time to see what I've been making.

First up:


Made for the Fancy Button dotee swap.  The description was simple.  You had to use at least one "fancy button" (meaning not the standard 2 or 4 hole type) on the body of your dotee.  It had to be part of the dotee, not just hanging on the tail.

I've had these buttons in my stash for EVER.  I bought them thinking they'd made wild and crazy eyes for a sock monkey but I never got around to using them until now.  I also busted out some stash fabric.  I've had this in my stash for a long time now.  I bought it (as I did so much fabric back in the day) on a whim when there was a good sale. . .hell, I don't even remember what online store now.  It's super cute Japanese fabric featuring little kids with fruit heads.


Cute and just a wee bit bizarre.  A combo I do enjoy.  The big fruit heads kind of worked with the dotee body shape I chose, too.

Since I had such great success with the trim on the seahorses I made, I used the same process to add the little pop pom trim as hair.  Then I couldn't resist and I added two little string legs at the bottom.  Then, only after I had added the little tail between the legs, did I realize I had added a penis to the doll.  OOPS.  Honestly, that wasn't my intention.  But now that it's there I'm going with it.  It's cute (if you don't have a dirty mind--funny if you do).

Next up is a doll I finished just last night and I'm SUPER excited about it.


Can you immediately recognize what it is?

Maybe this will help.

Oh, how I badly I wanted that image to be true and how disappointed I was when it wasn't (even though I was in college and KNEW the image was an exaggeration).

YES, I made a Sea Monkey!!

This doll is for the May Unique Holiday swap.  Did you know that Sea Monkey day is May 16.  So you still have time to stir yourself up a kingdom of happy little shrimp (or whatever they really are).


I think he turned out VERY well.  But the face is a little bit "charlie brown".  Cute, but Shultz-y.

I used a doll pattern found at Nuno Life .  I just altered the head to add the horns and altered the leg piece to make the tail and edited the leg piece to remove the existing foot and then added my own flipper style feet (which look a lot like Kermit the Frog's feet, now that I'm thinking about it).

I'm so happy this one turned out so well.  It's a tiny bit large (by dotee standards--it's about 6 inches long) but I don't think that will be an issue.

I like this one so much I just might make another (but I don't have a reason to make one right now).

So what's up next?

I need to get my Dorothy dotee finished for Friday (when I have another post office run).  Then finish up the last few stitches on the Giant Squid (needs to be submitted on Saturday).  Then I need to work on a stuffed toy for another swap and maybe (if I still have time) I'd like to make a hat for my sister's Kentucky Derby/Birthday party (I have a fun idea but I don't want to speak about it too much just yet).

Busy, busy, busy.

Swaps: Dotees Received

Time to show off some of the Dotee dolls I've received lately.

In no particular order:


Received from the Dr. Seuss themed swap I hosted.

I love this little gal.  The creator (sorry, I forgot who made it--I'm bad with names) did an "inspired by" dotee, which I LOVE.  I was hoping someone would go with that option, that's why I wrote the swap description to include that as an idea.  I didn't want everyone to make the same dotee (Grinch/Lorax).  This cutie does right by the good Dr. Suess.  The hair was inspired by Thing 1 and Thing 2 and the face was inspired by the cover critter from (I think, I can't remember now if I'm right) "Hop on Pop".  I think the face is SPOT ON.  It really looks like a Dr. Seuss face.

But what I REALLY love about this one is the tail.  It's a pipe cleaner with a bead on it.  Awesome idea that I bet I end up borrowing (eventually).

Love this dotee.

Love this one, too:


Pretty obvious this one is the Dorothy from the Wizard of Oz swap.  How cute is SHE.  And so much detail!!  I'm feeling very self conscious about the Dorothy I'll end up making (haven't got her done yet--got to get cracking on that).  I love everything about this gal.  She's spot on wonderful.


See, great details.  Little Toto in a basket and (of course!) the ruby slippers!

You know this dotee is inspiring me.  When I was on my latest craft store run, I made sure to pick up a few things just for the Dorothy I make.  I can't cheap out on this one but it's really intimidating me for some reason.  I know it will turn out well.

Last but certainly not least is a random dotee a sweet swapbot friend named Lynne sent me just because she felt like it.

How's that for awesome?


Adorable ladybug with flower antennae!  I just love the colors and the antennae (yes, they really wow me) and the way the wings are constructed from pleated fabric.  Simple but yet still so detailed and well constructed.  This cute little bug-a-boo really represents the heart of what I like to call "classic dotee style".  Take a basic shape and some fabric bits and make a little doll/toy from it.  Creativity and skill coming together to make something fabulous.

Thank you to Lynne and all the swap partners I've had to date.  I have NEVER been disappointed with any of my dotees and they all inspire me in different ways.  THANK YOU!!

Friday, April 19, 2013

Work in Progress: Giant Squid (yes, another one!)

Guess what's coming up in just a tiny bit over a week?

Art All Night.

I submitted something once before but it was YEARS ago.  I just always forget.  But now that I'm all into artsy/craftsy stuff again, I needed to use Art All Night as a motivator to make something.  Sometimes you just need a deadline.  Oh, I could have just scooped up one of my paintings and submitted it but it's more fun to make something JUST for the show.

And you know damn well that I've wanted to make another giant squid ever since I finished Biggie Smalls.  But I didn't want to make one just to make it and then have it sitting around my house taking up space.  If I made one for Art All Night then I could put a selling price on it and maybe sell it and then not have to house it for the rest of my life (dramatic!).

Ok, blah blah, enough chatter.  Let's see the work in progress pic.


See what I mean about it taking up space.  That's my couch its sitting on.  The head piece comes up to about my waist (I'm right around 5' 4").  Obviously, all the legs aren't pictured.  They are all stuffed and ready to be attached to the "skirt" piece.  Perhaps tonight I'll cut the "skirt" and get the legs sewn on.  That will be the last of the machine sewing for this, the rest will be hand stitched.  I'm sure if I had a better set up (and skill set) I could use a machine to atttache the leg skirt to the body and then close it all off with the bottom circle (or butt circle, as I call it) but it's just easier to do it by hand.  I can sit right there on my couch with the head propped between my knees and stitch away.  Easy peasy, squiddy squeezy.

I can't wait to have this DONE.  I need to go button buying this weekend to find some 3 inch covered shank style buttons to mimic the ones used on Biggie Smalls.  I liked that look.

OH, and in case it's not clear from that craptacular pic, the top fabric is orange with a red design (it's like # and @ signs but not exactly).  The underside fabric is white with little red lobsters.  It's super cute.  Originally I wanted to use some of the Bento Box line (the one with the cute smiling shrimp) but it was too pricey.  I scored the lobster for $5.98/yard.  And I think it was a better choice.

Of course, I'll have pics when it's done and pics from Art All Night.

Thursday, April 18, 2013

Progress Report: Little Portraits

Time for an update!!

First up, Mr. Roboto.
BEFORE:


AFTER:


The overall lightness of this pic is just the pic.  I didn't do much work on this painting.  I put in some high and lowlights (using the thinned out paint method--there's a term for that but I can't be bothered to look it up right now).  And obviously the antenna is there.  I'm not sure about that antenna just yet.  It will need a LOT of work.  So will the eye.  Right now it just has another coat of base color.

Next up, Priscilla.

BEFORE:


AFTER:


Again, the overall lightness is just from it being a bad photo.  I didn't get a pic of the crap I had to fix.  It was an easy enough fix, not too time consumming.  I did get rid of two circles, but I plan to put one back (the one over the eye).  The shape was just not right and since I had to put some black in to blot out the damage, that circle needed to go so I could try and do it better.  I'm really liking the eye.  It's coming along nicely. 

Overall it was a good night of painting.  I did cuss out Mr. Roboto's antenna at one point but only briefly.  I don't think any of my paintings have been completed without being cussed out at least once during the process.  Sometimes I wonder if painting isn't really a type of therapy, forcing me to constantly go through the feelings of rejection ("this painting sucks, I suck") only to finally accept them for what they are ("this one's not too bad, I like this or that on it").

Deep.