Thursday, June 28, 2012

Work in Progress: Paging Jacque Cousteau


Imagine, if you will.  You are in a tiny deep sea submarine exploring the oceans darkest trenches.

From the corner of your eye you think you spot. . . movement?

Quick, shine the light. . .


Wha. . .what. . .is. . .it?


No. . .it can't be.

Can it?

----------

Oh yes, it can and is.

I got a squid on my work bench and, at the risk of jinxing it, it's going quite well.  I found a pattern for a big squid pillow (think body pillow size) and just shrunk it down.  I didn't do any math magic on it, just printed off the generic pattern (it had measurements so you could measure out and create the giant pattern) which fit on one sheet of paper so I'm hoping the sizing is about right.  So far it looks pretty good.

The only major adjustment I might have to make is to the width of the head base.  It might need to be a bit bigger.  See, the length of the band--that you use to attached the legs to the head--should be twice the size of the width of the head and still be long enough to fit all 10 legs to it with very little length remaining.  I deliberately cut my strip longer than I thought I'd need (you can always trim down but you can't add back) but I still might need a bit more width on the head piece.

As it stands now, I think I'll do a gathering stitch on the band to pull it tight and THEN stitch it to the bottom of the head.  That should reduce puckers.

The hardest part so far is cutting it all out.  If this was going to be all one color I'd definitely need felt larger than 9x11 (or "paper size").  There is no way to get 16 tentacles, 4 arms, 2 heads, 4 head fins, and one attaching/face strip from one "paper size" sheet of felt.  But I like the tentacles being two-tone so that might be a moot point.

I have a LOT more stitching to do (7 tentacles, 1 arm, attaching it all together and adding eyes) but I'm already thinking about embellishments.  This definitely needs suckers on the limbs.  But sequins aren't going to be an option (limbs are too thin).  Maybe beads?  Or maybe just some fabric marker with a little felt bit (to give dimension)?  I have plenty of time to figure it out.

(oh and I'm not really THAT creative--I only thought of the "from the deep" thing after I had the pics--I had to shine a flashlight on my work table because the light in that room is so pathetic for photos--have I mentioned lately how much I HATE the new "green" lightbulbs?)

Wednesday, June 27, 2012

Harvest of Color

Yeah, yeah, I just had to do one more of these color combos for Fluffy Sheep Quilting.


This one is "How does your garden grow?"

Colors:  basil, corn yellow, tomato, school bus, (blank), eggplant, canary, azure, lime.

This one is all about the veggie garden.  Greens for the plants (two different shades, some for stems and some for edible plants like lettuce).  Yellow for corn.  Orange for pumpkins.  Bright yellow for SUNFLOWERS!  Eggplant for. . .eggplant, of course.  Tomato for. . .yup, tomatos (or strawberries).  And Azure for a beautiful blue sky!

Tuesday, June 26, 2012

Splish Splash Scraps!


Two scrappy ladies (in different lighting--the sun was coming up while I was taking these pics--poor gals smiled so prettily while standing on a cactus--OUCH!).

Meet Sarah and Angelina.

Ok, true confession.  I had no clue what to name these sisters so I did a google search for "famous sisters" and learned all about the Grimke sisters, who were early advocates for abolisionism and women's rights.

PERFECT!  (and I love their last name, too)

Sarah, with the blue tail, is the oldest (meaning I finished her first--only a few days before Angelina).


Sarah is the more understated of the sisters, with her fabric marker lips (what I consider "natural") and more natural tail design.

(another true confession:  I made a stitched mouth on Sarah but I stitched it BEFORE stuffing and once I stuffed it pulled out.  See, that's why you should follow the directions, which called for stitching the face on after stuffing.  The more you know!)


Since Sarah was my first go 'round with the pattern (from the "Wee Wonderfuls" book), you can see a bit of the learning curve.  Like here on her tail where the side stitching is very visible.  I don't hate the look (it does have a kind of ruffled tail edge look to it) but now that I've been through the pattern twice I see exactly how I should sew the two tail pieces together (more on that when I show off Angelina's tail).

Even with being the first off the assembly line (so to speak), Sarah is very cute.

OH, and both dolls are made from the scrap fabric I just bought from JAQS Fabric (their studio scrap bundles).  Fun fact:  Sarah's tail fabric is also what I used on the back of the "shhh" pillow.


Angelina is the more "flashy" sister, with her red stitched lips (that kind of have a lipstick feel) and a noticable part in her hair.


Her tail is also quite fabulous.  I used a scallop stitch to make the scale effect.  (woot! learning new stitches on my machine!).  And I used flashier fabric.  It's the last bits left over from the cloth bag!  I also stitched the tail together differently.  Let me backup for just a second and describe how the tail is made.  The tail is more like two tails sewn together (you make each side of the tail out of two pieces of fabric stitched on the wrong side, turned and then quilted). 

On the blue tail, I followed the directions and whip stitched the two tail tail sides together, that's why there are noticable stitches (that and I used white thread on blue fabric, that was on purpose).  For the orange tail, I used a running stitch hidden into the existing quilted edge stitch.  So it hid the stitches very well.  BUT. . .the edges of the tail aren't really snug to each other so. . .

I think I need to use a ladder stitch and only catch the bottom sides of each piece of fabric so the stitches will be totally hidden and the edges will be very snug to each other (not come apart a little before you get to the seam).  Ladder stitches are how you attach the tail to the body and the hair/wig to the head (again, catching only the inside piece of fabric, not both pieces).

That's another thing that's noticable on Sarah.  When I sewed her hair/wig on I brought the stitch all the way through both layers of the hair a few times so you can see the stitch (but I used a mathching thread so it's not as noticable).

I plan to make one more mermaid to go with my octopus, Molly.  She's going to have dark brown suede/flannel-ish hair, tan skin (cotton), and a green argyle tail.  I plan to start work on her in the next day or so and hope the work I did on these two fabulous girls will mean this third mermaid (yeah, I already named her Miriam) will be THE BEST.

(I'm also toying with making a different hair design for Miriam--it shouldn't be too hard).


Monday, June 25, 2012

Out of this World (colors)


I enjoyed making the first color collection so much I decided to do one more (since you can submit as many as you want, I like to have multiple chances).

This one is:

Abduction!

(left to right):  Ash, Coal, Basil, Lime, (blank), Black, Avacado, Bone, Canary

This would be a great set for making aliens.  The greens give a nice variety for skin tones and the grays are for the ship.  Black for their eyes and Canary?  Well that's for the lights along the side of the ship and the tractor beam for ABDUCTIONS!

Be careful when you're out at night, They might get you!

Feeling Scrappy!

It's no secret.

I love remnants and scraps.  Mostly because you can get them on the cheap (I do like a bargain) but also because they make me stop and think about what I'm making.  I rummage through what I have on hand and work with it instead of just buying something new and fresh.

That's not to say that my remnants and scraps aren't "new and fresh" in terms of design and all that.  I have some really nice fabrics in my stash.  But I've yet to buy a full yard of anything (meaning have it cut for me as yardage--sometimes I get darn close to a yard in the remnants I buy).

And that's not to say I don't buy some fabric with certain projects in mind.  But that's usually just in a very generic way, like "I need flesh tones for dolls" or "I need solid colors" or "No big patterns".

SO, I bought some scrap packs form JAQS fabrics (they have great scrap packs and fat quarter de-stashes--great stuff for great prices) and finally got around to doing some things with them.

This weekend I made:


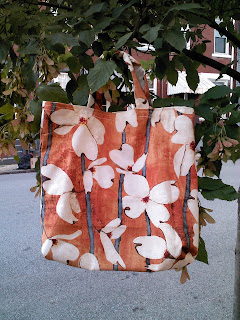
It's a small fabric bag from the free pattern at Green Bag Lady .  The pattern makes a larger bag (18 x 18 inch square of fabric for the bag) but my scrap was only about 13 inches so I just winged it.  While that made the bag not so great for grocery shopping (just too small) it was PERFECT to store all my little finished toys.  I put all the Spoonflower foods (remember those, from the cut and sew pre-print I bought a while ago?) in there along with the litter of puppies, the two kittens, Molly the octopus, Snarl the stegosaurus, George the chameleon, and Clark (super worm).  And there's still room for more stuff (guess I'd better start stitching up the rest of those foods--there are still a ton of those to finish!).

Once I got that done, I just had to see what else I could make from my scraps.

Here's some "work in progress" pics. 


I was going to try and keep it all under wraps until I was done but. . .eff that.

I'm finally making mermaids!

I got one done (you can see her taily-o in the second pic) and the second just needs assembled and she'll be done too (that's her in the top pic and just the top piece of her tail is in the second pic).

(that second pic also shows what the finished mermaids will look like--see that wee little mermaid there, too cute).

I'll give all the gorey details when I show them off but I just have to brag that I use the scraps from the bag to make the tail for the second mermaid AND I tried out a new stitch (on my machine) and some fabric markers.

Trying out new patterns and stuff is so fun.  And so is being able to make (so far) THREE things from scraps that only cost me $10-12 (I bought two packs--warm patterns and cool solids, $5-6 each--don't now remember the exact cost).

A splash of color!


Yum!  Kona Cotton solids.

I'm calling this collection:

Mermaid Splash

In order (left to right):  Peacock, Lime, Banana, Bubble Gum, (blank), Bahama Blue, Jade Green, Papaya, and Bone.

This is for a contest being held at Fluffy Sheep Quilting.  You make up a little grouping of eight of the new Kona Cotton solid colors and share if on your blog and then some winners are picked and you can score some free fabric.

Hey, who doesn't like a chance at free fabric, right?  And it was fun to use Big Huge Labs to make the mosaic (there's full instructions/rules at Fluffy Sheep Quilting).

I was going for a collection that would work well for underwater creatures.  How great would that Papaya look as a cute gold fish?  Or a dolphin made from the Bone?  Or a sea serpent from the Jade Green?  Or how about combining them (Bone, Banana, Bahama Blue) for a MERMAID!

Or you could go really bright and make a Bubble Gum pink faced mermaid with a Lime tail and Papay hair!  Oooh, I almost want to do that now!

Maybe if my collection wins, I will score some of these colors and can try that out.

Either way, this was a fun little distraction and I hope other try out making mosaics of yummy color (and even enter the little contest).

Friday, June 22, 2012

Embroidery!

This is a bit of a mixed lot post. 

It's mostly embroidery but there is some sewing too (and it's a bit of a work in progress, though I didn't tag it as such, I feel like I'm over using it lately).

A picture is worth a thousand words, right?


It's one of the dolls from the Spoonflower fabric I ordered.

Ok, now I have to just take a second and mention how much I love Heidi Kenney.  I don't buy a lot of handmade plush (yeah, I'm cheap and I prefer to make my own if I think I can) with the exception of Heidi's stuff.  When the Handmade Arcade comes to town, I scan the vendor list to see if she's on it and trot my happy self over there to buy from her.  Her plush are just so cute and even though I probably could make something similar, I just don't want to.  I enjoy the excitement of seeing what she brings to sell and figuring out the one or two things I want to add to my collection. 

When she started selling custom fabrics (at her booths) that's when I discovered Spoonflower and all the fabulous stuff there, including Heidi's cut and sew pair of dolls.  I've always loved cut and sew stuff like that and these dolls were no exception.

But they aren't just cut and sew dolls.  They are cut and EMBROIDER and sew.


This gal has a lot of tattoos.  The anchor on her throat/chest area looks a bit painful to me.  Butterfly on one arm (the other is tattoo free).


I used split stitches and a bit of chain stitch (but mostly split for everything).  It calls for backstitch but I'm not a fan of it (mostly because I haven't quite figured it out yet--how dumb is that--I know it's not hard but I just can't get into it yet).


A rose on her back.


Rope on one leg.


Bird on another (with a little french knot eyeball).

Did you notice the one MAJOR flaw yet?

Look again, I'll wait.

Yup.  Her legs are on backwards! 

At first I was irked as hell.  I really TRIED to make sure I had them all set right so they would be on "right" (meaning the seam would be to the back) but. . .well, there you go. 

Now I could tear them out and re-sew them but the thought of it makes me sad and tired.  And I kind of like her major flaw.  It lends to my theory that everything I make is part of the Land of Misfit Toys.  I did stitch in her toes a bit (they were pointy, like her hands) so it's less noticable but really, it's not less noticable.  It's totally noticable and I'm just about over it now. 

But wait a tick.  Look at that first pic again.

What's that she's holding?


It's a wee pillow with "shhh" embroidered on it.

Shh, don't mention to her that her legs are on backwards!

No, that's not what I was thinking when I made it.  I made it thanks to a post over at Wild Olive.  Mollie (aka Wild Olive) posted a free pattern of different "shhh"s.  I knew it would be a quick little project but I really didn't want to make a finished hoop or just have a random piece of embroidered fabric hanging around.

Then I realized, I just bought a whole mess of fabric scraps (side bar:  JAQS Fabrics has the best studio scrap bundles.  They come in warm/cool, pattern/solid and are all designer high quality fabric, not junky stuff--and some of the scraps are really big--they also have fat quarter destash bundles where you don't know exactly what you'll get print wise but that's what makes it fun--and they are CHEAP).  Some of the scraps were pretty small and I was wondering what project would come along where I could use them.

Ta-da.  Enter the tiny SHHH pillow!

Honestly, this took me about 20 minutes to make start to finish.  That includes the few minutes it took to re-thread my machine (with white from black).  And I think I can find a real use for it, too (if I want).  I think it would look cute if I added a little loop of ribbon and hung it from the door knob of my spare bedrooms.

So, that's what I did last night.  Tiny pillow and one doll.  (I only have the last tattoo to finish on the boy doll and then he'll get sewn up).

What do you think I should name the girl and boy dolls?

Thursday, June 21, 2012

Bon Voyage, Kismet!


I always feel a tiny bit guilty when I seal a stuffie up in their sandwich bag.  Like I should whisper to them, "take a deep breath!".

Silly.

But I can't NOT put them in the Super Protective Zipper Top Sandwich Bag.  It doesn't matter if I'm sending them in a plastic coated bubble envelope, they need the extra layer of protection only a zipper top (no, I don't buy brand name so I'm not using a brand name) bag can provide.  And it has to be the normal "pinch closed" type zipper, not those new fangled ones that have that slidey zipper.  Pishaw to those!

Later today I'll troop over to the post office and send Kismet off to his new home.

Bon Voyage, Kismet.  It's been fun getting to know you!

Wednesday, June 20, 2012

Waiting is the hardest part.

Oh, Tom Petty, you were so right.

The waiting *is* the hardest part.

Right now I'm waiting for:

--an order from fabric.com that I bought on 6/13.  I did all the "how long should it take" math and it should be here today or tomorrow.  It's driving me nuts but that's the price I pay for getting free shipping (and thankfully that lot isn't anything I need right now--but I WANTS IT!)

--payment for Kismet, the rainbow octopus.  I'm not worried it won't come through or anything but I'm just anxious to finally get him in the mail and have him safely get to his new abode and be 100% done with that project.  (he's all bagged up with his ship to address taped to his bag--just waiting)

--my $20 gift certificate.  Yeah, I won a $20 gift certificate (of my choice) a few days ago and I chose Prairie Point Junction (aka Wool Felt Central) the place where I planned to buy more nice felt to finish the puppies I'm making for my sister.  I have a whole list of felt colors I want (for all kinds of projects) so $20 will help keep my final costs lower (and if they accept paypal, I may be able to combine the gift certificate with the payment from Kismet and get a nearly "free" order).

Ooooh, the waiting is killing me.

(and this is totally random:  I had to stop browsing the fabric sites I like because I kept spending money--I've but a buying ban out until the end of the month, when JAQs fabrics might have their scrap and destash packs back in stock)

Monday, June 18, 2012

Random Thoughts (on giveaways and such)

My previous post got me thinking about a long-ish term project I want to do.  I've been keeing it under my hat (lest I jinx it) but I think I'll bring it up now.

A few months ago I stumbled upon the "Sew, Mama, Sew" blog.  In particular, the Giveaway Day/Week event they do.

Twice a year they have a giveaway day (extended to a week this year) where a mess of blogs share a link (at the SMS blog) to a giveaway they're having.  You get the chance to check out new blogs and enter (no cost) a bunch of giveaways for things ranging from fabric packs, notions, patterns, gift certificates, and finished items like dolls and kids clothes and purses.  It's a ton of fun and a great way to piss away time (really, it can be a time suck but a fun one).

I found out about it too late to participate (in the one they just had) but they'll have another one come December and I definitely want to participate then.

The only snags for me were:  I don't want to spend a lot (or anything, except shipping, if possible) and I don't have a lot of stuff to offer (like fabric from my stash or anything like that).

BUT. . .I could make something and offer it.

It would need to be small (to keep shipping low and so I could offer the contest to international folks too) and easy to make from supplies I already have.

So I came up with what I think is a kind of fun idea.

Versus.

I could offer TWO giveaways per post in the form of "X vs. Y".

The first idea is "Dogs vs Cats".  Folks enter by commenting which they prefer.  One entry per person (and none of the "extra entries if you like me" or any of that--too much work).  Then randomly draw one "dog" winner and one "cat" winner.  (dogs = felt puppies and cats = felt kitties)

The second idea is the geek version.  "Star Wars vs Star Trek".  The prizes are an ewok and a tribble.  Again, two winners one for "Wars" and one for "Trek".

None of these items are hard/costly for me to make and I think they would be things folks would want.  And it would get my blog a little more attention.  I'm not worried about making money off my blog or anything like that but I'd like to have more online "crafty friends" and what better way to make friends then by giving gifts?

But that won't be for a while.

Work in Progress: Birthday Puppies!

After seeing my litter of puppies, my sister commissioned (ok, I probably won't really charge her for them since she's my sister and she's always driving me to the craft and thrift stores when I visit her and making the puppies is fun and not hard at all so. . .) six to give her friend as a birthday gift.

So now that Kismet (the rainbow octopus--also a commission) is done I'm stitching up the puppies.


Three down, three to go.

More pics?

Of course.


No, the gray one and yellow one aren't ganging up on the black one.  The light just made this set up the best (so I could get a good snap of all of them including their collars).

Ok, time for closeups in the order in which I stitched them.


Now since they aren't mine, the names I'm giving aren't chiseled in stone.  But I'm calling this one Rose.  I was leaning toward Flora but I thought of Rose first and it just stuck.  Yes, I was going for a floral/plant name to go with the butterfly collar.

Rose is all gray with matching stitching.  She has bright blue eyes and a black nose.  Butterfly print ribbon collar.

I texted a pic to my sister right after I finished Rose and she (my sister) was very happy.  She texted me back the names of her friend's dogs (all dachsunds, that's why my sister wanted these puppies).  The dogs are Pepperoni, Lil Smokie, and Twinkie.

While my goal wasn't to make exact replicas of the real dogs, I just loved the name Twinkie so. . .


This is "my" Twinkie.


Complete with cream filling belly!

Twinkie is yellow with a white belly and one white ear (matching yellow stitching for everything).  Purple eyes and black nose.  Cupcake print ribbon collar.  She also managed to be the smallest (so far) of the litter.  I love how that happens.  It's the same pattern cut out the same way (I tape the pieces to the felt and then trim around) but she's definitely shorter (height, not length) than her siblings.

OH, I almost forgot, this is an altered pattern from the original puppy pattern.  I made the tail go up instead of down, which I like SO much better (and it's not any harder to sew either).  I'm not sure if I'll make any "down tail" puppies for this set or not, I'll have to see what I feel like as I keep stitching.

Last but not least for this round is. . .


Licorice.  Ok, not the most original name but I was riding high from Twinkie and still in a snack food naming theme so there you go.

Licorice is all black (with matching stitching), bright blue eyes and black nose (which you can barely see even when you look hard--let me just sidebar here for a second and say I practically had to get surgical lighting to stitch black on black, no joking, I turned on the lamp in my living room and stitched right under it to be able to see what I was doing).  Silver glitter ric rac collar.

Ok, how fabulous is that ric rac?  It made me want to call him Liberace not Licorice.  I scored the spool of ric rac at WalMart (boo hiss, I know, but I do go there once in a great while to scope clearance racks and lately I've had super craft clearance mojo--I scored a heap of embroidery floss right before I went on vacation and a few weekends ago I scored a mess of ric rac and some fabric markers).  I almost didn't buy the super skinny ric rac because it was so thin I thought "what will I ever use that for?" but I thought I might be able to make little ric rac flowers out of it and it was a great price so. . .

It's definitely getting used for the puppies.  I have green, baby blue, pink, and I think red all in this narrow width so at least one more puppy is getting a ric rac collar.

I'm making six puppies but I think I might also make a little Happy Birthday banner, too.  I'm thinking a little bunting (is that the word?) streamer dealie.  You know, the little triangle flags each with one letter embroidered on it to spell out "Happy Birthday".  I'm not sure yet if I will do it but I'm tempted.

THEN, I have to make one puppy for my mother to give to my aunt.  That one needs to be "regular dachsund color" (which I take to mean a tanish brown color) and have a neckerchief with the name "Kat" embroidered on it.

Then all my commissioned pieces will be done so I can get back to making random stuff for myself.

Friday, June 15, 2012

Work in Progress: DONE! (time to show off!)

Another work in progress is officially DONE.

I took that rainbow of felt and whipped it up into:


I call him Kismet.

I'm not sure if that will remain his name since he's not staying.  He's a commissioned item, so very soon he'll be shipped of to Virginia.

But there's still time to do a little turn on the catwalk so. . .

WORK IT, Kismet!


Each leg is differnt color but each have the same shiney white sequins (and random seed beads--really, I just used whatever one would fit down over the needle).  Sequins I scored at one of the best thrift stores I've been in for quite a while.  It was LOADED with "vintage" craft stuff.  Bowels of buttons I could have picked through all day (I'm not exaggerating, the bowls had candy scoops in them so you could dig around).  Spool after spool of thread, floss, ribbon, trims and funky notions.  I scored the sequins, some narrow width elastics, fuzzy trim/thread/yarn (not a whole skeen, just a few yards around a little card), a few buttons (one looks like a gear!) and a few other small things for only $3.  I look forward to visiting Weezies (yeah, love the name) every time I visit my family.

(bonus, there was the cutest kitten in the shop.  She was sitting in an old potty chair.  I tried to get a picture of her but she was too busy jumping around trying to get the shop cat, Butterbean's, tail.  I won't be surprised if my sister doesn't go back there and adopts her, though I get the feeling the shop owner really wants to keep her despite the "we have to find her a home" laments)

The whites of his eyes are stitched on using this shiney embroidery floss I scored (at the craft store, not Weezies).  I'm not exactly sure how to use it properly but I separated out a few strands (it had a ton of strands) and just stitched with it.  It's not that easy to work with what with all the strands, so it'll definitely be just an embellishment thread.


Funky top view.  He's almost exactly 4 inches around the legs (I didn't measure exactly but I put a 4 inch embroidery hoop over him and he fit perfectly inside, legs just brushing all the way around).

I searched my stuff to find a ruler to get an exact measurement on his height but when I didn't find the ruler right away I got annoyed and gave up (I'm sure if I had looked just one second longer I would have found it but I didn't want to be bothered). 


So here he is next to an altoid tin to get an idea how tall he is.  I was going to use my hand but that's not really a good idea how big he is.  Who knows?  Maybe I have super gigantic man-paws (or tiny little petite paws).


Uh-oh.  I think Molly is smitten.  Maybe she and Kismet can carry on a long distance love affair via love notes written in their own ink.  (wow, that's all kinds of gross when you think about it--but funny).

I just need to give Kismet a wee hair cut to get any random fuzzies out of the way and he'll be ready to head off to his new home.  (he has far less fuzzies than Molly, guess she could use a trim while I'm at it).

What's up next?

PUPPIES!!!

(and then maybe a rainbow striped zebra or a unicorn?  or maybe a mermaid?  or a monkey? or. . .)

Wednesday, June 13, 2012

On Commissions

When folks see the stuff I make right after they get done laughing or saying "too cute!" the next thing out of their mouth is:

You should sell this stuff.

Putting aside the fact that I tend to sew from non-original patterns (which means I technically shouldn't make a store filled with stuff I made from the pattern--though I have separate thoughts on that but that's for another day) I can't imagine how much I'd HATE my sewing if I had to do it "for a living".

Face it.  To make money from handmade goods you have to have one (or more) of the following:

1.  Fabulous luck

2.  All the time in the world.

3.  Very few bills and/or earthy needs.

Am I being dramatic?

Yes, a bit.

But lets be honest here.

Most folks are too cheap to pay a "living wage" to someone making a handmade item like, say, a stuffed toy.  You see, stuffed toys are easy to come by and have little "value" ("it's just a toy") so folks just aren't going to spend a lot of money for them.

Yeah, some wil but those are few and far between.  And to make a living finding those folks you have to WORK.  HARD.  All the damn time.

Just the thought of that makes not want to ever pick up a needle again and that makes me sad.

So there's no etsy store (or other such thing) in my future.

But that doesn't mean I don't sell stuff.  Hey, if someone wants me to make something for them and they want to pay then who am I to stop them.

All that is to say, I have a commission I'm working on now (for a stranger) and after seeing the puppies my mother wants one (for my aunt) and my sister wants six for a friend and THEN, just yesterday a co-worker comes up to me asking if I still make sock monkeys.  So I may have a commissioned monkey in my future.

But I'm still not starting a store or any such stuff.  I don't want this to become a JOB.  It's a fun hobby that might just pay for itself (once in a while).

Friday, June 8, 2012

Work in Progress: What will it be?


A rainbow of felt.

But what wil it become?

(hint:  count the sheets)

For the record, I got all of the main cutting and about 1/4 of the sewing done just last night (when I started).

The whole project will be made from supplies I already have on hand EXCEPT for one skein of floss.  See that darker purple color?  Yeah, I don't have any floss that matches well enough for my liking.  See, in the pic it looks like a deep purple but in reality it's a lot more blue.  I have a lot of purpley shades but nothing blue enough.

Yeah, I could just use a "very close" match but it would a) annoy me and b) this item is being sold so I want it to be the super best EVER and "very close" floss is not "super best".

And I'm going to visit my family this weekend so I'll have access to TWO craft stores (right across the stree from each other) so I can score the floss with no issues (and my long suffering wife won't have to go to the craft store--he despises going to craft stores almost as much as I despise going to Construction Junction, the local recycled home improvement stuff store--ugh, just thinking about going in there to find a used door gives me hives).

Here's hoping I find some other good stuff while I'm shopping *good remnant bin vibes*.

I'll be dropping the Ewok off to my nephew, Lowell, too.  Well, as long as my sister doesn't steal it from him (stealing from a cat, that's low).

Thursday, June 7, 2012

Progress Report: "Kitty Up"

This is the last progress report until the fall class semester starts up (in a few months).

BUT, that doesn't mean I'm going to rest on my paint spattered laurels.  I want to start (and hopefully complete) a "summer painting".  I probably won't dig into it until July since I have a July 4 project I want to get done by. . .of course.. .July 4.  I have a idea for the new painting (which won't be as large as the current one) so I have good hopes I can work on it one or two sessions a week and get it done over the summer break.

Hold up, this is a progress report on "Kitty Up" not a wish list of projects I want to produce so. . .

Here is where the painting was when I started last night:


And here's where it is NOW:


First thing I notice is how much lighter the newer pic is.  That is mostly the lighting from the room, not that I totally lightened the actual painting (I'm looking at Mr. Roboto's face and I didn't work on the light gray at all last night so it being lighter now is just photo trickery, if you will).

I worked mostly on the darker gray areas trying to get the mottled effect of the felt.  I think it's heading in the right direction.  The big problem is in making the hands look like something other than big ass blobs (the closer hand has real issues in that respect).  There's also the issue of the warped perspective, too.  Due to the angle, the closer of the hands is far larger than the futher away one.  Like "carnival mirror" distorted big.  It's also right in front of the dark gray chest panel so they do kind of blend together EXCEPT the hand (due to it being closer to the camera and the light really bouncing off it) shows the mottled color so much more than the other dark gray parts (all the dark gray parts are the same felt, which is very uniform in color, so the extreme mottling on the closer hand is just due to the photo).  So I'm trying to capture that effect to make that closer hand stand out more.  In person (and up close on the painting) the mottling looks like a hot mess.  But if you stand resonably away from the painting (as you would) it looks decent.  I definitely need to work on it more.

I also lightened the orange block.  It looks really light now but that could just be the photo.  It definitely needed to be brightened a bit.  I also darkened the darker parts on Timothy (but it doesn't translate well in this photo).

The shading on the shoulder corners is coming along nicely, too.  Really adding depth.  Adding the stitching really made the whole thing start to come together well, too.  It's crazy how that happens.  Something as minor as that can really make you feel like the painting is heading in the right direction.  Same with putting a face on Timothy.  Clearly that's going to change a lot before the painting is done but just seeing it on him really rounds things out.  It cracked me up, too.  At one point I had the eyes roughed in and had put some measurement dots on for the nose (just two for the side corners) and Timothy looked like an alien pig cat hybrid.  It even made my wife laugh.

I did a bit of work on the background, too.  That light swipe across the bottom is really working.   It's not there yet but it definitely is heading there.  Funny thing is, the background is what most folks comment on.  Like it really grabs their attention.  I don't know if that means the rest of the composition is just boring or if the background really is that interesting (or it's just folks being polite, like how you find something nice to say when you meet an ugly baby--"Oh, look at the little fingers!").

For the record, here is the reference photo I'm working from:


I'm definitely looking forward to putting the corduroy effect on (the class instructor is kind of giddy over that process, too--patience).

Monday, June 4, 2012

Work in Progress: Robot


What's that?  Why it's a work in progress.

Last week was (at long last) vacation.  Of course I took some crafty stuff along (for when my poor skin had enough sun--yes, even though I wear mega high level sun screen I still have to retreat after a while) and finally got around to working on a second robot (nick named Cylindrical Robot).

That there is the body, one arm/leg, and a rough up of the head.  I don't think that head is going to work, though.  It's a little too tall and thin.  I could turn it on its side and add a neck and it might work but I'm not sold on it just yet.

The arms and legs (and hand and feet) will be the same as Mr. Roboto.  And the body is a simple cylinder.  Right now the tops and bottom are a little puffy so I might run a thread through and pull them down (kind of like you see on cushions).  We'll see.


While the top and bottom are bulgy, the trap door turned out pretty freaking sweet.  I debated on making cogs but that was just a bit tedious.  And I want this robot to have the same feel as Mr. Roboto.  Mr. Roboto's "buttons" are made from bits of scrap felt so this robot needed the same (and not overly fancy).

Double bonus:  the latch on the door was a bead I found in the dryer lint trap.  It's obviously not from any of MY clothes, so I think it fell off something of my friend's.  She tends to wear clothes that have embellishments.  The latch is kind of rough (the hook part is just a hoop of thread that I put a wee bit of tape on) but that lends to the "made in a home garage" feel, which is what I'm going for with these robots.

Now I just need to pilfer the random pens I find at work to score some more springs.  I'm not sure exactly what the face will look like but there needs to be a spring on it somewhere.

AND, I also go some embroidery stitching done this week, too (no pics).  I'm just about done putting all the tattoos on the Spoonflower dolls.  I might have to buy some more floss in order to get it finished up (almost out of the color I'm using and don't have any more).